The alarm screams, you hit snooze five times, and suddenly it’s a desperate, frantic race against the clock—who truly has the time or the mental capacity to cook a proper, hot meal before coffee has even started doing its job? Forget the tired cereal dust; your body requires serious, savory fuel.
That’s precisely where these glorious, customizableProtein-Packed Breakfast Burritos Ready to Freeze & Reheatswoop in like culinary superheroes, decisively saving your sanity one delicious, perfectly wrapped bite at a time.
- Prepare a month’s worth of breakfast in under an hour, effortlessly transforming your chaotic, stressful mornings into streamlined, beautifully smooth sailing events.
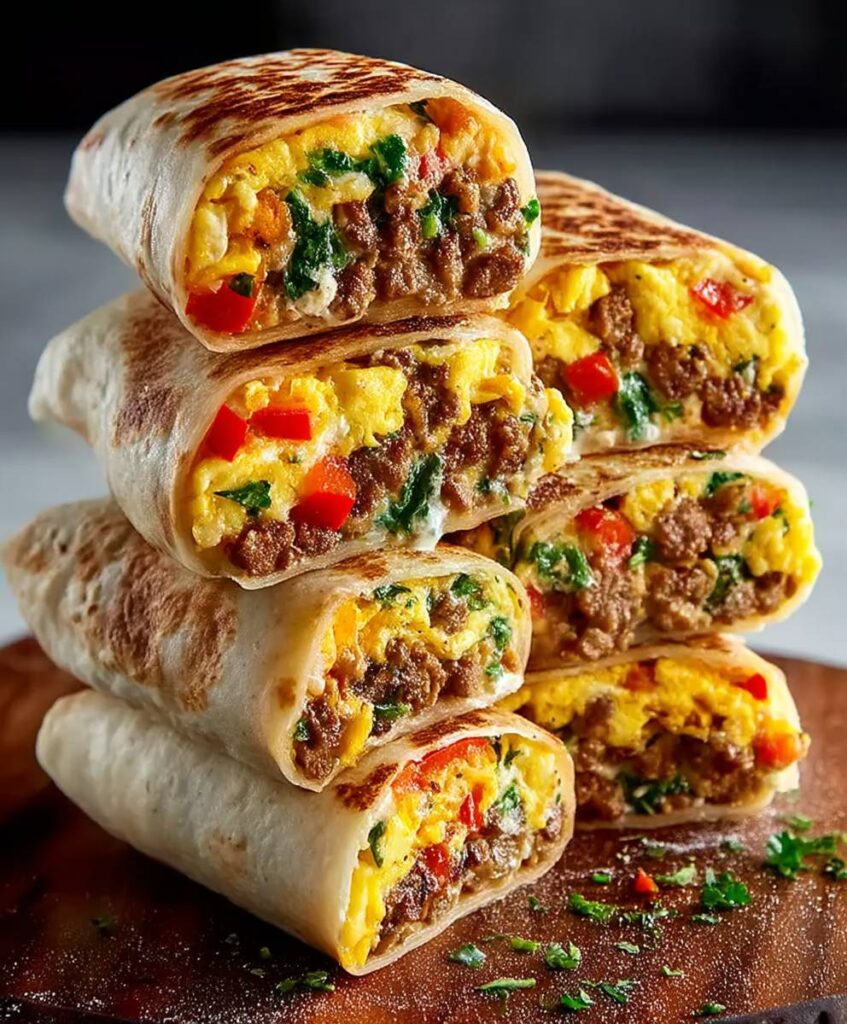
- Layered with rich, savory seasoned ground chicken, fluffy scrambled eggs, and spicy pepper jack cheese, these burritos absolutely burst with satisfying flavor.
- A perfectly golden, lightly toasted flour tortilla holds a nutrient powerhouse of fillings, crafting the most satisfying grab-and-go meal you could possibly imagine.
- Easily customize the filling mixture with your favorite types of beans, fresh vegetables, and preferred sauces to match any unique craving you might be experiencing.
Why You Need These Protein-Packed Breakfast Burritos Ready to Freeze & Reheat
The Saga of the Scrambled Egg Sprint
We have all lived the scenario: It is 7:00 AM, you are fully dressed for work, keys are jingling, and you realize you have forgotten the most crucial element of adulting—breakfast. You sprint to the stove, trying to juggle a coffee mug and an egg carton, attempting to make scrambled eggs while simultaneously checking your email. The result is usually sad, rubbery eggs, questionable counter splatter, and a lingering sense of disappointment that haunts you until lunchtime.
This recipe offers an exit strategy from that high-stress, low-reward situation. This isn’t just a recipe; it’s a strategic life hack disguised as an exceptionally delicious, savory meal. By dedicating a single hour on a Sunday afternoon, you fundamentally change your morning narrative for the next two or three weeks. You pull one of these magnificent burritos out of the freezer, toss it in the microwave or toaster oven, and five minutes later, you are eating a complete, hot, high-protein meal. Think of the extra time you gain—you could meditate, read a book, or, perhaps more realistically, enjoy an extra five minutes of scrolling through social media, blissfully aware that breakfast is handled.
This meal prep solution targets maximum nutritional value without sacrificing flavor or demanding complex culinary skills. We use lean protein, high-fiber wraps, and plenty of flavorful vegetables and seasonings. The secret to making them freezer-proof involves ensuring the ingredients are cooked relatively dry and fully cooled before wrapping, preventing that dreaded sogginess that ruins lesser freezer meals. We also need to talk about the folding technique—a proper burrito fold is the difference between a secure, reheat-ready masterpiece and an explosion of cheesy filling in the microwave.
Mastering the Art of the Perfect Fold for Freezer Success
A sloppy burrito is an engineering failure, especially when destined for the freezer. A tight, secure fold is paramount to ensure the contents remain safely sealed during the freezing and reheating process. If you wrap it loosely, moisture escapes, ice crystals form, and you end up with a cracked tortilla and a disappointing texture upon thawing. We want structural integrity.
Start by placing your filling slightly below the center line of the tortilla, leaving generous space on all edges. First, fold the sides inward—imagine tucking in the sides of a neatly made bed. Then, grab the bottom edge closest to you and pull it tightly up and over the filling. As you begin the roll, use your fingers to gently push the filling back toward the center, ensuring the roll remains snug and compact. Roll upward slowly until the burrito is completely sealed. This method ensures maximum filling retention and minimal risk of explosion when you finally warm it up on a Tuesday morning.
Ingredients for Protein-Packed Breakfast Burritos Ready to Freeze & Reheat
Here’s what you’ll need to make this delicious dish:
- Large Flour TortillasOpt for burrito-sized (10-12 inches) high-fiber or whole wheat tortillas for better structural support and superior nutritional benefits.
- Ground Chicken or TurkeyUse lean ground chicken or turkey instead of high-fat sausage; cook it thoroughly and season heavily for maximum savory flavor.
- Large EggsThese form the creamy, fluffy base of the burrito filling; scramble them gently, ensuring they remain slightly moist but not overly wet.
- Black BeansCanned black beans rinsed well and drained add essential fiber and a robust, earthy texture to the overall protein content of the meal.
- Shredded Cheddar Cheese BlendA mild or sharp cheddar blend melts beautifully and binds the other ingredients together inside the wrap during the final heating process.
- Bell Peppers and OnionsDiced finely and sautéed until tender, these vegetables provide crunch, color, and a necessary dose of freshness and aromatic sweetness.
- Taco Seasoning MixUse a bold, flavorful blend of spices like chili powder, cumin, and smoked paprika to season both the ground meat and the vegetables for complexity.
- Olive OilNeeded for sautéing the vegetables and cooking the protein; choose a high-quality extra virgin variety if possible.
The full ingredients list, including measurements, is provided in the recipe card directly below.
How to Make Protein-Packed Breakfast Burritos Ready to Freeze & Reheat
Follow these simple steps to prepare this delicious dish:
Step 1: Preparing the Proteins and Vegetables
Heat two tablespoons of olive oil in a large, nonstick skillet over medium-high heat. Add the diced onions and bell peppers, sautéing them for about five to seven minutes until they are soft and slightly caramelized. Remove the vegetables and set them aside in a large mixing bowl. In the same skillet, brown the ground chicken or turkey, breaking it up as it cooks. Drain any excess liquid completely, then season the meat generously with the taco seasoning mix before removing it from the heat and adding it to the bowl with the vegetables.
Step 2: Scrambling the Eggs
Whisk the large eggs with a splash of water or broth, along with a pinch of salt and black pepper, until they are light and frothy. Pour the egg mixture into the same skillet (add a touch more oil if necessary) over medium heat. Scramble the eggs until they are just set and slightly fluffy, aiming for a texture that is cooked through but not dry. Immediately add the cooked eggs to the mixing bowl containing the seasoned meat and vegetables.
Step 3: Combining the Filling and Cooling
Add the rinsed black beans and the shredded cheddar cheese blend to the meat, vegetable, and egg mixture in the large bowl. Gently fold all the ingredients together until they are evenly distributed. This step is critical: you must let the entire filling cool completely to room temperature before assembling the burritos. Warm filling releases steam when wrapped, which leads directly to soggy tortillas during the freezing and thawing cycle. Spread the filling thinly on a sheet pan to speed up the cooling process.
Step 4: Assembling and Folding the Burritos
Lay out the large flour tortillas on a clean surface. Scoop about one cup (or a suitable amount that allows for folding) of the cooled filling onto the center of each tortilla, placing it horizontally closer to the edge nearest you. Fold the two sides of the tortilla inward about an inch, then pull the bottom edge up tightly over the filling. Roll the burrito away from you, keeping the tension tight throughout the rolling process to create a secure, compact package.
Step 5: Freezing for Maximum Longevity
Wrap each tightly rolled burrito individually first in parchment paper or foil, and then place them all into a heavy-duty, freezer-safe, airtight zip-top bag. Label the bag with the date. Flash freezing them on a tray for 30 minutes before bagging can help prevent them from sticking together. Store theProtein-Packed Breakfast Burritos Ready to Freeze & Reheatfor up to three months.
Transfer to plates and drizzle with your favorite hot sauce or a dollop of fresh yogurt for the perfect finishing touch after reheating.
Freezing and Reheating for Peak Performance
Successfully reheating your breakfast burrito is an art form that separates the true meal prep aficionados from the novices. The goal is a hot center and a soft, pliable tortilla, not a chewy, tough exterior or a lukewarm interior.
Reheating Instructions: Microwave Method (Quickest)
If you are truly short on time, the microwave is your fastest friend. Remove the frozen burrito from the zip-top bag and remove the outer layer of foil, leaving it wrapped in the parchment paper (or paper towel if you didn’t use parchment). Heat the burrito on 50% power for three minutes. Flip the burrito, and heat it on high for another 60 to 90 seconds until thoroughly hot in the center. Letting it rest for one minute after heating helps distribute the heat evenly.
Reheating Instructions: Oven or Toaster Oven Method (Best Texture)
For the absolute best texture, especially if you prefer a slightly crisp exterior, use the oven. Preheat your oven or toaster oven to 375°F (190°C). Remove the frozen burrito from all packaging and wrap it tightly in a fresh layer of foil. Bake directly on the rack for 25 to 30 minutes. Unwrap the burrito carefully (it will be steaming hot) and bake for an additional five minutes without the foil to crisp up the tortilla slightly. This method ensures the interior heats slowly and evenly, preventing rubberiness.
Customizing Your High-Protein Breakfast Wraps
The beauty of these freezer-friendly breakfast wraps lies in their infinite adaptability. Once you have the core components—the eggs and the tortilla—you can swap almost everything else based on preference, dietary needs, or simply whatever ingredients happen to be lurking in your refrigerator. Use these ideas to keep your morning routine exciting and far from monotonous.
Swapping the Protein Source
Instead of ground chicken, consider using finely diced, pre-cooked beef steak, thinly sliced deli-style roast beef cut into small strips, or even pre-cooked lean ground lamb seasoned with Mediterranean spices like oregano and mint. You can also make this recipe entirely vegetarian by doubling the beans and adding extra ingredients like diced potatoes or crumbled firm tofu that has been pressed and pan-fried until crispy.
Adding Flavor Boosters and Vegetables
Don’t be shy about injecting more flavor. Try stirring in a spoonful of homemade vinegar-based BBQ sauce or a smoky chipotle paste into the cooked meat mixture. Incorporate different vegetables based on what’s in season; roasted sweet potatoes (ensuring they are dry) add sweetness, and sautéed mushrooms or spinach wilted down completely add bulk and vitamins. Remember the golden rule: everything must be cooked completely and dry before it hits the tortilla.
Frequently Asked Questions About Freezer Breakfast Meals
What is the best way to prevent my breakfast burritos from becoming soggy?
The key to avoiding a soggy burrito is managing moisture. Ensure all cooked ingredients, especially the scrambled eggs and the seasoned meat, are cooked until relatively dry and fully drained of any liquid. Most importantly, allow the entire filling mixture to cool completely to room temperature before you start wrapping them; warm filling creates condensation when frozen, which leads directly to mushiness upon reheating.
Can I add salsa or sour cream before freezing the burritos?
No, you should never add high-moisture condiments like salsa, sour cream, guacamole, or chunky tomato to the burrito before freezing. These items will separate and turn icy during freezing, ruining the texture of the entire meal. Always add these fresh condiments after you have successfully reheated the burrito.
How long will these protein-packed breakfast burritos keep in the freezer?
When properly wrapped first in foil or parchment and then stored inside a durable, airtight freezer bag or container, these burritos maintain their quality and flavor for up to three months. Beyond the three-month mark, they remain safe to eat, but the quality of the texture might begin to decline due to potential freezer burn.
What alternatives can I use instead of flour tortillas?
While large flour tortillas are the easiest to fold and maintain structure during freezing, you can experiment with larger whole wheat wraps or spinach wraps. Corn tortillas tend to crack when frozen and thawed, so they are generally not recommended for this particular freezer meal prep recipe. If you prefer a lower-carb option, you can use the filling to make freezer-ready breakfast bowls instead.
There exists a universal morning struggle: the alarm screams, gravity increases tenfold, and suddenly, the idea of cooking anything beyond pouring cereal feels like climbing Everest. We all want a hearty, satisfying start to the day, but few of us have the ambition to whip up a gourmet spread at 6 AM. This realization hit me hard three years ago when I accidentally showed up to a 7:30 AM meeting still wearing my slippers, fueled only by lukewarm ambition and a single cup of coffee. Something had to change.
I needed a breakfast solution that was nutritious, delicious, and, most importantly, required zero cognitive function before 8:00 AM. Enter the savior of sleepy mornings, the hero of meal prepping, the mighty breakfast burrito. Master this recipe once, and you conquer breakfast for weeks. Say goodbye to sad toast and hello to genuine morning dominance with these amazing freezer breakfast wraps.
The Case for Freezer Burritos
Meal prepping often gets a bad rap. People picture bland chicken and steamed broccoli eaten out of Tupperware containers that inevitably smell faintly of garlic, no matter how much you wash them. But prepping breakfast is different. Breakfast is the foundation of your day, and skimping on protein means crashing hard before noon.
These freezer-friendly morning meals solve three major problems simultaneously. First, they deliver a massive dose of energy (thanks to eggs, cheese, and lean meat) right when you need it most. Second, they are incredibly cost-effective compared to buying expensive grab-and-go options daily. Third, and perhaps most valuable, they give you back those precious 15 minutes of morning time—minutes you can spend meditating, walking the dog, or simply hitting the snooze button one extra time without guilt.
Why These Protein-Packed Breakfast Burritos Ready to Freeze & Reheat Reign Supreme
The secret to a successful freezer burrito lies in two things: moisture management and maximizing flavor. If the filling is too wet, the tortilla gets soggy when it thaws. If the flavor is too mild, reheating only accentuates the blandness. My recipe uses carefully cooked vegetables and perfectly scrambled eggs, seasoned aggressively, and wrapped tightly to lock in all that goodness. We use succulent ground turkey seasoned with homemade taco spices instead of traditional processed sausage, delivering a clean, powerful flavor profile that keeps beautifully in the freezer. When you reach for these delicious burritos, you grab not just a meal, but peace of mind.
Ingredients: Your Morning Power Arsenal
This recipe makes 12 large burritos. Adjust quantities as needed.
For the Turkey & Seasoning
- 1.5 lbs lean ground turkey or ground chicken
- 1 large yellow onion, diced
- 2 bell peppers (any color), diced
- 3 cloves garlic, minced
- 1 tablespoon chili powder
- 1 teaspoon smoked paprika
- 1 teaspoon cumin
- 1/2 teaspoon dried oregano
- Salt and black pepper to taste
- 1 tablespoon olive oil
For the Eggs & Filling
- 18 large eggs
- 1/4 cup milk or non-dairy milk alternative (for fluffiness)
- 2 cups shredded cheddar cheese blend (or Monterey Jack)
- 1/2 cup chopped fresh cilantro (optional)
- 12 large (10-inch) flour tortillas (look for the heartier, less delicate variety)
- Hot sauce or salsa for serving (optional)
Step-by-Step Instructions: Assembly Line Mastery
Preparation is key here. Think of yourself as running a highly efficient breakfast factory. Do all the chopping and measuring before you turn on the stove.
- Prepare the Turkey Filling:Heat the olive oil in a large skillet over medium-high heat. Add the diced onion and bell peppers and sauté until softened, about 5 to 7 minutes. Add the ground turkey, breaking it up with a spoon.
- Season and Cook:Once the turkey is mostly browned, drain any excess liquid if necessary (this is crucial for preventing freezer sogginess). Stir in the minced garlic, chili powder, paprika, cumin, and oregano. Season generously with salt and pepper. Cook for an additional 2 minutes until fragrant. Set the filling aside in a large bowl.
- Scramble the Eggs:Whisk the 18 eggs thoroughly with the milk, salt, and pepper. Cook the eggs in the same skillet (or a separate non-stick pan) over medium heat, stirring frequently until they are just set but still slightly moist. Avoid overcooking the eggs, as they will dry out upon reheating.
- Combine the Filling:Add the cooked eggs to the bowl with the turkey mixture. Gently fold in the shredded cheese and fresh cilantro until everything is evenly distributed.
- Warm the Tortillas:To prevent the tortillas from cracking when rolled, warm them briefly. You can wrap a stack of 4 tortillas in a damp paper towel and microwave them for about 20 seconds, or heat them one at a time on a dry skillet for 10 seconds per side.
- Assemble the Burritos:Place a warmed tortilla on a clean surface. Spoon approximately 1 cup of the filling mixture slightly off-center toward the bottom of the tortilla. Leave about an inch of space on the edges. Fold the sides inward over the filling, then starting from the bottom, roll the burrito upward tightly and firmly until sealed.
- Immediate Freezing Prep:Wrap each assembled burrito tightly in aluminum foil. Label the foil with the date. Place the foil-wrapped burritos into a large freezer bag to protect them from freezer burn.
Perfecting the Cooking Process

Achieve peak flavor by ensuring the turkey is fully cooked and slightly dry before adding seasoning. Scramble the eggs quickly, removing them from the heat when they are still soft; carryover cooking will finish them perfectly. Combine all ingredients gently before assembly.
Add Your Touch
Swap the turkey for lean shredded beef or black beans for a vegetarian option. Introduce heat with pickled jalapeños or chipotle powder in the seasoning blend. Alternatively, swap cheddar for pepper jack cheese to add a little extra zing and texture.
Storing & Reheating
Store tightly wrapped burritos in the freezer for up to three months. To reheat, remove the foil and microwave on high for 2-3 minutes, flipping halfway. For crispier results, finish in a toaster oven or air fryer for 5 minutes after microwaving.
My younger brother once tried to microwave one straight from the freezer without removing the foil. The ensuing sparks and smell taught him a valuable, albeit startling, lesson about proper reheating methods. Safety first, folks!
Chef’s Expert Tips for the Ultimate Freezer Burrito
- Always ensure your filling is cooled completely before assembly; warm filling generates steam, which inevitably leads to a soggy, textureless tortilla when thawed.
- When scrambling eggs, avoid adding excessive liquid ingredients like salsa or cottage cheese, as high moisture levels dramatically compromise the freezing and reheating texture.
- Use heavy-duty, restaurant-style tortillas if possible, as they are thicker and less prone to tearing or becoming brittle during the freezing and thawing cycle.
Frequently Asked Questions About Freezer Breakfast Wraps
How long do these frozen burritos last?
Properly wrapped burritos will maintain their excellent quality in a standard freezer for up to three months. After that, they remain safe to eat but might start to lose some moisture and flavor consistency.
Can I add potatoes to the filling?
Absolutely! Potatoes are a great addition, but make sure they are fully cooked (roasted or fried until slightly crispy) and allowed to cool completely before mixing. This prevents excess moisture and keeps the filling sturdy.
What is the best way to reheat these Protein-Packed Breakfast Burritos Ready to Freeze & Reheat for a crowd?
For large batches, remove the foil and wrap the burritos in paper towels. Place them on a baking sheet and bake in a preheated oven at 350°F (175°C) for 20-25 minutes. This warms them through evenly without drying them out.
Do I need to thaw them before reheating?
No thawing is necessary. These burritos are designed to go straight from the freezer to the microwave or oven, making your mornings truly efficient and hassle-free. Thawing can sometimes lead to a slightly mushy texture.
The beauty of theProtein-Packed Breakfast Burritos Ready to Freeze & Reheatis their sheer convenience married with nutritional excellence. You have successfully conquered breakfast, transforming the most chaotic part of your day into a smooth, protein-fueled launch sequence. Enjoy the extra sleep, and savor the knowledge that you have a stack of delicious, ready-to-go meals waiting patiently in the freezer. Now go forth and conquer your day!
Conclusion for Protein-Packed Breakfast Burritos Ready to Freeze & Reheat
Say goodbye to skipping breakfast or relying on lukewarm coffee fumes to power your morning. TheseProtein-Packed Breakfast Burritos Ready to Freeze & Reheatare the ultimate solution for anyone who values their snooze button as much as their sustained energy levels. We walked you through the simple steps to creating a massive freezer stash of customizable, delicious wraps. By investing just one hour this weekend, you guarantee yourself weeks of high-protein, perfectly balanced breakfasts that require zero thought before 9 AM. So grab your biggest spatula, fire up the stove, and conquer the morning rush before it even begins!
Print
Protein-Packed Breakfast Burritos Ready to Freeze & Reheat
- Total Time: 35 minutes
- Yield: 4 servings 1x
Description
Master freezer prep with these savory sausage and cheddar burritos. We cook the eggs lightly for ideal reheating texture. Maximize your morning routine! Complete instructions and nutrition included.
Ingredients
- 12 large (10-inch) flour tortillas
- 1 pound breakfast sausage (bulk roll)
- 12 large eggs
- 1/4 cup milk or heavy cream
- 1 cup shredded cheddar cheese (or preferred blend)
- 1 medium bell pepper, diced finely
- 1/2 small onion, diced finely
- 1 teaspoon kosher salt and 1/2 teaspoon black pepper
Instructions
- Step 1: Prepare the Fillings. In a large skillet, brown the breakfast sausage, breaking it up as it cooks. Drain off any excess grease and set the sausage aside. Add the diced bell pepper and onion to the same skillet and sauté until softened (about 5-7 minutes).
- Step 2: Cook the Eggs. Whisk the large eggs with the milk, salt, and pepper until slightly frothy. Pour the mixture into a non-stick skillet over medium-low heat and scramble the eggs until they are just set (slightly undercooked is ideal for reheating later).
- Step 3: Combine and Assemble. Gently mix the cooked sausage, sautéed vegetables, scrambled eggs, and shredded cheese together in a large mixing bowl until evenly distributed. Briefly warm the tortillas (about 15 seconds each in the microwave) to make them pliable and prevent tearing during rolling.
- Step 4: Wrap the Burritos. Spoon about 3/4 cup of the filling mixture onto the center of each tortilla. Fold the left and right sides of the tortilla inward over the filling, then fold the bottom flap up and roll tightly away from you to form a sealed burrito.
- Step 5: Freeze and Reheat. Wrap each finished burrito tightly in plastic wrap or aluminum foil, then transfer them to a freezer-safe bag or container. Freeze for up to 3 months. To reheat: Remove foil/plastic and microwave from frozen for 2-3 minutes, flipping halfway through, or wrap in foil and bake at 350°F for 20-25 minutes.
Notes
- For optimal freshness and to prevent freezer burn, wrap each cooled burrito tightly in plastic wrap first, then secure it in aluminum foil before bagging and freezing.
- While microwaving is fast, try finishing the heated burrito (unwrapped) in a 350°F air fryer for 3 minutes to crisp up the tortilla shell beautifully.
- Freshen up the meal by serving the hot burritos with cold contrasts like a side of creamy avocado ranch dip, fresh pico de gallo, or a lime wedge.
- To guarantee a perfect texture upon reheating, drain every bit of grease from the sausage and liquid from the sautéed vegetables, as excess moisture leads to soggy burritos.
- Prep Time: 15 minutes
- Cook Time: 20 minutes
- Method: Stovetop
- Cuisine: American
Nutrition
- Serving Size: 1 large burrito (approx. 200g)
- Calories: 410
- Sodium: 780mg
- Fat: 20g
- Saturated Fat: 7g
- Trans Fat: 0g
- Protein: 3g
FAQs
How long do these freezer-friendly breakfast wraps stay fresh?
You can keep these marvelous make-ahead breakfast wraps in the freezer for up to three months! The secret to maximum longevity is wrapping them tightly first in parchment paper or foil, and then sealing them inside a heavy-duty freezer bag, removing as much air as possible. Label the bag with the date, because even though they are delicious, you don’t want to play freezer roulette three seasons from now. When storing, lay them flat initially so they freeze uniformly, ensuring they keep their perfect burrito shape.
What is the best way to reheat my Protein-Packed Breakfast Burritos Ready to Freeze & Reheat?
The best reheating method depends on how fast you need that protein hit. For a speedy morning, unwrap the burrito and microwave it for 1-2 minutes until heated through. If you have a few extra moments, the oven or toaster oven yields a superior texture. Preheat to 350°F (175°C), wrap the burrito loosely in foil, and bake for 20–25 minutes. This method crisps the tortilla nicely, preventing it from getting soggy. Never try to reheat them still wrapped in plastic wrap—we want breakfast, not a melting disaster.
How can I prevent my tortillas from getting soggy after freezing?
Sogginess is the enemy of a great make-ahead meal, but we have a secret weapon! Before adding the filling, slightly toast or warm your tortillas in a dry pan for about 30 seconds per side. This reduces moisture content. Crucially, ensure all your fillings—especially the scrambled eggs and sautéed vegetables—are cooled completely before wrapping. Steam trapped inside equals mushy tortillas later. If you are using salsa or sour cream, keep it on the side for dipping after reheating, never inside the burrito itself.
Can I swap out the fillings in these freezer breakfast wraps?
Absolutely! These wraps are designed for customization. If you used ground turkey or chicken in the main recipe, feel free to substitute with shredded lean beef or diced savory lamb for variety. You can also bulk up the veggie quotient using sautéed bell peppers, spinach, or black beans. Just remember the anti-sogginess rule: all added ingredients must be cooked and cooled thoroughly before assembly. This flexibility means you can tailor your freezer stash to prevent flavor fatigue for months to come.