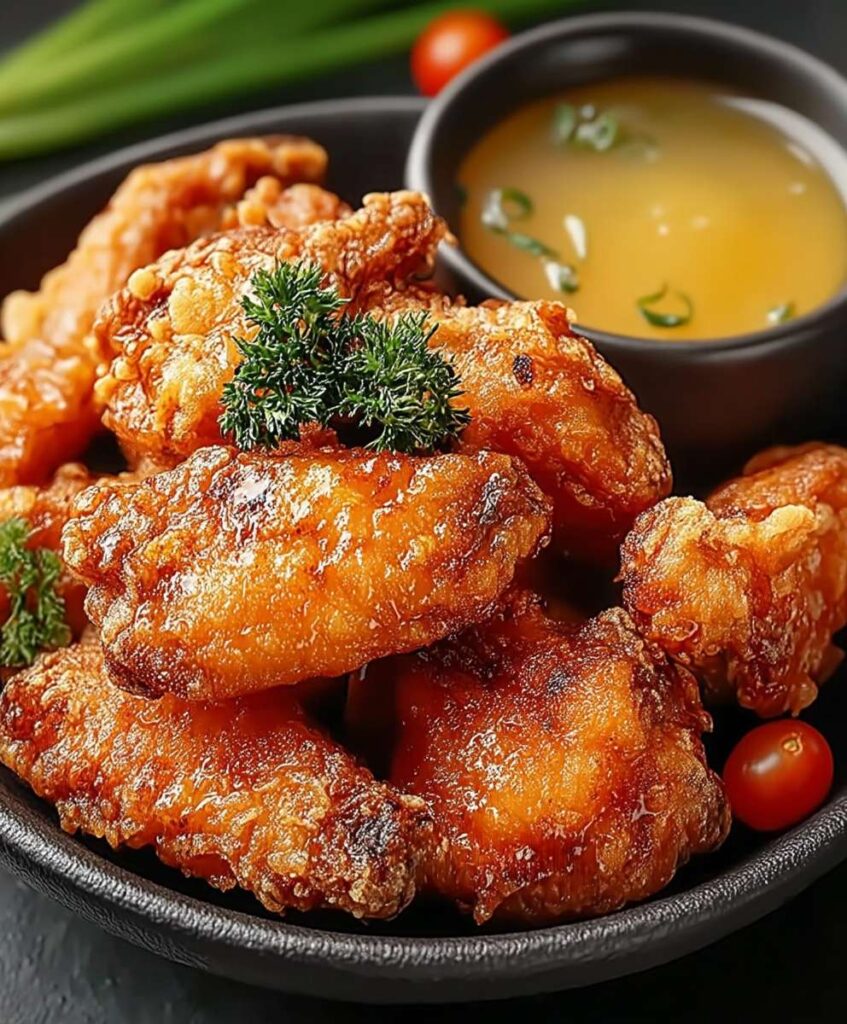
The moment that crispy, golden nugget of chicken hits your tongue, it’s a revelation. Forget everything you thought you knew about frying—this isn’t just chicken, it’s a flavor explosion wrapped in a delicate, shattering crunch. This is the art ofJapanese Fried Chicken (Karaage), the ultimate party snack and comfort food champion.
I first encountered this culinary magic during a particularly disastrous attempt at karaoke, where the food completely stole the show. Thankfully, this recipe is infinitely easier than hitting a high note, guaranteeing tender, perfectly seasoned chicken every single time you make it.
- Flavor Profile: Experience the depth of savory umami balanced with fresh ginger and garlic, delivering an unforgettable, juicy interior.
- Ease of Preparation: Simple marination and a clever double-fry technique ensure restaurant-quality results right in your own kitchen tonight.
- Visual Appeal: Achieve that iconic, craggy golden crust and tender meat, making this dish an absolute showstopper on any plate.
- Versatility: Excellent served hot or cold, Karaage pairs beautifully with rice, salads, or as the star of a delicious homemade bento box lunch.
Ingredients for Japanese Fried Chicken (Karaage)
Here’s what you’ll need to make this delicious dish:
- Boneless, Skinless Chicken ThighsChoose quality chicken thighs for their superior moisture content and rich flavor, cutting them into bite-sized pieces for optimal frying.
- Ginger and GarlicFreshly grated is crucial; these aromatics provide the sharp, foundational flavor base for the marinade.
- Soy SauceUse a good quality light soy sauce to introduce deep umami and salinity without overpowering the delicate chicken flavor.
- Potato Starch (or Cornstarch)This is the secret to the signature light, craggy, and intensely crunchy coating that defines authentic Karaage.
- Rice Vinegar With Sugar (Rice Grape Juice With Vinegar Alternative)Substitute with apple juice mixed with a small dash of rice vinegar to add necessary sweetness and balance to the marinade.
- Sesame OilJust a few drops will enhance the overall aroma and add a layer of toasted nuttiness to the chicken pieces.
- Neutral Frying OilCanola, vegetable, or peanut oil works best as they have high smoke points and won’t impart unwanted flavors during the frying process.
The full ingredients list, including measurements, is provided in the recipe card directly below.
How to Make Japanese Fried Chicken (Karaage)
Follow these simple steps to prepare this delicious dish:
Step 1: Marinate the Chicken
In a large bowl, combine the diced chicken pieces with the grated ginger, garlic, soy sauce, sesame oil, and the rice vinegar with sugar substitute. Ensure every piece of chicken is coated evenly in the savory mixture. Cover the bowl and refrigerate for at least 30 minutes, although an hour or two is optimal for truly deep flavor penetration. If you are preparing this for a busy weeknight, you can marinate the chicken the night before.
Step 2: Prepare the Coating and Oil
When you are ready to fry, pour the neutral oil into a heavy-bottomed pot or Dutch oven, ensuring it is at least three inches deep. Heat the oil to 340°F (170°C). While the oil heats up, remove the chicken from the marinade and drain any excess liquid. Add the potato starch directly to the chicken and toss vigorously until every piece is completely covered in the dry coating. The starch should look slightly clumpy and textured, which is precisely what creates the characteristic Karaage crunch.
Step 3: The First Fry for Texture
Carefully drop the chicken pieces into the hot oil, working in small batches to avoid overcrowding the pot, which lowers the oil temperature rapidly. Fry the chicken for approximately 90 seconds to 2 minutes, until the starch coating sets and the chicken looks pale golden. This first fry cooks the interior and seals the moisture inside. Remove the chicken using a spider strainer and place it on a wire rack—never on paper towels, as they trap steam and ruin the crispness.
Step 4: Rest and Reheat the Oil
Allow the partially cooked chicken to rest on the wire rack for at least 5 minutes. This resting period lets the internal heat finish cooking the chicken gently and ensures the surface moisture evaporates entirely, preparing it for the final, intense crisping step. While the chicken rests, increase the oil temperature to 375°F (190°C).
Step 5: The Second Fry for Ultimate Crunch
Return the rested chicken pieces to the hotter oil, again working in small batches. This second fry is quick but essential; it usually takes only 30 to 60 seconds. Watch closely as the chicken turns a deep, beautiful golden brown color and the exterior becomes intensely crispy. Remove the chicken immediately and transfer it back to the wire rack.
Transfer to plates and drizzle with fresh lemon juice or serve alongside a spicy mayonnaise dip for the perfect finishing touch.
Mastering the Crispy Coating: Secrets of the Japanese Fried Chicken
Many people attempt to replicate the legendary crunch of this classic dish and fall short, often ending up with a soggy mess rather than the desired shattering crispness. The secret to perfectJapanese Fried Chicken (Karaage)lies almost entirely in the technique, specifically the materials used for the coating and the precise temperature control during frying. If your fried food isn’t crunchy enough to wake up the neighbors, you might be skipping one of these crucial steps.
The Magic of Potato Starch
Unlike wheat flour or breadcrumbs used in Western frying, potato starch or katakuriko creates a distinct texture. When tossed with the marinated, wet chicken, it absorbs the moisture quickly and forms a thin, craggy shell. This thin shell is key because it fries faster and retains less grease than a thicker, flour-based coating. The result is a featherlight, incredibly crunchy exterior that doesn’t feel heavy or doughy. If you cannot find potato starch, high-quality cornstarch is the next best alternative, offering a similar effect, although the texture might be marginally smoother.
The Essential Double-Fry Technique
The double-fry is non-negotiable for authentic Karaage. The first fry at a lower temperature (340°F) achieves two things: it cooks the chicken through without burning the coating, and it sets the structure of the starch shell. The resting period between the two stages allows residual steam to escape and ensures the surface is perfectly dry for maximum crisping. The second, quick fry at a higher temperature (375°F) then flashes the exterior, driving out any remaining moisture and creating that distinct, audible crackle when you bite into the chicken. Trying to do it all in one go often results in dry chicken wrapped in a soggy, undercooked crust—a culinary tragedy we aim to avoid.
Perfect Pairings and Serving Suggestions
While the chicken is undeniably the star of the show, what you serve alongside your homemade Japanese fried chicken can elevate the entire dining experience. Karaage is versatile enough to be a standalone snack, but it truly shines when paired thoughtfully with balancing flavors and textures. Traditionally, it is often served simply with a wedge of lemon, whose acidic juice cuts through the richness of the fried meat beautifully.
Finding the Ideal Dipping Sauce
If you prefer a dipping option, the possibilities are delicious and diverse. A classic pairing is Kewpie mayonnaise, which is richer and sweeter than most Western varieties, offering a smooth counterpoint to the crunch. For those who enjoy a little kick, mixing the mayonnaise with a dash of chili garlic sauce or a smoky paprika powder creates a fantastic, slightly spicy dipping sauce. Another excellent option is a simple soy-ginger glaze, made by reducing soy sauce, a touch of maple syrup or brown sugar, and more fresh ginger until thick and syrupy. This sauce adds an extra layer of savory depth without overwhelming the main dish.
Accompaniments for a Complete Meal
To turn your flavorful fried chicken into a full, satisfying dinner, consider serving it with some contrasting side dishes. Steamed white rice is always a perfect backdrop, soaking up any residual savory juices. For a refreshing balance, a light cabbage salad dressed with a sesame-ginger vinaigrette works wonderfully, providing a much-needed crunch and acidity. If you are feeling ambitious, serving the chicken over a bed of fluffy rice with pickled ginger and a sprinkle of chopped scallions turns this into a fantastic, customizable bowl meal that appeals to everyone.
Troubleshooting and Tips for Flawless Frying
Frying food can feel intimidating, but adhering to a few simple safety and temperature rules ensures your experience making this Japanese Fried Chicken is stress-free and yields perfect results every time. Remember, the key to success in deep-frying is consistency, which means keeping a close eye on your oil temperature from start to finish.
Temperature Control is Critical
Invest in a reliable deep-fry or candy thermometer. Guessing the temperature is the quickest route to burnt exteriors and raw interiors. As established, the two temperature zones—340°F for cooking, 375°F for crisping—are essential. If the oil is too cool during the first fry, the coating will absorb too much oil, resulting in greasy chicken. If the oil is too hot initially, the coating will burn before the interior is cooked. Monitor the temperature constantly, especially after adding cold chicken to the pot, as the temperature will naturally dip.
Safety First: Oil Management
Never leave a pot of hot oil unattended, even for a moment. Ensure your pot is large and sturdy, minimizing the risk of tipping. If you experience excessive splattering, reduce the temperature slightly. Always lower the chicken into the oil gently, using tongs or a spider strainer, dropping it away from you to avoid splashes. Once you finish frying, allow the oil to cool completely before attempting to discard it or pour it back into a storage container. This patience prevents accidents and ensures a clean kitchen cleanup.
Maximizing Marinade Flavor
For the most flavorful fried chicken, let the chicken marinate for as long as possible. While 30 minutes works in a pinch, allowing the chicken to soak up the aromatics for 4 hours, or even overnight, results in exponentially better flavor. The acid-free marinade mixture ensures the chicken stays tender while allowing the salt and umami to permeate the meat fibers thoroughly. Don’t worry about slicing the chicken too small, but make sure the pieces are roughly uniform in size, which guarantees even cooking times.
The Accidental Discovery of Sunshine on a Plate

My first attempt at making crispy chicken was a grease fire disaster. I nearly burned down my apartment complex trying to recreate a mediocre fast-food drumstick, but then I stumbled upon a recipe for Japanese Fried Chicken (Karaage). It was a delightful surprise, yielding unbelievably tender chicken encased in a thin, crackly shell of pure joy.
We’ve all been there: staring into the fryer, questioning our life choices, wondering why our chicken looks less ‘golden brown’ and more ‘charred black.’ For years, fried chicken remained my culinary nemesis. I tried complicated breadings, triple dips, and even consulted ancient frying texts (aka YouTube), yet nothing worked. My chicken was either soggy, dry, or aggressive enough to chip a tooth. Then, during a deep dive into savory Asian cuisine, I encountered the legendary method of preparing Japanese Fried Chicken (Karaage), and suddenly, the kitchen gods smiled upon me. This isn’t just fried chicken; it’s an architectural marvel of flavor and texture, requiring only a simple marinade and the magic of potato or corn starch.
The Philosophy Behind Perfect Karaage
The secret to great karaage isn’t the breading; it’s the marinade and the technique. Unlike Western fried chicken, which often relies on thick flour coatings, authentic Japanese Fried Chicken (Karaage) uses a minimal coating, usually potato starch (katakuriko), which provides an incredibly thin, light, and airy crust. The chicken itself, typically boneless, skin-on thighs, absorbs a powerful umami punch from soy sauce, ginger, and garlic, ensuring every bite is moist and flavorful right to the center.
Forget the complicated brines and overnight soaks. This preparation is remarkably straightforward. We’re going to cube the chicken, baptize it in the marinade for just 30 minutes, and then employ the essential technique known as the “double fry.” Trust me, the double fry is the key to achieving that structural integrity—a perfectly crisp exterior that stays crunchy long after it hits the serving plate. It’s the culinary equivalent of an energy shield for your chicken.
Essential Ingredients for Authentic Flavor
While the process is simple, the quality of the ingredients matters immensely. Use fresh ginger and garlic—the pre-minced jars simply won’t deliver that sharp, aromatic lift we are aiming for. When selecting your chicken, boneless, skin-on chicken thighs are non-negotiable. The extra fat ensures the final product remains juicy even after high-heat cooking. If you use breast meat, you run the risk of creating flavorful cardboard, and nobody wants that.
- For the Chicken:2 lbs boneless, skin-on chicken thighs, cut into 1.5-inch pieces.
- The Marinade Magic:1/4 cup soy sauce (or tamari for gluten-free needs), 2 tablespoons rice vinegar with sugar (sweet rice seasoning), 1 tablespoon grated fresh ginger, 2 cloves minced fresh garlic, 1 teaspoon granulated sugar, and 1/2 teaspoon white pepper.
- The Coating Power:1 cup potato starch (or cornstarch), plus extra for dusting.
- For Frying:4 cups neutral frying oil (canola, vegetable, or peanut).
Perfecting the Cooking Process
The golden rule for this recipe is prioritizing temperature control. Marinate the chicken first while the oil heats, ensuring it reaches the initial low temperature necessary for cooking the meat through. Then, elevate the temperature for the second fry to achieve maximum crispness and the signature golden-brown hue.
The Double-Fry Technique Explained
This method transforms Japanese Fried Chicken (Karaage) from merely good to absolutely spectacular. We fry the chicken twice: the first time to cook the chicken thoroughly and melt some of the interior fat, and the second time at a higher temperature to blast the surface coating into a magnificent, shatteringly crispy shell.
First, heat your oil to 325°F (160°C). This low, slow fry ensures the center of the chicken cooks without burning the starch coating. Carefully drop about half of the marinated chicken pieces into the hot oil, making sure not to overcrowd the pan, which would immediately drop the temperature too low. Fry these for about 2 to 3 minutes, until the pieces are light blonde and cooked through. Remove them and place them on a wire rack—not paper towels, as wire racks ensure air circulation and prevent sogginess. Repeat this process with the remaining chicken.
Once all the pieces have completed their first dip, increase the oil temperature significantly, aiming for 375°F (190°C). This is the serious crisp-making stage. Return the chicken to the hot oil in small batches and fry them for another 60 to 90 seconds, just until they turn a deep, beautiful golden brown. Listen for the satisfying crunch sound as you pull them out—that’s the sound of success. Drain them again on the wire rack and sprinkle lightly with flaky sea salt while still hot. Serve immediately with a wedge of lemon and perhaps some spicy mayonnaise for dipping.
Add Your Touch
Feel free to experiment beyond the traditional recipe; try swapping the rice vinegar with sugar for apple cider vinegar mixed with a touch of sugar for acidity. Adding a sprinkle of finely ground white sesame seeds to the starch coating also introduces a lovely nutty aroma, enhancing the overall depth of the Japanese Fried Chicken (Karaage).
Flavor Variations and Dipping Delights
The beauty of Japanese Fried Chicken (Karaage) lies in its adaptability. While the classic ginger-garlic marinade is divine, you can easily pivot the flavor profile. For a citrusy twist, add the zest and juice of half a lemon to the marinade. If you prefer a warmer, spicier note, incorporate a teaspoon of chili paste or a pinch of cayenne pepper into the soy mixture. You can also experiment with different starch coatings; a 50/50 mix of potato starch and rice flour yields an even lighter and more delicate crust, often favored by purists.
Don’t stop the customization at the chicken itself; the dipping sauce is equally crucial. Traditional karaage is often served simply with a lemon wedge, but if you’re looking to elevate the experience, try a quick homemade spicy mayo (mayonnaise mixed with sriracha and a dash of rice vinegar) or a savory ponzu dipping sauce. For those seeking something truly unique, a sweet and tangy glaze made from reduction of pineapple juice, soy sauce, and a thickening agent like arrowroot powder offers a fantastic contrast to the salty, crispy chicken.
Storing & Reheating
Store leftover Japanese Fried Chicken (Karaage) in an airtight container in the refrigerator for up to three days. To restore the crispy texture, always reheat it in a convection oven or air fryer at 350°F (175°C) for five to eight minutes until fully heated through and crunchy again. Never use the microwave.
Chef’s Essential Tips for Perfect Karaage
-
Always utilize boneless, skin-on chicken thighs; the fat content ensures moisture retention and flavor, preventing the final product from drying out during the intense double-fry process.
-
Do not skip the double-fry technique; the initial fry cooks the inside, and the second, hotter fry seals the outside, delivering that signature crispy, non-soggy exterior.
-
Ensure the chicken pieces are lightly but fully coated in potato starch before frying, shaking off any excess powder to prevent the oil from becoming cloudy and burning.
I remember serving this Japanese Fried Chicken (Karaage) at a backyard gathering, and my notoriously picky cousin declared it “better than anything they sell in a restaurant,” which, honestly, felt like winning the culinary Olympics.
Conclusion for Japanese Fried Chicken (Karaage)
Mastering Japanese Fried Chicken (Karaage) means embracing the simplicity of a great marinade and respecting the necessity of the double-fry technique. This dish provides an unparalleled combination of juicy, savory chicken and a remarkably light, crunchy coating that keeps people coming back for more. Whether served as a main course, a party appetizer, or a delightful afternoon snack, this approach guarantees success, delivering true sunshine on a plate. Stop fearing the deep fryer and start creating this incredible, easy-to-make culinary masterpiece today; your taste buds will thank you profusely for taking the plunge.
Print
Japanese Fried Chicken (Karaage)
- Total Time: 35 minutes
- Yield: 4 servings 1x
Description
Achieve truly succulent Karaage! Our secret marinade uses tangy apple juice, balancing rich soy, ginger, and garlic for maximum flavor penetration. Instructions and nutritional facts included.
Ingredients
- 1.5 lbs boneless, skin-on chicken thighs
- 2 tablespoons soy sauce
- 1 tablespoon apple juice (Japanese cooking grape juice with vinegar)
- 1 teaspoon freshly grated ginger
- 1/2 teaspoon freshly grated garlic
- 1/2 cup potato starch (or cornstarch)
- 3 cups vegetable oil (for deep frying)
Instructions
- Step 1: Cut the chicken thighs into roughly 1.5-inch bite-sized pieces. In a medium bowl, combine the soy sauce, apple juice, grated ginger, and grated garlic; add the chicken pieces and toss thoroughly to coat.
- Step 2: Cover the bowl and refrigerate the marinated chicken for a minimum of 30 minutes, or ideally 2 hours, allowing the flavors to fully penetrate the meat.
- Step 3: Just before frying, drain off any pooling marinade liquid. Place the potato starch on a shallow dish and dredge each piece of marinated chicken, pressing firmly so the starch adheres completely; shake off any excess coating.
- Step 4: Heat the vegetable oil in a deep pot or Dutch oven to 320°F (160°C). Fry the chicken in small batches for 90 seconds to 2 minutes until lightly golden and cooked internally; remove the chicken and place it on a wire rack to rest for 5 minutes.
- Step 5: Increase the oil temperature to 350°F (175°C). Return the rested chicken to the hot oil and fry for an additional 45 to 60 seconds until the exterior is deeply golden brown and shatteringly crispy.
- Step 6: Remove the karaage from the oil, drain briefly, and serve immediately, typically accompanied by a wedge of lemon.
Notes
- If you have leftovers, cool the karaage completely on a wire rack before storing it in the fridge; this prevents steam from softening the crust while chilled.
- Never microwave; instead, use an air fryer or convection oven set to 375°F (190°C) for a few minutes to successfully reactivate the shatteringly crispy exterior.
- Elevate your platter beyond the standard lemon wedge by serving the chicken alongside a side of shredded cabbage and a custom dipping sauce of Kewpie mayonnaise mixed with a dash of chili oil.
- Use authentic potato starch, if possible, as it results in a lighter, drier, and more robustly crispy coating compared to the slightly denser texture provided by cornstarch.
- Prep Time: 15 minutes
- Cook Time: 20 minutes
- Method: Stovetop
- Cuisine: American
Nutrition
- Serving Size: 4-5 pieces (approx. 150g)
- Calories: 420
- Sodium: 750mg
- Fat: 30g
- Saturated Fat: 7g
- Trans Fat: 0g
- Protein: 2g