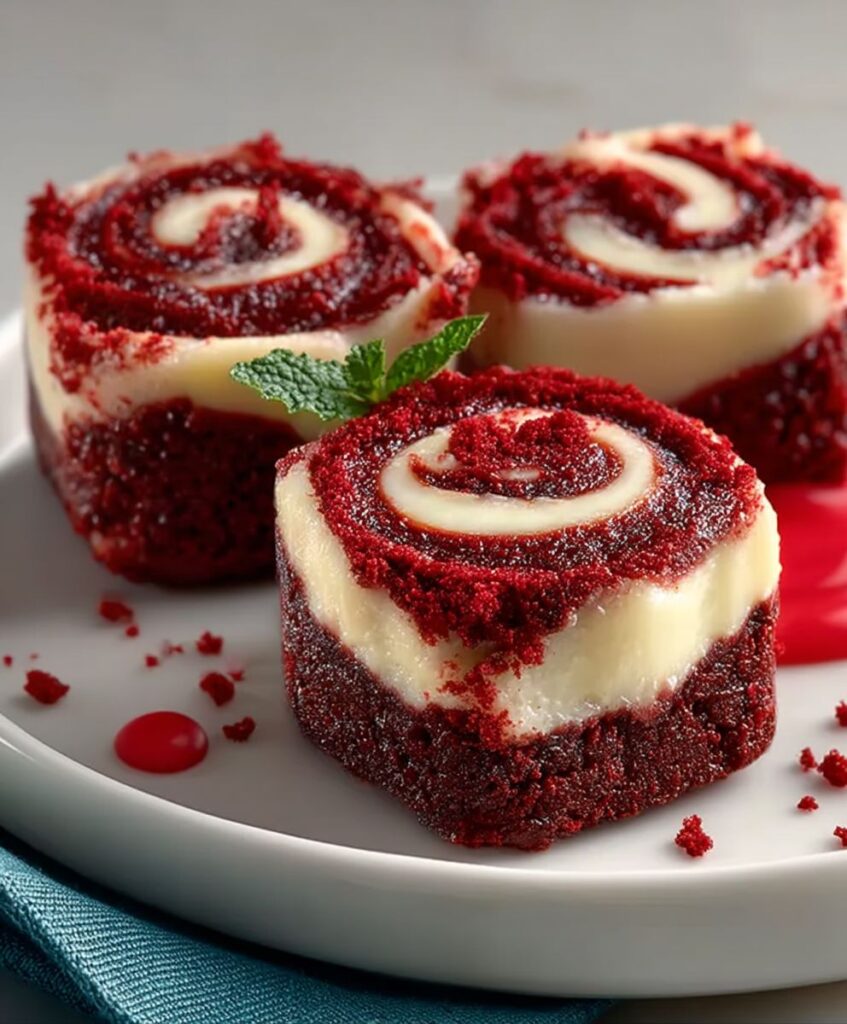
Have you ever needed a dessert that screams “sophisticated fun” but takes less effort than deciding what to watch on streaming TV? Enter the magnificent, deeply colored, and impossibly fudgy world ofSweet Red Velvet Brownie Bites.
These aren’t your average brownies; they are miniature explosions of cocoa goodness, kissed with that signature velvet tang, proving that sometimes, the best things come in bite-sized packages ready to steal the show.
- The flavor profile perfectly balances deep, rich cocoa notes with a subtle, bright tanginess, making them intensely satisfying without being overly sweet.
- Achieve show-stopping visual appeal with their striking crimson color and a crackly crust, ensuring they are the most requested dessert at any gathering.
- Preparation is delightfully straightforward, requiring minimal active mixing time before they bake into fudgy, decadent, and perfectly portioned treats.
- These versatile little jewels are perfect served plain, dusted with powdered sugar, or topped with a swirl of tangy cream cheese frosting for elevated elegance.
Ingredients for Sweet Red Velvet Brownie Bites
Here’s what you’ll need to make this delicious dish:
- Unsalted ButterWe melt this to ensure maximum fudgy chewiness in the final bite, providing essential richness and moisture.
- Granulated SugarThis acts as a primary structure builder and ensures that necessary crisp, crackly top that signals a perfect brownie.
- EggsUse large eggs, ensuring they are at room temperature for better emulsification and a smoother, silkier batter consistency.
- Pure Vanilla PowderEssential for rounding out the flavors, vanilla complements the cocoa and adds complexity beyond just sweetness.
- All-Purpose FlourMeasured correctly (spooned and leveled), the flour binds the ingredients without developing too much gluten, keeping the bites tender.
- Unsweetened Cocoa PowderChoose a high-quality variety, as this is the backbone of the “brownie” flavor, providing depth and chocolate intensity.
- Red Food Coloring GelGel color provides a much deeper, vibrant crimson hue than liquid coloring, essential for the signature red velvet look.
- White Vinegar or Lemon JuiceA tiny splash of acid reacts beautifully with the cocoa, enhancing the red color and providing the slight tang characteristic of red velvet.
- SaltJust a pinch helps to amplify all the sweet and chocolate flavors, ensuring the overall taste is balanced and never flat.
The full ingredients list, including measurements, is provided in the recipe card directly below.
The Myth, The Legend, The Crimson Craving
I distinctly remember the first time I encountered red velvet cake. I was at a painfully elegant wedding where the bride had apparently demanded “a cake that looked like it was perpetually blushing.” Naturally, I assumed it was some highly artificial dessert designed purely for aesthetics. Boy, was I wrong. That cake was moist, tangy, and utterly unforgettable. The brownie version, however, takes all the drama and none of the fuss, delivering that classic complexity in a simple, portable package.
The history of red velvet is filled with delightful rumors, often involving wartime rationing where beets were supposedly used for color. Thankfully, we don’t need root vegetables to achieve this gorgeous hue today, but the combination of cocoa and acid remains the historical key. That subtle tang is what separates red velvet from plain chocolate, making it feel less like a dessert and more like a mysterious, delicious adventure. When you createSweet Red Velvet Brownie Bitesat home, you are stepping into a lineage of secretly complex baking that tastes far more difficult than it actually is. It is the perfect culinary camouflage for a baker who wants maximum applause for minimal effort.
Why Bite-Sized Treats Rule the Dessert Table
Let’s be honest, we all love the idea of portion control until we have to actually do it. That’s why these brownie bites are not just a cute novelty; they are a necessary strategic move in the war against overindulgence. When you present a platter of full-sized brownies, your internal monologue starts shouting, “Just one slice, just one massive slice.” But when faced withSweet Red Velvet Brownie Bites, you grab two or three, feel extremely sophisticated about your perceived moderation, and walk away feeling victorious. They eliminate the agonizing decision of how big to cut the square, making them ideal for parties, lunchboxes, or simply for managing your 3 p.m. snack attack.
The small size also optimizes the crust-to-fudge ratio, a critical element in the architecture of the perfect brownie. Every single bite delivers a satisfying edge piece experience, complete with that desirable crackle on top. If you bake them in a mini muffin tin instead of cutting a large slab, the bites become even easier to handle and achieve a lovely dome shape, ready for piping with frosting. This ensures maximum enjoyment and minimum mess, which is a win-win for both the host and the hungry guest.
How to Make Sweet Red Velvet Brownie Bites
Follow these simple steps to prepare this delicious dish:
- Step 1: Prep the Oven and PanPreheat your oven to 350°F (175°C). Line a standard 8×8 inch square baking pan with parchment paper, leaving an overhang on two sides to easily lift the finished brownies out later.
- Step 2: Melt and Mix the Wet BaseIn a heat-safe bowl, melt the butter, then whisk in the sugar until well combined. Once slightly cooled, vigorously whisk in the room-temperature eggs and vanilla until the mixture lightens slightly and thickens.
- Step 3: Develop the Color and TangStir in the red food coloring gel and the white vinegar or lemon juice until the color is uniformly vibrant and deep red. This is the stage where the magic color transformation happens!
- Step 4: Incorporate the Dry IngredientsIn a separate bowl, whisk together the flour, cocoa powder, and salt. Gently fold the dry mixture into the wet ingredients using a spatula until just combined. Be careful not to overmix, as that develops gluten and results in tougher brownies.
- Step 5: Bake to PerfectionScrape the batter into the prepared pan and spread it evenly. Bake for 25 to 30 minutes. The brownies are done when a toothpick inserted near the edge comes out clean, but the center still has moist crumbs attached.
- Step 6: Cool, Cut, and ServeAllow the brownies to cool completely in the pan before lifting them out using the parchment paper overhang. Once cool, cut them into small, perfect bite-sized squares.
Transfer to a platter and dust lightly with powdered sugar or top with a tiny dollop of cream cheese frosting for the perfect finishing touch.
Achieving Maximum Fudgy Texture and Perfect Crimson Color
Baking brownies often seems straightforward, but achieving that perfect fudgy center and crisp, crackly top requires a few sneaky tricks. The two most common questions about red velvet treats concern texture and color, and mastering both guarantees yourSweet Red Velvet Brownie Biteswill be legendary.
The Secret to the Signature Red Velvet Hue
To ensure your bites look like they belong on the cover of a magazine and not like mildly disappointed chocolate squares, you must commit to the color. Forget liquid food coloring; it dilutes the batter and often leaves the result looking muddy brown. Use a high-quality gel food coloring. A generous teaspoon of the deep red gel is usually necessary to penetrate the cocoa powder’s natural darkness.
Another crucial, often overlooked ingredient is the small amount of acid, whether that is vinegar or lemon juice. Historically, red velvet relied on non-Dutched cocoa powder, which reacts with the acid and baking soda to reveal a deeper reddish tone naturally. While modern cocoa often prevents that natural reaction, the acid still enhances the vibrancy of the added dye and gives the classic subtle tang. Don’t worry, you won’t taste the vinegar; you will only experience its magical effects on the visual presentation.
Temperature Tactics for Fudgy Bites
If you prefer a cakey brownie, bake longer. But if you are in the superior fudgy camp—and let’s face it, who isn’t?—the key lies in underbaking, slightly. Most brownie recipes are ruined by leaving them in the oven five minutes too long. You are aiming for that glorious moment when the edges look set and a slight crust has formed, but the center still seems just a touch underdone. Remember, the brownies continue cooking as they cool in the hot pan. If you pull them out when a toothpick comes out totally clean, you’ve overcooked them.
We also use melted butter rather than creamed butter and fat, which inhibits gluten development, contributing directly to that dense, gooey texture. Resist the temptation to incorporate too much air when mixing; gentle folding after the wet ingredients are combined ensures maximum density. Using a metal pan is also highly recommended because it conducts heat more efficiently than glass, helping to set the edges while keeping the center tender.
Creamy Pairing and Smart Storage Solutions
While these bites are utterly delightful on their own, the classic pairing for red velvet is a tangy, sweet frosting. You cannot possibly serve red velvet without the iconic cream cheese topping; it is simply against the laws of dessert physics. I recommend whipping up a quick batch while the brownies are cooling to complete the ultimate red velvet experience.
Quick and Tangy Cream Cheese Frosting
The key to perfect cream cheese frosting is using cold cream cheese and soft butter, combining them until perfectly smooth before incorporating powdered sugar and a dash of vanilla powder. If you find your frosting too soft, try adding an extra tablespoon of powdered sugar or chilling the bowl for fifteen minutes; this stabilizes the fats beautifully. Remember, the tang is as important as the sweetness, so a little extra lemon juice or a tiny splash of white vinegar in the frosting can elevate the flavor profile substantially.
Maximizing Shelf Life and Flavor
Once cooled and cut, these brownie bites store remarkably well. For maximum freshness, keep them in an airtight container at room temperature for up to four days. If you are preparing them ahead of time, especially if they are frosted, the refrigerator is your best friend, extending their life for up to a week. However, refrigerated brownies can sometimes lose their fudgy texture, so I highly recommend popping them in the microwave for five to ten seconds before serving to restore that melt-in-your-mouth richness.
If you need to make a massive batch ofSweet Red Velvet Brownie Bitesfor a big event, they freeze beautifully. Wrap them tightly in plastic wrap, then place them in a freezer-safe bag or container for up to three months. Thaw them overnight at room temperature. This is a marvelous time-saving strategy for busy holiday seasons or when unexpected guests arrive demanding a sophisticated, crimson-colored dessert. Always ensure they are completely cooled before wrapping to prevent condensation and sogginess.
These little treats are proof that a small dessert can pack a huge punch of flavor, color, and texture. Go ahead, dive into the velvet revolution; your taste buds will thank you.
The Accidental Discovery of Sunshine on a Plate

I was aiming for a simple chocolate cookie, but accidentally over-fudged the batter and added too much crimson dye. What emerged from the oven wasn’t a cookie; it was a batch of decadent, intensely colored bites. It felt like I’d bottled sunshine, only richer and much sweeter.
Perfecting the Cooking Process
Start by melting the butter and chocolate gently to ensure a smooth base, then whisk the sugar and eggs vigorously for that signature crackle top. Fold in the dry ingredients last, being careful not to overmix, which is key to achieving that perfect fudgy center for the Sweet Red Velvet Brownie Bites.
Add Your Touch
Try swapping out the classic vanilla cream cheese frosting for a tangy lemon curd swirl if you crave zest. Alternatively, sprinkle crushed freeze-dried strawberries on top for texture, or mix white chocolate chips directly into the brownie batter before baking for extra gooey pockets.
Storing & Reheating
Store these delicate Sweet Red Velvet Brownie Bites in an airtight container at room temperature for up to three days, or refrigerate them if they have cream cheese frosting. They taste best served slightly chilled, but you can warm them briefly (10 seconds) in the microwave if you prefer a molten core.
Ditching the Dinner Party Drama
Let’s be honest: red velvet cake is stunning, but it’s also a demanding diva of a dessert. It requires careful layering, precision frosting, and the terrifying prospect of slicing it neatly in front of company. I prefer my baking therapy to be simple, fast, and guaranteed to produce minimum mess and maximum cheer. That’s why we’ve translated that rich, cocoa-buttermilk magic into convenient, two-bite treats. These aren’t just brownies; they are miniature explosions of fudgy, tangy flavor, perfect for sneaking right off the cooling rack.
This journey began on a rainy Saturday when my kitchen resembled a crime scene committed by cocoa powder. My mission was to create a red velvet dessert that tasted luxurious but behaved well in a muffin tin. The trick is balancing the acidity of the buttermilk and vinegar—essential for activating the cocoa’s color—with the fat needed for a truly chewy brownie texture. Many recipes turn out dry or cakey, missing that dense, satisfying chew. After three disastrous batches that tasted like dry sponges dipped in food coloring, I finally cracked the code: less flour, more melted butter, and a tiny, almost medicinal amount of vinegar. The result? The decadent, perfect Sweet Red Velvet Brownie Bites you are about to bake.
Gathering Your Crimson Ammunition
Before you preheat the oven and strap on your apron, make sure you have everything ready. Baking these tiny treasures is primarily about preparation. We are aiming for fudgy, not cakey, which means precise measurements are your best friend. Do not eyeball the cocoa powder—it is the difference between a dark, mysterious red and a pale, sad pink.
Ingredients for the Fudgy Base
- 1 cup (2 sticks) unsalted butter, melted
- 1 1/2 cups granulated sugar
- 1/2 cup packed light brown sugar
- 4 large eggs, at room temperature
- 1/4 cup unsweetened cocoa powder
- 1 teaspoon white distilled vinegar
- 2 teaspoons vanilla powder
- 1/4 cup buttermilk (or 1/4 cup milk mixed with 1/2 teaspoon white vinegar)
- 1 bottle (1 oz) red food coloring, liquid or gel (use gel for best color saturation)
- 1 cup all-purpose flour
- 1/2 teaspoon baking soda
- 1/2 teaspoon salt
Ingredients for the Tangy Cream Cheese Glaze
- 8 ounces cream cheese, softened
- 1/2 cup (1 stick) unsalted butter, softened
- 3 cups powdered sugar, sifted
- 1 teaspoon vanilla powder
- 2 tablespoons milk or heavy cream
Mixing the Magic: Step-by-Step Guide
The beauty of the brownie bite format is the speedy cook time. We use mini muffin tins for uniformed perfection, ensuring every single bite has a beautiful, chewy edge and a molten center. Follow these steps meticulously for optimal fudginess.
- Prep Work:Preheat your oven to 350°F (175°C). Lightly grease a 24-cup mini muffin tin or line it with paper liners.
- Wet Ingredients:In a large bowl, whisk the melted butter, granulated sugar, and brown sugar until thoroughly combined. Beat in the eggs one at a time until the mixture is thick and glossy, about 2 minutes. This step creates the desirable crackly top.
- Color and Flavor:Whisk in the buttermilk, vanilla powder, vinegar, and red food coloring until the deep red hue is evenly distributed. Don’t worry if the color looks intense; it will mellow slightly when the flour is added.
- Dry Components:In a separate medium bowl, whisk together the flour, cocoa powder, baking soda, and salt. Gradually fold the dry ingredients into the wet mixture using a spatula. Stop mixing as soon as the flour streaks disappear—overmixing develops gluten and leads to a cakey bite instead of a fudgy one.
- Bake the Bites:Fill each muffin cavity about two-thirds full. Bake for 12 to 15 minutes. The edges should look set, but a toothpick inserted in the center should still come out slightly moist with fudgy crumbs, not clean.
- Glaze Time:While the bites cool completely on a wire rack, prepare the glaze. Beat the softened cream cheese and butter until smooth. Gradually add the sifted powdered sugar and vanilla powder, beating until fluffy. Add milk or cream until the glaze reaches a smooth, spreadable consistency.
- Finishing Touch:Once the brownie bites are fully cool, generously top each one with a dollop of cream cheese glaze. Serve immediately or store them for later indulgence.
Chef’s Secret Weapon: Insider Tips
- Always use gel food coloring for red velvet. Liquid versions dilute the batter and yield a disappointing, faded brick color instead of a rich, vibrant crimson hue.
- Sifting your powdered sugar for the glaze is non-negotiable; tiny lumps turn into irritating little pockets of dry sweetness, ruining the smooth texture.
- Chilling the batter for thirty minutes before scooping helps the bites retain their structure during baking, resulting in a slightly denser and more satisfying chew.
I once took these to a neighborhood gathering, and my neighbor, usually reserved, actually stole the final Sweet Red Velvet Brownie Bite right off the platter. It confirmed my theory: nobody can resist that perfect pairing of fudgy chocolate and tangy cream cheese.
Conclusion for Sweet Red Velvet Brownie Bites
Creating these Sweet Red Velvet Brownie Bites transforms the elaborate process of making red velvet cake into a delightful, low-stress baking adventure. We have established that the keys to success lie in balancing acidity, avoiding overmixing the batter, and ensuring your cream cheese glaze is impeccably smooth. These decadent miniature desserts offer a rich, fudgy texture with that essential hint of cocoa and buttermilk tang, all capped off by a perfect swirl of frosting.
Whether you need a quick dessert for an impromptu gathering or simply want a tiny dose of pure indulgence, these bites deliver big flavor without the drama. Go ahead, fill those mini muffin tins, and prepare for immediate adoration.
Print
Sweet Red Velvet Brownie Bites
- Total Time: 35 minutes
- Yield: 4 servings 1x
Description
These vibrant red velvet bites blend melted butter and sugar for a deeply fudgy texture. Perfect single-serving decadence! Full instructions and nutritional facts are included.
Ingredients
- 1/2 cup (1 stick) unsalted butter, melted
- 3/4 cup granulated sugar
- 1 large egg
- 1 teaspoon vanilla bean paste
- 1 tablespoon liquid red food coloring
- 1/2 cup all-purpose flour
- 1/4 cup unsweetened cocoa powder
- 1/4 teaspoon salt
Instructions
- Step 1: Preheat the oven to 350°F (175°C). Lightly grease a 24-cup mini muffin tin or line with paper liners, and set aside. In a medium bowl, whisk together the melted butter and granulated sugar until fully combined.
- Step 2: Whisk in the egg and vanilla powder until the mixture is smooth. Add the red food coloring and mix until the color is evenly distributed and the batter is a vibrant red.
- Step 3: In a separate small bowl, whisk together the flour, cocoa powder, and salt. Gently fold the dry ingredients into the wet ingredients using a spatula until the batter is just combined. Be careful not to overmix.
- Step 4: Scoop the batter into the prepared mini muffin tin cups, filling each approximately 3/4 full.
- Step 5: Bake for 12 to 15 minutes, or until the edges are set and a toothpick inserted into the center of a bite comes out with moist crumbs attached. Let the brownie bites cool completely in the tin before carefully removing them.
Notes
- Keep cooled bites fresh for up to three days by storing them in an airtight container at room temperature, or freeze them individually wrapped for up to two months.
- If the bites have lost their initial fudginess, a quick 8-10 second flash in the microwave will bring back that soft, melted interior.
- Enhance the red velvet experience by serving these mini treats alongside a cup of hot coffee and a small drizzle of cream cheese glaze.
- To achieve the signature deep red hue, ensure the red food coloring is perfectly distributed in the wet ingredients before folding in the cocoa mixture; this prevents streakiness and guarantees a vibrant color payoff.
- Prep Time: 15 minutes
- Cook Time: 20 minutes
- Method: Stovetop
- Cuisine: American
Nutrition
- Serving Size: 1 brownie bite
- Calories: 115
- Sodium: 55mg
- Fat: 6.0g
- Saturated Fat: 3.5g
- Unsaturated Fat: *Note: DV percentage is generally not provided for Unsaturated Fat or Phosphorus.
- Trans Fat: 0g
- Protein: 11.5g