Remember that glorious feeling of sneaking dessert before dinner? Now, imagine that dessert is creamy, dreamy, and requires zero baking effort, making thesePeanut Butter Frozen Yogurt Barsyour new guilt-free secret weapon for beating the heat.
They deliver maximum satisfaction with minimal prep, giving you that delightful combination of salty crunch and sweet, tangy smoothness that defines true summer bliss.
- Effortless preparation means you spend more time relaxing and less time sweating over a hot oven during the warmest summer months.
- The perfect balance of salty peanut butter swirl against the tangy, sweet frozen yogurt creates a completely addictive flavor profile.
- Achieve a stunning layered look that makes this dessert visually appealing and impressive for guests at any backyard gathering.
- Easily adapt the recipe with different nut butters or toppings, offering endless versatility for diverse preferences and tastes.
Why You Need These Peanut Butter Treats Right Now
If your life currently resembles a chaotic juggling act involving work, family, and the ever-present question of “What’s for dessert?” then you are exactly who I wrote this recipe for. We all deserve treats that feel luxurious but don’t demand hours of our precious time. I vividly recall the moment I invented these bars—it was 3 PM on a Tuesday, and I had promised myself a magnificent dessert, but my energy levels were dipping lower than the stock market.
The solution? Something no-bake, utterly decadent, and relying on ingredients I always keep stocked. Enter the humble tub of Greek yogurt and the mighty jar of peanut butter. By combining these two pantry heroes, we skip the complicated churners and tricky temperature controls usually associated with homemade ice cream. We dive straight into the deep end of deliciousness. This recipe for Peanut Butter Frozen Yogurt Bars doesn’t just promise a dessert; it promises a moment of glorious, effortless peace in bar form.
Forget the stress of elaborate layer cakes or finicky pastries. This is the definition of high reward, low effort. You simply press the crust, mix the filling, swirl the magic, and let the freezer handle the rest of the hard work. It’s the kind of recipe you memorize because it saves the day so reliably, whether you need a last-minute party dessert or just a quiet, satisfying snack after the kids go to bed.
The Undeniable Magic of Texture in Frozen Desserts
A truly great frozen dessert isn’t just about flavor; it’s about the textural contrast. If everything is just one smooth, cold block, it can be a bit boring. That is why the base layer of these treats is absolutely critical. We start with a buttery, crisp crust made from crushed cookies or crackers that provides a necessary counterpoint to the creamy filling. Every bite begins with a satisfying crunch and immediately melts into the smooth, tangy sweetness of the frozen yogurt. Achieving this balance is what elevates this simple concept from a basic frozen snack into a sophisticated, satisfying treat.
The secret to keeping the filling creamy, rather than icy, lies in using full-fat Greek yogurt and a little powdered sugar. The fat content helps prevent large ice crystal formation, resulting in a velvety mouthfeel that rivals premium ice cream. The peanut butter, swirled in haphazardly, doesn’t just add flavor; its fat content further ensures that creamy, decadent texture that makes these Peanut Butter Frozen Yogurt Bars irresistible. This careful consideration of texture is the secret weapon in your dessert arsenal.
Ingredients for Peanut Butter Frozen Yogurt Bars
Here’s what you’ll need to make this delicious dish:
- Graham Cracker CrumbsUse finely ground crumbs to ensure a tight, cohesive crust that doesn’t crumble when cut.
- Unsalted ButterMelted butter acts as the binding agent for the crust, ensuring it sets up firm and holds its shape in the freezer.
- Light Brown SugarA small amount adds depth and a slight caramel flavor to the crust, enhancing the peanut butter pairing.
- Full-Fat Greek YogurtEssential for achieving the best, creamiest texture and preventing ice crystals from forming in the filling.
- Creamy Peanut ButterUse a commercial brand that is smooth and easy to drizzle; natural peanut butter may separate and become oily.
- Powdered SugarThis dissolves instantly into the yogurt, adding sweetness without leaving a grainy texture like granulated sugar might.
- Vanilla Bean PasteA splash of pure vanilla bean paste enhances all the other flavors and adds aromatic complexity to the filling.
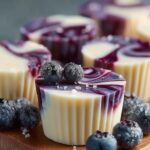
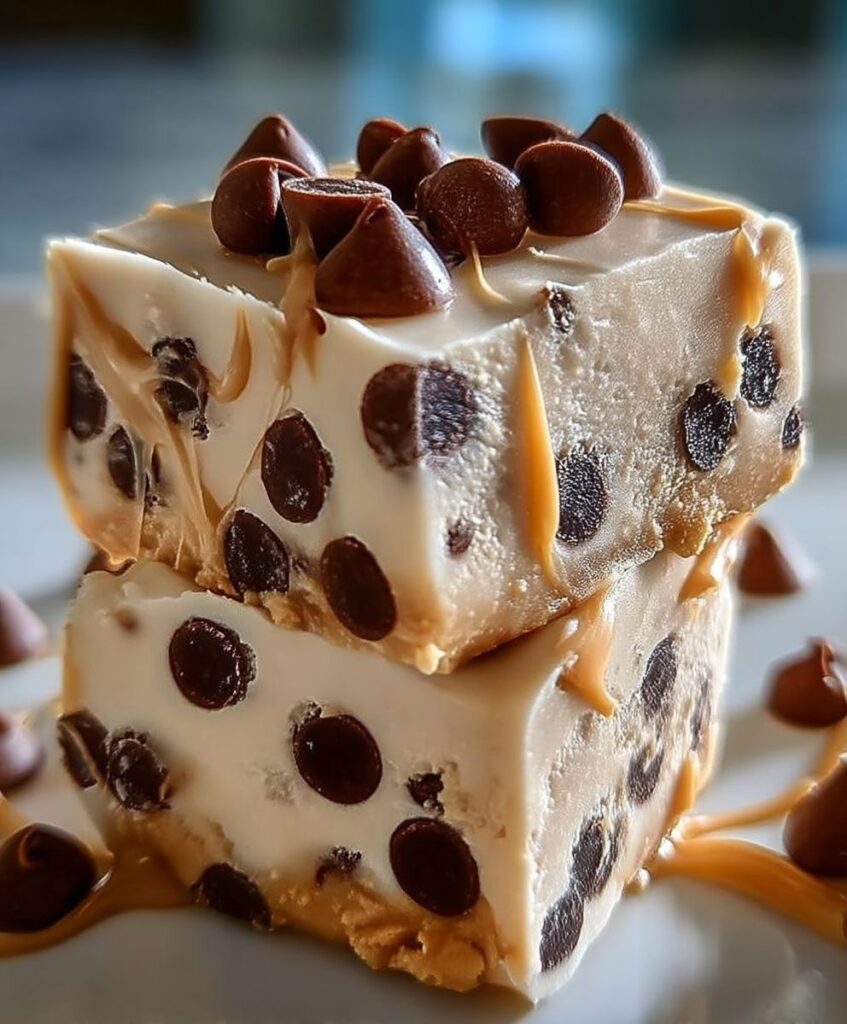
- Dark Chocolate Chips or ShavingsUsed for melting and drizzling over the top layer to provide a rich, visually appealing finish.
The full ingredients list, including measurements, is provided in the recipe card directly below.
How to Make Peanut Butter Frozen Yogurt Bars
Follow these simple steps to prepare this delicious dish:
-
Step 1: Press the Perfect Crust
Preheat your oven to 350°F (175°C), although these bars are no-bake, we briefly bake the crust to set it firmly. Line an 8×8-inch baking pan with parchment paper, leaving an overhang on the sides for easy removal later. In a medium bowl, combine the graham cracker crumbs, melted butter, and brown sugar until the mixture resembles wet sand. Press this mixture firmly and evenly into the bottom of the prepared pan, using the bottom of a measuring cup to compact it tightly. Bake for 8 minutes, then remove and let it cool completely on a wire rack.
-
Step 2: Prepare the Creamy Yogurt Filling
While the crust cools, prepare the filling. In a large mixing bowl, combine the full-fat Greek yogurt, powdered sugar, and vanilla bean paste. Use a spatula or whisk to mix until the sugar is fully incorporated and the filling is completely smooth. Taste the mixture and adjust the sweetness if necessary; remember, freezing slightly dulls the perception of sweetness.
-
Step 3: Assemble and Swirl the Layers
Pour the prepared yogurt filling directly over the cooled crust in the pan. Smooth the top evenly with the back of a spoon. Warm the creamy peanut butter slightly in the microwave (about 15-20 seconds) until it becomes easily pourable. Drizzle the warm peanut butter in lines or dots across the top of the yogurt layer. Using a knife or skewer, gently run it through the peanut butter and yogurt to create a beautiful, rustic swirl pattern, being careful not to disturb the crust below.
-
Step 4: Freeze and Set
Transfer the assembled bars to the freezer immediately. Freeze for a minimum of 6 hours, or ideally overnight, to ensure they set completely hard. A full freeze prevents the bars from becoming sticky or messy when you slice them.
-
Step 5: Slice and Garnish
Once fully frozen, use the parchment paper overhang to lift the entire block of bars out of the pan. Place the block on a sturdy cutting board. Allow the block to sit at room temperature for just 5 to 10 minutes to soften slightly before cutting; this prevents cracking. Use a sharp knife dipped in hot water and wiped dry to cut the block into 16 even squares. Melt the dark chocolate chips and drizzle a final decorative zigzag pattern over the tops of the cut bars for the perfect finishing touch. Serve immediately or return to the freezer.
Expert Tips and Troubleshooting for Creamy Frozen Yogurt Bars
The key to mastering any no-bake frozen dessert lies in understanding how ingredients interact when temperatures drop dramatically. If you find your frozen yogurt bars turning out brittle or icy, the culprit is often a lack of fat or stabilization. Always opt for full-fat dairy products in frozen recipes because the fat molecules inhibit large water crystals from forming, ensuring that signature creamy texture you desire. Furthermore, never try to rush the chilling process; adequate time in the freezer is essential for structural integrity.
If you live in a particularly humid environment, which can make frozen desserts melt faster, consider chilling your mixing bowl and utensils before you start combining the ingredients. Working with cold tools helps maintain the integrity of the yogurt base longer, giving you more time for that aesthetically pleasing peanut butter swirl before everything gets too warm. Remember, presentation matters just as much as flavor, so take your time with the final chocolate drizzle.
Customizing the Crunchy Crust
While the graham cracker crust is a classic choice, feel free to experiment with other crunchy foundations. Crushed vanilla wafers, chocolate sandwich cookies (with the cream filling removed), or even finely crushed salty pretzels mixed with butter all make fantastic crusts. The salty-sweet combination offered by pretzels, in particular, pairs exceptionally well with the rich creaminess of the peanut butter filling, creating a complex and intriguing flavor profile that guests will rave about.
How to Store Your Frozen Yogurt Bars
Proper storage is crucial for maintaining the freshness and texture of your Peanut Butter Frozen Yogurt Bars. After cutting the bars, wrap each one individually in plastic wrap or wax paper to prevent freezer burn and keep them from sticking together. Once individually wrapped, place the bars in an airtight container. They will maintain their quality and flavor for up to two months in a deep freeze. To enjoy a bar, just pull it out of the freezer and let it sit for two minutes before eating—this brief time allows the flavor to bloom and the texture to become perfectly scoopable.
Frequently Asked Questions About No-Bake Desserts
Can I use natural peanut butter in this recipe?
While you can certainly use natural peanut butter for the filling, be aware that its consistency tends to be runnier and less stable. If you choose a natural variety, make sure it is well-stirred, but expect the “swirl” to be less defined and potentially more prone to settling than commercial creamy peanut butter.
How long do Peanut Butter Frozen Yogurt Bars need to freeze?
For the bars to achieve the correct firm consistency for clean slicing, they require a minimum of 6 hours in a deep freezer. If you have the time, an overnight freeze is always recommended to guarantee the best results and prevent any structural collapse during the cutting process.
What is the best way to cut the frozen bars neatly?
The secret to clean cuts is heat and speed. Before cutting, let the pan sit at room temperature for about 5 to 10 minutes. Then, fill a tall glass with hot water, dip a sharp chef’s knife into the water for 30 seconds, and wipe it completely dry. Make one decisive cut, reheat and dry the knife, and repeat for the next cut. This technique ensures smooth, professional-looking edges.
The Day the Freezer Called My Name (And Demanded Peanut Butter)
There are summer days, and then there aresummer days. You know the ones—the air is thick enough to chew, the pavement is shimmering, and the only thing that sounds appealing is a dessert so cold it gives you immediate brain freeze. I remember one particularly sweltering afternoon when my family was attempting to turn the backyard hose into an Olympic swimming pool, and I was melting faster than a snowman in the Sahara. While ice cream was the obvious choice, sometimes, you crave something a little lighter, a little tangier, and infinitely more customizable. That’s when the vision hit me: the ultimate handheld summer treat. We needed creamy, we needed tangy, and most importantly, we needed that glorious, salty-sweet punch of peanut butter.
The first batch was… let’s just say experimental. It was delicious, but slightly messy—more like glorified yogurt slush than a bar. After several tweaks, involving strategic use of creamy yogurt and a crucial dash of plant-based gelling power, I perfected the structural integrity of these marvelous, chilled squares. What resulted was a batch of incredible no-bake bars: perfectly smooth, deliciously cool, and packed with flavor. These delightful Peanut Butter Frozen Yogurt Bars are now mandatory in our house from May to September. They are ridiculously easy to make, require minimal ingredients, and vanish from the freezer faster than I can hide from household chores. Get ready to meet your new favorite way to beat the heat.
Ingredients for Sensational Frozen Peanut Butter Treats
This recipe is deceptively simple, relying on high-quality ingredients to deliver maximum impact. Make sure you use full-fat Greek yogurt for the best texture; it freezes beautifully and prevents a grainy result, ensuring every bite is heavenly.
The Crust (The Foundation of Awesome)
- 1 ½ cups whole grain graham cracker crumbs (or oat flour)
- ¼ cup unsalted butter, melted
- 2 tablespoons brown sugar, packed
- 1 pinch fine sea salt
The Filling (Creamy, Dreamy Deliciousness)
- 2 cups full-fat Greek yogurt, plain or vanilla
- ¾ cup natural peanut butter (smooth or crunchy, your choice)
- ½ cup powdered sugar (sifted)
- 1 teaspoon vanilla bean paste
- 1 tablespoon agar-agar powder (plant-based stabilizer, crucial for texture)
- ¼ cup warm filtered water
The Topping (The Grand Finale)
- ¼ cup chopped roasted peanuts
- 2 ounces dark chocolate chips (melted for drizzling)
Step-by-Step Assembly Instructions
Since these delightful frozen treats require no baking, the process focuses on efficient assembly and strategic freezing. Follow these simple steps for perfectly formed Peanut Butter Frozen Yogurt Bars every time.
Preparing the Crust Base
First, conquer the crust. In a medium bowl, combine the graham cracker crumbs, melted butter, brown sugar, and sea salt. Mix these ingredients thoroughly until the mixture resembles wet sand. Press this mixture firmly and evenly into the bottom of an 8×8 inch baking dish lined with parchment paper, ensuring you leave an overhang on two sides for easy removal later. Place the dish in the freezer while you prepare the filling—we want that crust rock solid before the yogurt goes on top.
Creating the Creamy Center
This is where the structure and flavor combine. In a small, separate bowl, dissolve the agar-agar powder completely into the ¼ cup of warm water. Stir continuously for about two minutes until it thickens slightly; this step ensures your bars hold their shape perfectly and don’t turn into a soupy mess upon thawing. In a large bowl, combine the Greek yogurt, peanut butter, powdered sugar, and vanilla bean paste. Use a hand mixer or a sturdy spatula to mix until everything is completely smooth and uniform, eliminating any lumps. Now, quickly whisk in the prepared agar-agar mixture until fully incorporated. You must work relatively fast here, as the plant-based stabilizer starts setting quickly as it cools.
Freezing and Finishing the Bars
Retrieve the chilled crust from the freezer. Pour the creamy yogurt mixture evenly over the graham cracker base. Use an offset spatula to smooth the top surface, creating a level layer. Sprinkle the chopped peanuts evenly over the top immediately so they adhere to the setting yogurt. Carefully transfer the dish back into the freezer. Freeze the bars for a minimum of 6 hours, or ideally, overnight, ensuring they are thoroughly solid before attempting to cut them. Once fully frozen, use the parchment paper overhang to lift the entire frozen slab out of the dish. Slice into 9 or 12 equal-sized portions using a sharp, warmed knife. For an extra decadent finish, melt the dark chocolate chips and drizzle them artfully over the top of each bar just before serving.
Perfecting the Cooking Process

To achieve peak efficiency and perfect texture, start by preparing and chilling the graham cracker crust immediately. While the crust is setting up, you can dissolve the agar-agar stabilizer and blend the creamy filling components. Combining the two processes minimizes downtime and ensures the yogurt mixture sets properly when introduced to the cold crust.
Add Your Touch
Feel free to customize these delicious peanut butter frozen yogurt bars with different textures and flavors. Swap graham crackers for crispy chocolate sandwich cookies or use sunflower seed butter instead of peanut butter for an alternative flavor profile. Try folding in mini chocolate chips or a swirl of berry jam into the yogurt mixture before freezing for extra bursts of flavor.
Storing & Reheating
Store these refreshing bars in an airtight container, separated by sheets of parchment paper, in the freezer for up to three months. Because they are yogurt-based, they should always be consumed directly from the freezer; they do not require reheating, but rather a slight 5-minute thaw at room temperature before eating for the best texture.
Chef’s Essential Tips for Supreme Results
I once served these at a summer block party, and my neighbor insisted they were store-bought! The secret to their incredible flavor and structure lies in careful mixing and freezing.
- Always use full-fat Greek yogurt, as low-fat versions contain too much water, which causes the bars to become icy and grainy when frozen solid.
- Ensure the agar-agar is completely dissolved and slightly thickened before adding it to the yogurt mixture; this guarantees structural stability, especially in warm weather.
- When drizzling chocolate, use a piping bag or the corner of a sandwich bag with a tiny snipped corner for maximum control and a professional, polished presentation.
The Nutritional Scoop
While these Peanut Butter Frozen Yogurt Bars taste like a total splurge, they offer a good balance of protein and healthy fats, thanks to the Greek yogurt and peanut butter. They make an excellent post-workout treat or a satisfying afternoon snack, providing a cool, nutritious lift.
Estimated Nutritional Information (Per Bar, based on 9 servings)
- Calories: 310-330
- Protein: 12g
- Fat: 18g
- Carbohydrates: 28g
Frequently Asked Questions About Frozen Yogurt Treats
Can I substitute the Greek yogurt with regular yogurt?
While technically possible, regular yogurt is much thinner and contains significantly more water, resulting in an icier and less creamy finished bar. Stick strictly to high-quality, full-fat Greek yogurt for the best, smoothest texture that holds up well in the freezer.
Why is the agar-agar powder necessary for the structure of these frozen bars?
Agar-agar, a wonderful plant-based gelling agent, acts as a critical stabilizer in this recipe. It prevents the water content in the yogurt from forming large, gritty ice crystals, which causes the grainy texture often found in homemade frozen yogurt, guaranteeing a perfectly smooth, sliceable bar.
How long do these frozen yogurt bars take to set completely?
For best results and maximum firmness, you must allow the Peanut Butter Frozen Yogurt Bars at least six hours in the freezer, but ideally, let them set overnight. Rushing the freezing process often leads to bars that are too soft or easily crumble when you attempt to cut them.
Are there alternatives to graham cracker crumbs for the crust?
Absolutely. You can use ground oat flour mixed with sugar and butter for a simple base, or finely crushed vanilla wafer cookies work exceptionally well too. Ensure whatever base you use is pressed very firmly into the dish to prevent it from separating from the yogurt layer.
Can I use a low-sugar sweetener instead of powdered sugar?
Yes, you can easily substitute the powdered sugar with a powdered erythritol or monk fruit blend. Ensure the substitute is finely powdered so it dissolves fully and does not create a gritty texture in the frozen yogurt mixture.
These Peanut Butter Frozen Yogurt Bars are more than just a dessert; they are a declaration of independence from the heat, a high-protein treat that satisfies every craving. Whether you’re looking for a simple snack or a crowd-pleasing party dessert, these chilled squares will definitely steal the show. Now go forth, conquer your kitchen, and stock your freezer with these marvelous creations!
The Story Behind the Ultimate No-Bake Treat
We’ve all been there: it’s the middle of July, the heat index is trying to kill your enthusiasm, and the mere thought of turning on the oven feels like an act of betrayal against your air conditioning unit. Yet, the dessert cravings persist, strong and demanding. This is exactly how these wonderful Peanut Butter Frozen Yogurt Bars were born—out of pure necessity and a refusal to sacrifice creamy indulgence just because it was too hot outside to bake a cake. These treats are the absolute definition of low-effort, high-reward snacking.
Achieving Optimal Creaminess: The Ingredient Breakdown
The secret to these bars lies in choosing the right base. Using plain, full-fat Greek yogurt provides the necessary density and tanginess that elevates the flavor far beyond standard ice cream. Combined with rich, natural peanut butter, the mixture becomes unbelievably smooth and almost cheesecake-like once frozen. We skip the granulated sugar in the filling, opting for the subtle, deep sweetness of pure maple syrup instead. This combination not only tastes incredible but also helps prevent the bars from turning into impenetrable blocks of ice.
- For the Crust:
- 1 ½ cups finely crushed graham crackers
- ¼ cup melted butter or plant-based alternative
- 2 tablespoons brown sugar (optional, for extra depth)
- For the Filling:
- 3 cups full-fat plain Greek yogurt
- ¾ cup smooth, natural peanut butter
- ½ cup pure maple syrup
- 1 teaspoon vanilla bean paste
Crafting the Crunchy Base
Start by preparing your foundation. In a medium bowl, thoroughly mix the crushed graham crackers, melted butter, and the optional brown sugar until the mixture is fully cohesive and damp, resembling wet beach sand. Line a 9×5 inch loaf pan with parchment paper, ensuring the paper overhangs the sides—this acts as your crucial handle for removal later. Press the cracker mixture firmly and evenly into the bottom of the pan. Use the bottom of a measuring cup or a flat spatula to really pack it down. Slide the crust into the freezer for ten minutes while you prepare the glorious filling.
Mixing and Freezing Your Peanut Butter Delight
In a large mixing bowl, combine the Greek yogurt, peanut butter, maple syrup, and vanilla bean paste. Use a sturdy whisk or an electric mixer to blend these ingredients until the filling is perfectly smooth, homogeneous, and streak-free. Taste test a tiny bit to ensure the sweetness level is right for you, adjusting the maple syrup if necessary. Pour the creamy mixture directly over your chilled crust, spreading it gently with a rubber spatula to create an even top layer. Return the loaf pan to the freezer for a minimum of four to six hours. For the best slicing texture, letting them freeze overnight is highly recommended.
Serving Suggestions and Pro Tips
When you are ready to serve, pull the pan out of the freezer and use the parchment paper overhang to lift the entire block onto a cutting board. Crucially, let the block sit at room temperature for about five to ten minutes before slicing. This brief rest period softens the edges slightly, making it much easier to cut neat, clean bars without cracking the crust. If you plan to serve them later, immediately re-wrap the individual portions and place them back in the freezer. These treats are fantastic on their own, but a sprinkle of sea salt before serving truly amplifies the rich peanut butter flavor.
Conclusion for Peanut Butter Frozen Yogurt Bars
These Peanut Butter Frozen Yogurt Bars truly stand out as the ultimate no-bake dessert solution for those sweltering summer months. We successfully combined the tangy richness of Greek yogurt with the savory sweetness of peanut butter, all balanced upon a delightful, crunchy, buttery crust. This incredibly easy recipe proves that you do not need complex cooking techniques or intimidating ingredients to achieve absolute dessert perfection. They are easy to prepare, perfect for batch cooking and meal prepping snacks, and universally loved by everyone who tries them. Stop battling the heat in your kitchen and start enjoying these cool, creamy treats immediately, satisfying your deepest cravings with minimal effort.
Print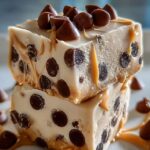
Peanut Butter Frozen Yogurt Bars
- Total Time: 35 minutes
- Yield: 4 servings 1x
Description
Crunchy, buttery graham meets smooth, tangy Greek yogurt swirled with rich peanut butter. These no-bake bars (after the quick crust bake!) are the perfect cool treat.
Ingredients
- 1 1/2 cups crushed graham crackers
- 1/4 cup unsalted butter, melted
- 3 cups plain Greek yogurt (full-fat recommended)
- 1/2 cup creamy peanut butter
- 1/4 cup honey or maple syrup
- 1 teaspoon alcohol-free vanilla extract
- 1/4 teaspoon fine sea salt
Instructions
- Step 1: Preheat the oven to 350°F (175°C) and line an 8×8 inch baking pan with parchment paper, leaving an overhang on two sides for easy removal. In a medium bowl, combine the crushed graham crackers and melted butter until evenly moistened. Press the mixture firmly and evenly into the bottom of the prepared pan to form the crust, then bake for 8 minutes. Remove and let cool completely.
- Step 2: While the crust cools, prepare the yogurt filling. In a large bowl, combine the Greek yogurt, peanut butter, honey (or maple syrup), vanilla powder, and salt. Use a whisk or spatula to mix thoroughly until the mixture is completely smooth and uniform in color.
- Step 3: Pour the peanut butter yogurt mixture over the cooled graham cracker crust. Use an offset spatula to spread the mixture evenly across the pan, ensuring the top is smooth. Gently tap the pan on the counter a couple of times to release any air bubbles.
- Step 4: Place the pan in the freezer. Freeze the bars for a minimum of 4 to 6 hours, or preferably overnight, until they are completely solid and firm to the touch.
- Step 5: When ready to serve, use the parchment paper overhang to lift the solid block of frozen yogurt out of the pan. Let it sit at room temperature for 5 to 10 minutes to soften slightly, then use a sharp knife dipped in hot water to cut the block into 9 or 16 bars. Store any leftovers in an airtight container in the freezer.
Notes
- Store leftover bars tightly wrapped or in an airtight container for up to two months, separating layers with parchment if stacking them.
- For the cleanest slices, allow the frozen slab to sit at room temperature for precisely 8 to 10 minutes before using a long, sharp knife dipped in hot water to cut the bars.
- Using full-fat Greek yogurt is essential as the higher fat content prevents the bars from freezing too icy and maintains a smoother, creamier texture.
- Elevate the bars by drizzling the cut pieces with melted dark chocolate or a sprinkle of chopped salted peanuts just before serving.
- Prep Time: 15 minutes
- Cook Time: 20 minutes
- Method: Stovetop
- Cuisine: American
Nutrition
- Serving Size: 1 Bar (approx. 55g)
- Calories: 205
- Sodium: 125mg
- Fat: 11g
- Saturated Fat: 3.5g
- Trans Fat: 0g
- Protein: 18g
FAQs
How long can I store Peanut Butter Frozen Yogurt Bars?
You can store these homemade frozen yogurt treats easily for up to three months, provided you store them correctly. Once the bars are completely frozen, slice them into individual servings using a sharp, hot knife. Wrap each bar tightly in plastic wrap, then place all the wrapped bars into a large airtight container or a freezer-safe zip-top bag. Storing them individually prevents them from sticking together and reduces freezer burn dramatically. This method ensures you always have a satisfying, cold snack ready to grab whenever the craving strikes, keeping them fresh and delicious for weeks on end.
Can I make these Peanut Butter Frozen Yogurt Bars dairy-free?
Absolutely, adapting this recipe for a dairy-free lifestyle is simple and yields fantastic results. Substitute the standard Greek yogurt with a full-fat, unsweetened coconut yogurt or a high-quality almond milk yogurt. Ensure the substitution maintains a thick, creamy texture, as watery substitutes will result in overly icy bars. Additionally, use a plant-based butter alternative for the graham cracker crust instead of traditional dairy butter. The structural integrity and delicious flavor remain intact, offering a wonderfully creamy dessert that everyone can enjoy regardless of their specific dietary preferences.
What are the best topping alternatives for these frozen yogurt treats?
The beauty of these simple frozen yogurt bars lies in their versatility regarding toppings and final touches. While a simple peanut butter drizzle is classic and always a winner, consider melting dark chocolate chips with a tiny bit of coconut oil to create a beautiful, crackly chocolate shell over the top before the final set. Alternatively, you could sprinkle mini chocolate chips, chopped salted peanuts, or even a dusting of cocoa powder for added richness. For a touch of fruitiness, swirling a small amount of warm fruit preserves, like seedless raspberry or apricot, into the yogurt mix before freezing adds a vibrant complexity to the overall flavor profile.
Why did my frozen yogurt mixture become too icy or crystallized?
Icy crystallization typically occurs when the yogurt mixture contains too much water or insufficient fat and natural sugar stabilizers. To prevent this outcome, always utilize full-fat Greek yogurt, as the higher fat content inhibits large ice crystal formation and promotes a delightfully smoother, creamier texture. Ensure you measure the liquid sweetener accurately, because maple syrup acts as a natural antifreeze, helping the texture remain soft when frozen. If your yogurt base seemed overly thin initially, you could gently mix in a tablespoon of powdered milk or a plant-based protein powder to absorb excess moisture before pouring and freezing, guaranteeing that ideal bar consistency.