The smell of freshly baked bread is the ultimate comfort, but let’s be honest, sourdough often feels like culinary sorcery reserved for professionals. We crack the code today. ThisBest Ever Sourdough Bread Recipe (Step-by-Step)guarantees the open crumb and shattering crust you crave.
Forget the fear of flat loaves or gummy centers. We streamline the often-complex process, turning that intimidating starter into your trusty, bubbly assistant. Get ready to pull the most magnificent, deeply flavorful artisan bread right from your own oven.
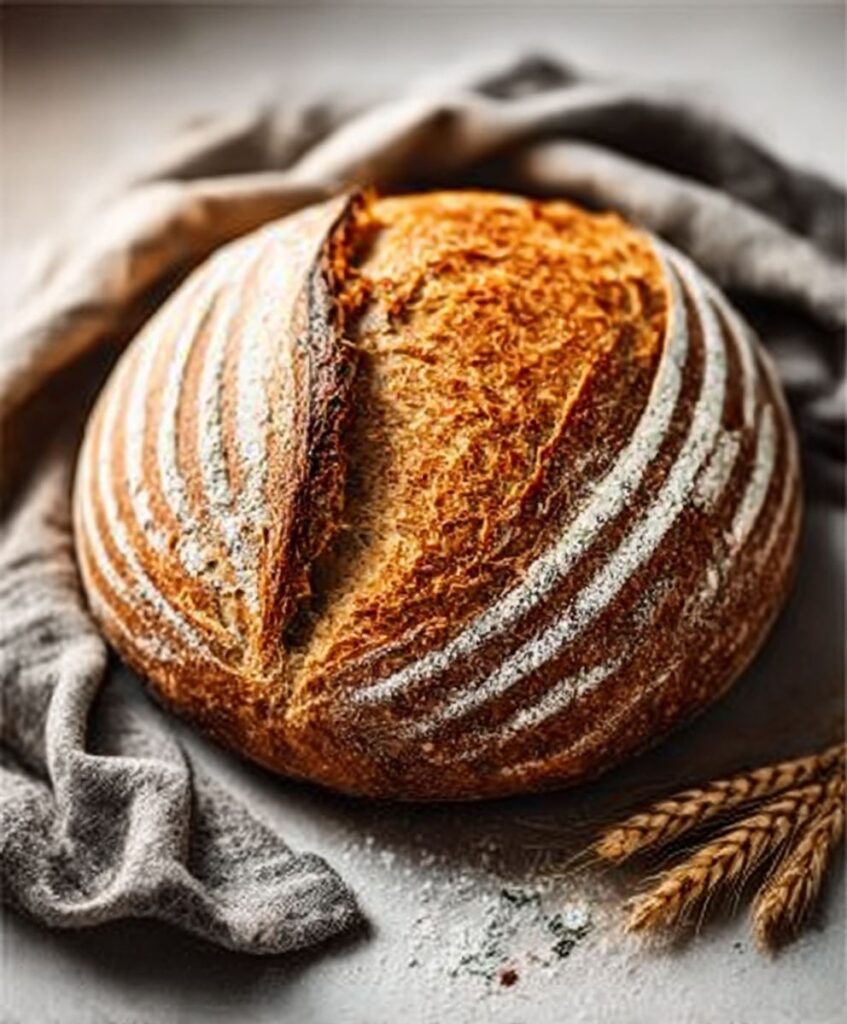
- Achieve an impressively deep caramel crust using a simple Dutch oven technique right in your home oven for professional results.
- The flavor profile is delightfully tangy and complex, requiring only three common ingredients plus your trusty, well-maintained starter.
- This method simplifies the folding process, making this sophisticated artisan loaf manageable even for novice bakers determined to succeed.
- Enjoy incredible versatility, perfect for dipping into rich olive oil, pairing with sharp cheeses, or building the ultimate gourmet sandwich.
The Tangled Tale of the Sourdough Starter and the First Mix
Many aspiring bakers fail not because of the baking itself, but because they treat the sourdough starter like a high-maintenance pet that demands attention at 3 AM. Relax! Your starter, which is essentially captured wild yeast and bacteria, thrives on consistency, not panic. Before attempting thisBest Ever Sourdough Bread Recipe (Step-by-Step), ensure your starter, often called “Fred” or “Bertha” in baker circles, is active, bubbly, and passes the float test.
The float test is crucial: drop a small spoonful of starter into a glass of water. If it floats, your starter is ready to go to work, full of the gas needed to lift your dough to legendary heights. If it sinks like a bad idea, feed it and wait a few more hours. Starting with a weak starter is the number one reason sourdough loaves come out dense and flat. Do not rush this step. Once you confirm your starter is strong, we move onto the Autolyse.
Understanding Autolyse and Bulk Fermentation
The term ‘Autolyse’ sounds complicated, but it is simply resting your flour and water mixture before adding the salt and starter. This rest allows the flour to fully hydrate and the gluten structure to begin forming naturally without manual manipulation. This step drastically reduces the kneading time and improves the extensibility of the dough later on. Mix the water and flour until just combined—you want no dry pockets of flour left.
Cover this shaggy dough mass and let it sit for 30 to 60 minutes. After the Autolyse, you introduce the starter and the salt. Salt is critical for flavor and, importantly, it helps strengthen the gluten structure and controls the fermentation rate. Mix thoroughly until the dough is unified. Now begins the Bulk Fermentation phase, which is less about kneading and more about building strength through gentle, periodic folds. This is where the magic really happens—the fermentation process develops the complex flavor and the necessary rise for that perfect open crumb structure. Over the next 3 to 5 hours, you will perform four sets of stretch and folds every 30 minutes, giving the dough a short break in between each set.
Ingredients for Best Ever Sourdough Bread Recipe (Step-by-Step)
Here’s what you’ll need to make this delicious dish:
- Active Sourdough StarterThis is the engine of your bread; ensure it is fed, bubbly, and passes the float test before use.
- High-Quality Bread FlourThe high protein content (typically 12% or higher) is essential for developing strong gluten networks that trap gases.
- Filtered WaterUse filtered or purified water rather than tap water, as chlorine can sometimes inhibit the activity of the natural yeast and bacteria.
- Fine Sea SaltSalt not only enhances flavor dramatically but also helps tighten the gluten structure and controls the speed of fermentation.
The full ingredients list, including measurements, is provided in the recipe card directly below.
How to Make Best Ever Sourdough Bread Recipe (Step-by-Step)
Follow these simple steps to prepare this delicious dish:
Step 1: Autolyse and Initial Mixing
In a large mixing bowl, thoroughly combine the bread flour and the filtered water until you see no dry flour remaining. Cover the bowl loosely and let this shaggy mass rest for 60 minutes at room temperature. After the rest, gently dimple the dough surface and incorporate the active starter, mixing with your hands until the starter is evenly distributed and the dough begins to feel cohesive. Rest for 15 minutes.
Step 2: Salt Integration and Initial Folds
Add the measured fine sea salt and use the “Rubaud” method (wetting your hand and mixing firmly in a squeezing motion) to integrate the salt completely. This should take about five minutes. Immediately begin the first set of stretch and folds. Perform four sets of stretch and folds, waiting 30 minutes between each set. For each set, gently stretch the dough from the sides, folding it over the center, rotating the bowl 90 degrees, and repeating until you have completed a full rotation.
Step 3: Bulk Fermentation and Pre-Shaping
After the four sets of folds are complete, cover the bowl and let the dough bulk ferment until it increases in volume by 30 to 50 percent—this usually takes between 3 to 6 hours depending on your kitchen temperature. Once sufficiently risen, turn the dough out onto a lightly floured surface. Gently pre-shape the dough into a loose round using a bench scraper, then allow it to rest uncovered for 30 minutes (the bench rest).
Step 4: Final Shaping and Cold Proofing
Shape the dough tightly into a round or oval using a tension-building technique. Work quickly but gently to avoid degassing the dough completely. Transfer the shaped loaf, seam-side up, into a heavily floured banneton basket or a bowl lined with a floured cloth. Cover the basket tightly with plastic wrap and place it in the refrigerator for the cold proofing stage. This proof should last between 12 and 18 hours; the cold temperature deepens the flavor and makes the dough easier to score.
Step 5: Baking the Perfect Loaf
Preheat your oven and a Dutch oven inside to 500°F (260°C) for at least one hour. Carefully remove the hot Dutch oven. Flip the cold loaf out of the banneton onto a piece of parchment paper. Score the top of the loaf quickly and confidently with a razor blade or sharp knife. Lower the loaf and parchment paper into the hot Dutch oven, cover it, and immediately return it to the oven. Bake covered for 20 minutes. Reduce the temperature to 450°F (230°C), remove the lid, and bake for another 25 to 35 minutes until the crust is a deep mahogany color. Transfer the finished bread to a wire rack to cool completely before slicing.
Allow the bread to cool for at least two hours before slicing to prevent a gummy interior. Serve immediately with high-quality olive oil and a sprinkle of herbs for the perfect finishing touch.
Troubleshooting Common Sourdough Hiccups
Sourdough is notorious for testing patience, and even seasoned bakers occasionally encounter unexpected issues. If you pull a flat loaf out of the oven, do not despair; it usually comes down to one of two things: a weak starter or insufficient gluten development during the bulk fermentation. If your starter was definitely strong, you likely needed more folding or more time during the bulk rise to build strength. A dough that spreads out like a pancake instead of holding its shape during the final proof needs more structure.
Another common issue is the gummy crumb, where the interior feels wet, sticky, or dense. This often indicates one of two things: either the bread was sliced before it had cooled properly (cooling allows residual steam to finish the cooking process), or it needed more time in the oven. When checking for doneness, aim for an internal temperature of 208°F to 210°F (98°C to 99°C). Never slice warm sourdough—it’s torture, yes, but essential for the best texture.
How Temperature Affects Your Perfect Loaf
Temperature is the invisible, yet immensely powerful, ingredient in making the perfect artisan loaf. Remember that the wild yeast in your starter is very sensitive to environmental changes. A warmer kitchen dramatically speeds up fermentation, requiring less time for the bulk rise and folding stages. A cool kitchen, conversely, can slow the process down considerably. For example, a bulk rise that takes 4 hours at 78°F (25°C) might take 8 hours at 68°F (20°C).
Maintaining a consistent environment, especially during the bulk fermentation phase, gives you predictable results. If your kitchen is cold, try using a proofing box or placing your dough near a pilot light or on top of a turned-off oven with the light on. Consistency is key to mastering this recipe and achieving predictable results every time you bake.
The Benefits of Long Cold Proofing
While the steps detail a long cold proof, many new bakers wonder why this extended chill period is necessary. The cold proofing stage does two major things for your dough. First, it slows down the yeast activity dramatically, allowing the bacteria to continue working slowly. This extended period of slow fermentation is what creates the deep, complex, and satisfying tangy flavor associated with traditional sourdough bread.
Second, and perhaps more importantly for the appearance, the cold hardens the outer layer of the dough. This makes the dough much easier to handle and score precisely once you take it out of the refrigerator. Scoring a very cold loaf gives you a cleaner cut, ensuring the oven spring happens exactly where you direct it, creating those beautiful, signature “ears” on your loaf.
Why is my dough too sticky to handle during shaping?
Excessive stickiness usually indicates one of two issues: either your hydration level (the ratio of water to flour) is very high, or you have not built up enough dough strength through the stretch and fold process. If the hydration is high, lightly dust your work surface and hands with flour during shaping. If strength is the issue, ensure you are creating enough surface tension in your final shaping step.
Can I skip the Dutch oven and just bake on a baking sheet?
Technically, yes, but do not expect the same quality result. The Dutch oven acts as a closed, steam-filled chamber, trapping the moisture released by the dough. This trapped steam keeps the crust soft during the initial high-heat bake, allowing the loaf to expand fully (the “oven spring”). Once you remove the lid, the dough sets into a gorgeously crisp crust. Baking on a sheet pan without supplemental steam will often result in a thicker, duller crust and less overall volume.
Sharing Your Perfect Sourdough Creation
Now that you have successfully baked theBest Ever Sourdough Bread Recipe (Step-by-Step), you own a magnificent, crusty loaf. The deep aroma and complex sour flavor are your rewards for mastering patience and the science of wild yeast. Remember, practice makes perfect when dealing with live cultures, so embrace the journey and the occasional slightly wonky loaf.
Share this stunning creation with friends, slice it thick for avocado toast, or turn the leftover heel into croutons. This bread is the perfect canvas for almost any meal, confirming that truly great things often take time and a little bit of loving dedication.
The journey into baking sourdough is not merely about combining flour and water; it is a commitment, a test of patience, and often, a descent into delicious madness. For years, I treated my bread baking like a casual fling, expecting instant gratification. I failed spectacularly, resulting in flat, dense discs that tasted mildly of disappointment and aggressively of uncooked dough. But persistence pays off, and after countless hours staring critically into the glass jar housing my beloved, bubbling starter—whom I affectionately call Steve—I finally cracked the code to achieving the magnificent goal: theBest Ever Sourdough Bread Recipe (Step-by-Step).
This recipe transforms baking from a chore into a rewarding ritual. We are chasing that perfect open crumb, that deeply caramelized crust, and that signature tangy flavor that makes store-bought bread weep silently in its plastic wrapper. Forget everything you thought you knew about difficult baking; we are making artisan-quality bread right in your kitchen, requiring nothing more than four ingredients, proper timing, and a healthy dose of culinary optimism.
The Sourdough Starter Saga
Your starter is the heart and soul of this operation. If you do not have an active, happy starter, you cannot make this tangy bread. A healthy starter should double in size about four to six hours after being fed and have plenty of visible bubbles. Think of it as a small, hungry pet that needs consistent attention and high-quality flour.
Feeding Your Ferocious Friend
If your starter lives in the refrigerator, pull it out 12 hours before mixing your dough. Give it a couple of feedings using equal parts starter, flour (a 50/50 mix of all-purpose and whole wheat works beautifully), and lukewarm filtered water. We need it active, peaking, and ready to work its magic. Remember, the stronger your starter is, the better the final rise on your rustic loaf will be. A sleepy starter makes a sleepy loaf, and nobody wants to eat sleepy bread.
What You Need for the Ultimate Loaf
Ingredients
- 100 grams active, ripe sourdough starter (100% hydration)
- 350 grams filtered water (lukewarm, about 85°F)
- 500 grams high-quality bread flour (at least 12% protein)
- 10 grams fine sea salt
Equipment
- Large mixing bowl
- Dutch oven (or heavy pot with a tight-fitting lid)
- Digital kitchen scale (essential for accuracy!)
- Bench scraper
- Proofing basket (banneton) or a bowl lined with a heavily floured tea towel
Mixing, Folding, and the Rise to Glory
The total timeline for this process spans about 18 to 24 hours, but most of that time is hands-off resting. Embrace the long wait—it’s where the flavor develops.
Step 1: The Autolyse and Initial Mix (The Sticky Phase)
In your large bowl, combine the 350 grams of water and 100 grams of active starter. Whisk lightly until the starter dissolves. Add the 500 grams of flour and mix only until no dry flour remains. Do not knead yet; this is just hydration. Cover the bowl with plastic wrap or a lid and let it rest for 30 minutes. This process, called the autolyse, allows the flour to fully hydrate and gluten development to begin before the salt interferes.
Step 2: Incorporating the Salt
After the autolyse, sprinkle the 10 grams of salt over the dough. Using wet hands, pinch and fold the dough repeatedly for about two minutes. The dough will feel sticky and loose, but keep going until the salt is fully incorporated and you feel the dough start to gain minimal structure. Cover again and let rest for 30 minutes.
Step 3: The Bulk Fermentation and Folds
Bulk fermentation is the most critical time for developing strength and flavor. Over the next three hours, you will perform four sets of ‘stretch and folds,’ separated by 30-minute rest periods. This technique builds gluten without aggressive kneading.
- Folds 1 & 2 (Hour 1 & 1.5):Wet your hands. Grab one side of the dough, stretch it gently upward, and fold it over the center. Rotate the bowl and repeat this process for all four sides.
- Folds 3 & 4 (Hour 2 & 2.5):The dough will be much stronger now. Handle it more gently.
After the final fold, let the dough rest, covered, for another 1.5 to 3 hours at room temperature (72–76°F). The dough should increase in volume by about 30–50% and look noticeably bubbly. This timing is highly dependent on your kitchen temperature.
Step 4: Pre-Shaping and Rest
Lightly flour your counter. Gently turn the dough out onto the surface. Using your bench scraper, fold the edges in on themselves to form a rough ball. Flip the dough seam-side down and let it rest, uncovered, for 20 minutes. This relaxes the gluten before the final shaping.
Step 5: Final Shaping and Cold Proofing
Shape the dough into a tight round or oval loaf, applying tension to the outer skin. Work quickly and confidently. Place the dough seam-side up into your generously floured proofing basket. Cover the basket tightly with plastic and place it in the refrigerator for 12 to 16 hours. This cold proof deepens the flavor and firms up the dough, making it much easier to score and handle before baking.
Baking the Best Ever Sourdough Bread Recipe (Step-by-Step)
Step 6: Preheat and Score
About 45 minutes before you plan to bake, place your Dutch oven and its lid into your oven. Preheat the oven to 500°F (260°C). This extended preheat is crucial for getting a great spring and crust. Carefully remove the cold dough from the refrigerator. Place a sheet of parchment paper over the dough and invert the basket onto the counter. The loaf should fall out onto the paper.
Using a sharp razor or lame, score the top of the dough quickly. A single deep slash or a decorative pattern allows steam to escape, controlling where the dough expands.
Step 7: The Steam Phase (Lid On)
Carefully remove the blazing hot Dutch oven from the oven. Using the parchment paper as a sling, gently lower the dough into the pot. Place the lid back on immediately and return the pot to the oven. Reduce the heat to 450°F (230°C). Bake with the lid on for 20 minutes. The steam trapped inside the pot creates that beautiful, thin, crispy crust.
Step 8: The Browning Phase (Lid Off)
Remove the lid and continue baking for another 25 to 30 minutes until the crust is a deep golden brown mahogany color. The internal temperature should register at least 208°F (98°C).
Step 9: Cooling (The Hardest Part)
Remove the loaf from the Dutch oven and place it on a wire rack. You must resist the urge to cut into it immediately. The bread is still cooking internally and cooling it completely for at least two hours prevents a gummy texture. This wait is brutal, but essential for the perfect artisan bread crumb.
Perfecting the Cooking Process

For maximum efficiency and the perfect result, ensure your Dutch oven is fully preheated to 500°F before loading the dough. Schedule your bulk fermentation folds around routine kitchen tasks, ensuring you complete the final, critical shaping step right before the evening cold proof. This timing streamlines the entire complex process.
Add Your Touch
Feel free to customize this artisan bread recipe after the initial mixing phase. Try incorporating 50 grams of toasted seeds like sesame or pumpkin seeds during the first set of stretch and folds for texture, or mix in grated aged cheddar and jalapeños for a savory kick. You could also substitute 50 grams of bread flour with whole wheat or rye flour for a deeper, nuttier flavor profile.
Storing & Reheating
Once completely cooled, store your beautiful homemade loaf at room temperature in a paper bag to maintain crust quality. Avoid plastic bags, which trap moisture and lead to a soft crust. To refresh a day-old slice, lightly mist the crust with water and bake for 5–7 minutes at 350°F (175°C); this revives its delightful crunch.
When I first served this gorgeous loaf, my neighbor demanded the Best Ever Sourdough Bread Recipe (Step-by-Step) on the spot, confessing she had tried and failed for months to get this exact tangy flavor and height.
Expert Tips for a Faultless Loaf
-
Always use the float test: drop a small piece of starter into water. If it floats, it is active enough to lift your dough beautifully.
-
Use lukewarm water during the initial mix. Cold water slows fermentation dramatically, while hot water can shock and kill your active cultures.
-
Do not be afraid to bake the crust dark. The deep mahogany color indicates maximum flavor development and a truly crispy texture.
Frequently Asked Questions About Sourdough Baking
How do I know when bulk fermentation is finished?
Look for signs that the dough is feeling airy and jiggly, not dense. It should increase in volume by 30 to 50% and bubble visibly around the edges. When you poke it gently, the indentation should slowly rebound about halfway.
Can I substitute all-purpose flour for bread flour?
While you can, bread flour has a higher protein content, which is crucial for developing the strong gluten needed to trap the gas and give the bread its signature height and open crumb structure. Using only all-purpose flour may result in a slightly flatter loaf.
What if my oven does not reach 500°F?
Preheat your oven and Dutch oven to the highest safe temperature your oven allows, typically 475°F (245°C). Ensure you maintain the required baking times, but monitor the crust carefully to prevent burning at lower temperatures.
How long does a freshly baked sourdough loaf last?
Stored properly in a paper bag at room temperature, this rustic loaf will retain excellent quality for 3 to 4 days. You can also slice the entire cooled loaf and freeze the slices in an airtight bag for up to three months, toasting them directly from the freezer.
Why is my crumb gummy after cooling?
A gummy crumb is almost always caused by cutting the loaf before it has completely cooled. The starches need time to set, which takes a minimum of two hours. Patience is truly the final ingredient in this fantasticsourdough bread recipe.
Conclusion for Best Ever Sourdough Bread Recipe (Step-by-Step)
You have wrestled with the wild yeast, perfected your stretch-and-folds, and now stand victorious with the perfect loaf cooling on your rack. Mastering the Best Ever Sourdough Bread Recipe (Step-by-Step) is more than just following instructions; it’s an initiation into a club where the aroma of freshly baked bread reigns supreme. Remember that great sourdough is built on consistency, patience, and the willingness to learn from the occasional flat loaf. We hope this comprehensive guide empowers you to bake confidently, consistently producing loaves with incredible chew, phenomenal flavor, and a crust that sings its glorious song. Enjoy the unparalleled satisfaction of slicing into your homemade masterpiece!
Print
Best Ever Sourdough Bread Recipe (Step-by-Step)
- Total Time: 35 minutes
- Yield: 4 servings
Description
Master the perfect sourdough loaf! This recipe uses autolyse and four sets of stretch-and-folds to guarantee a complex, airy crumb and superior crust. Detailed steps and full nutrition guide provided.
Ingredients
- Active Sourdough Starter (levain): 100 grams
- High-Protein Bread Flour: 400 grams
- Whole Wheat Flour: 50 grams
- Lukewarm Water (approximately 90°F / 32°C): 350 grams
- Fine Sea Salt: 10 grams
- Rice Flour (for dusting banneton): As needed
Instructions
- Step 1: The Mix and Autolyse. In a large bowl, whisk the starter and water together until dissolved. Add both flours and mix thoroughly with your hand until no dry flour remains (this is the shaggy mass). Cover and let rest for 30 minutes (autolyse). Next, sprinkle the salt over the dough and wet your hand; squeeze and fold the dough for 2 minutes until the salt is fully incorporated.
- Step 2: Bulk Fermentation and Strength Building. Over the next 3 to 4 hours, perform a series of four "stretch and folds" every 30 minutes. Gently stretch the dough up from one side and fold it over itself (turning the bowl 90 degrees each time). After the folds are complete, allow the dough to continue bulk fermenting until it has increased in volume by about 30-50% and feels bubbly and airy.
- Step 3: Shaping and Cold Proofing. Gently turn the dough out onto a lightly floured surface and pre-shape it into a loose round. Rest for 20 minutes (bench rest). Flip the dough, shape it tightly into a boule or batard, and place it seam-side-up into a banneton heavily dusted with rice flour. Cover the banneton tightly and transfer it to the refrigerator to cold proof for 12 to 18 hours.
- Step 4: Preheat the Oven and Dutch Oven. One hour before baking, preheat your oven to 500°F (260°C) with a Dutch oven placed inside. Ensure the Dutch oven is fully hot before proceeding to the next step.
- Step 5: Score and Bake. Carefully invert the cold dough onto a piece of parchment paper. Use a sharp razor (lame) to score the top deeply. Carefully transfer the dough and parchment into the hot Dutch oven, cover with the lid, and reduce the oven temperature to 475°F (245°C). Bake covered for 20 minutes, then remove the lid and continue baking for an additional 25-30 minutes until the crust is deep golden brown.
- Step 6: Cooling. Remove the loaf from the Dutch oven and transfer it to a wire rack. Allow the bread to cool completely (at least 2 hours) before slicing to ensure the internal crumb sets properly.
Notes
- For optimum freshness, store the cooled loaf cut-side-down on a wooden board or wrapped loosely in a clean linen towel at room temperature, as refrigeration rapidly dries out the crumb.
- To restore a crisp crust, briefly spritz the cooled loaf with water and reheat it on a bare oven rack at 350°F (175°C) for 8 to 10 minutes.
- This slightly rustic loaf shines when served alongside a cheese board or used as the perfect vehicle for a classic avocado toast topped with everything bagel seasoning.
- Chef’s Tip: Do not slice the bread prematurely; the required two-hour minimum cooling time allows internal steam to dissipate and sets the starch structure, guaranteeing a light, non-gummy crumb.
- Prep Time: 15 minutes
- Cook Time: 20 minutes
- Method: Stovetop
- Cuisine: American
Nutrition
- Serving Size: 1 slice (approx. 75g)
- Calories: 155
- Sodium: 340mg
- Fat: 0.5g
- Saturated Fat: 0g
- Trans Fat: 0g
- Protein: 0g
FAQs
Diving into the world of natural leavening often brings up a ton of questions. We’re here to help demystify the process and ensure your bread journey is successful, addressing common pitfalls and maximizing your rise.
Why isn’t my sourdough starter activating and rising properly?
Starters are moody little beasts, aren’t they? If your bubbly friend is suddenly flatlining, the most common culprit is temperature. Sourdough starters thrive in a warm environment, ideally between 70-75°F. Secondly, ensure you are feeding it reliably with a 1:1:1 ratio (starter:flour:water) and using unbleached, high-quality flour. Avoid using chlorinated tap water; the chlorine can inhibit yeast activity. Consistency is truly key for achieving that vigorous, ready-to-bake starter needed for the Best Ever Sourdough Bread Recipe (Step-by-Step). Patience, consistent feeding, and warmth will bring the activity back.
How do I know when the dough is sufficiently proofed before baking?
Determining perfect proofing often feels like magic, but we use the legendary poke test! Gently poke the side of the dough with a wet finger. If the indentation springs back immediately, it needs more time—it’s under-proofed. If it springs back slowly, leaving a slight dimple—that’s the sweet spot, indicating it is ready for baking. If the indentation stays put and doesn’t spring back at all, you have unfortunately over-proofed it, which can lead to a flat loaf. Mastering this technique ensures the spectacular oven spring critical to this amazing sourdough bread recipe.
Can I use different flours when following this amazing sourdough bread recipe?
Absolutely, you can experiment with flour variations, but approach this with caution when creating your ultimate sourdough loaf. This particular recipe works best with high-protein bread flour mixed with a small portion of whole wheat or rye for flavor depth and nutritional complexity. Remember that whole grain flours absorb significantly more water than standard white flour, so you might need to increase the hydration slightly to reach the correct dough consistency and prevent dense results. Always make small, controlled adjustments when substituting flours because the absorption rate drastically affects the final texture and open crumb structure.
What is the secret to getting a deep, golden crust using the Best Ever Sourdough Bread Recipe (Step-by-Step)?
The deep, glorious crust that makes everyone jealous comes down to two essential elements: extreme heat and trapped steam. To achieve that stunning color and texture using the Best Ever Sourdough Bread Recipe (Step-by-Step), you must bake the bread initially in a very hot vessel, like a Dutch oven, with the lid firmly in place for the first 20 minutes. This crucial step traps the moisture released by the dough, creating maximum steam and delaying crust formation. When you remove the lid, the dough sets quickly, achieving maximum oven spring and developing that signature golden-brown, crackling exterior.