The moment the temperature drops, I start plotting my oven usage like a cozy villain, usually resulting in a mountain of flour dust. This year, forget the complicated stuff; we’re diving into pure, buttery nostalgia with the ultimateThumbprint Heart Cookies Recipe – Winter Cookies.
These aren’t just baked goods; they are edible hugs, featuring a soft shortbread base and a jewel-toned heart of sweet fruit preserves that just scream winter comfort.
- Effortless Elegance: This simple shortbread base comes together quickly, requiring minimal chill time and zero complicated shaping techniques for stress-free baking.
- Nostalgic Flavor Profile: Enjoy the perfect balance of rich, vanilla-infused butter and bright, tangy fruit jam that melts beautifully in your mouth with every bite.
- Visually Stunning Appeal: The vibrant fruit centers contrast beautifully with the golden shortbread, making these cookies look gorgeous on any holiday platter or cozy table setting.
- Highly Customizable Delight: Easily swap out the strawberry or raspberry preserves for apricot, cherry, or even lemon curd to tailor the flavor to your personal seasonal preference.
I remember the first time I attempted a batch of traditional holiday cookies. It was a disaster involving dough stuck to the ceiling fan and a smoke detector singing opera. My aspirations of becoming a domestic goddess crumbled faster than over-baked biscotti. That is precisely why I fell head over heels for the simplicity of the thumbprint cookie—specifically, the heart version. They look sophisticated, but their creation is wonderfully low-stress, provided you avoid the ceiling fan incident.
The beauty of thisThumbprint Heart Cookies Recipe – Winter Cookieslies in its forgiving nature. It’s essentially a shortbread recipe masquerading as a fancy pastry chef’s creation. Shortbread demands respect, yes, but it doesn’t demand perfection. It requires quality butter, the patience to cream it properly, and maybe a quiet promise that you won’t overwork the dough. When you pull these golden beauties from the oven, dusted lightly with powdered sugar, they don’t just look good; they look like you know exactly what you’re doing, even if five minutes ago you were Googling, “Is this dough supposed to look like sand?” (Spoiler: initially, yes.)
The Secret Weapon: Butter, Butter, Butter
Listen, if you are going to make a shortbread cookie, you absolutely cannot skimp on the butter quality. Think of the butter as the foundation of your cookie empire. If you use sad, flavorless butter, your entire structure collapses into mediocrity. Use high-quality, unsalted butter that is truly softened—not melted, not fridge-hard, but perfectly room temperature. When you poke it, your finger should leave a slight indentation without sinking into an oily mess. This temperature dance is critical because it allows the butter to capture air when creaming with the sugar, leading to that coveted light, melt-in-your-mouth texture.
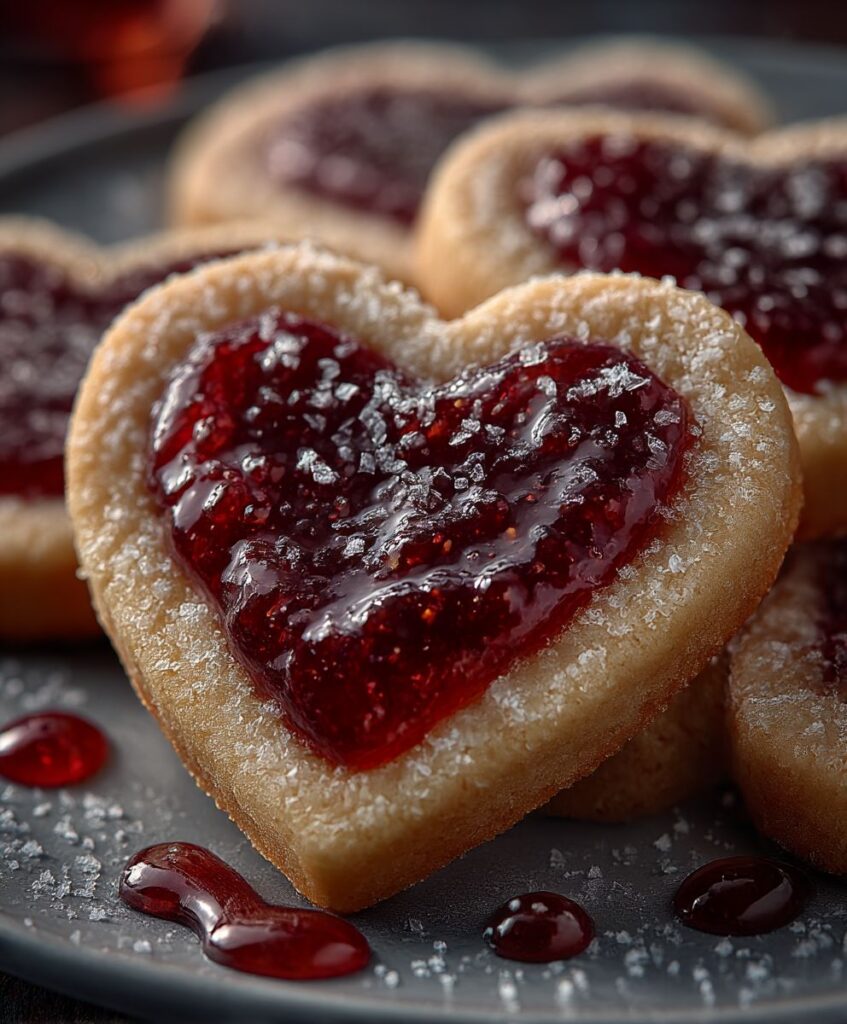
The ‘heart’ component comes from a clever little trick during shaping. While traditional thumbprints use, well, a thumb, we are going to use the handle end of a wooden spoon or even a small measuring spoon to create a slightly deeper indentation, perfect for holding the jam. Once the indentation is made, you use a careful pinch near the top to slightly sharpen the curve, mimicking the top of a heart shape. It’s minor artistry, requiring less effort than trying to park parallel on a busy street. This small adjustment turns a classic cookie into a romantic seasonal treat, perfect for gifting or impressing guests at your next cozy gathering. Don’t worry if they aren’t perfectly symmetrical; the slight wonkiness adds character, proving they were lovingly homemade and not mass-produced by a robotic cookie factory.
Choosing Your Jewel-Toned Filling
While the shortbread base is the sturdy, reliable backbone of the operation, the jam is the dazzling outfit. Selecting the right preserves is crucial. You want something vibrant and thick. I personally adore raspberry preserves because the tartness cuts through the richness of the butter perfectly. Strawberry or cherry also works wonderfully, providing a deep, ruby color that truly pops against the pale cookie. Crucially, look for high-quality preserves, ideally those made with only fruit, sugar, and pectin, ensuring they are thick enough not to bleed all over your pristine cookies while baking.
A frequent mistake home bakers make is adding the jam too soon. If you add a liquid filling before baking, it tends to bubble over and caramelize hard onto the tray, ruining the pristine appearance. We fill the indentation onlyafterthe initial bake—about halfway through the total baking time. This method ensures the cookie structure is set, preventing the jam from sinking or escaping, keeping your heart-shaped centers intact and beautiful. Trust the process; a slightly empty indentation is temporary. We return the cookies to the oven after filling for just a few minutes, allowing the jam to set and become warm and glossy.
Troubleshooting the Perfect Bake
Baking these beautiful winter cookies requires patience and accurate temperature control. Aim for 350°F (175°C). Too hot, and the edges burn before the center is cooked; too cold, and they spread out into sad, flat discs. If your kitchen is particularly warm, the dough might become sticky after rolling. If this happens, do not panic. Simply place the rolled balls back onto the baking sheet and chill them in the refrigerator for 10 to 15 minutes. Cold dough holds its shape much better during the initial heat blast of the oven.
Another common quandary is the powdered sugar dust. If you sprinkle it on before the cookies are completely cooled, the residual heat will absorb the sugar, making the cookies look wet and patchy, which is a major aesthetic crime. Wait until they are fully cooled on a wire rack before showering them with the lightest snow of confectioners’ sugar. This final dusting enhances the texture contrast and gives the cookies that classic, professional, ‘I definitely know how to bake’ look we are aiming for. Remember, the goal is slightly golden edges and centers that are still pale and soft. Enjoy the journey of creating these heartwarming treats; they are truly a perfect symbol of winter baking simplicity.
Mastering the Heart Shape Technique
Creating the perfect heart shape in your thumbprint cookie is a lot simpler than trying to sculpt something out of fondant. Start by rolling your dough into smooth, uniform balls, about one inch in diameter. Uniformity is key here for even baking; otherwise, you risk having some crunchy cookies and some doughy ones. Once rolled, place them on a parchment-lined baking sheet.
Now for the heart indent. Instead of a messy thumb, grab a small, round measuring spoon or the back of a small, thin handle (like from a dessert fork). Press gently but firmly into the center of each dough ball to create a deep well. This is your initial impression. Next, take a small pinch of the dough directly above the center indentation and pull the sides slightly outward and down, shaping the classic V-notch at the top of the heart. If you look closely, you should see two gentle humps leading down to the central well. If you mess up, simply re-roll the ball and try again. The dough is forgiving; treating it almost like playdough at this stage is acceptable, as long as it stays cool enough to handle.
Once shaped, these little heart cookies are ready for their close-up—or rather, their hot date with the oven. They truly embody the spirit of winter baking, offering warmth and simple joy in every bite. Whether you are baking them for a cozy weekend treat, or just because you needed an excuse to use up that gorgeous jar of raspberry preserves, this recipe delivers maximum charm with minimal fuss. Prepare for compliments; they are well-deserved.
Ingredients for Thumbprint Heart Cookies Recipe – Winter Cookies
Here’s what you’ll need to make this delicious dish:
- Unsalted ButterEnsure the butter is truly softened to room temperature for optimal creaming and light texture; quality matters immensely in shortbread.
- Granulated SugarThis provides the necessary sweetness and works with the butter to create aeration during the creaming process.
- Pure Vanilla PowderUse the best quality extract you can find, as the flavor is critical to the shortbread base.
- All-Purpose FlourMeasure this accurately by spooning it into the measuring cup and leveling it off, avoiding packing the flour down.
- SaltJust a pinch enhances the overall flavor and balances the sweetness of the sugar and jam.
- Fruit Preserves or JamSelect a thick, high-quality preserve like raspberry or strawberry, which holds its shape well and offers vibrant color.
- Confectioners’ SugarUsed solely for the final dusting, providing a beautiful, snowy finish once the cookies have cooled completely.
The full ingredients list, including measurements, is provided in the recipe card directly below.
How to Make Thumbprint Heart Cookies Recipe – Winter Cookies
Follow these simple steps to prepare this delicious dish:
-
Step 1: Creaming the Base and Preparing the Dough
Preheat your oven to 350°F (175°C). Line two baking sheets with parchment paper. In the bowl of a stand mixer fitted with the paddle attachment, cream the softened butter and granulated sugar together on medium speed until the mixture is light and fluffy, about 3 to 4 minutes. Scrape down the sides of the bowl, then beat in the vanilla powder.
-
Step 2: Mixing and Chilling
In a separate bowl, whisk together the flour and salt. Gradually add the dry ingredients to the butter mixture, mixing on low speed until the dough just comes together and no streaks of flour remain. Be careful not to overmix. Once combined, divide the dough into 1-inch balls and place them onto the prepared baking sheets.
-
Step 3: Shaping the Heart Indentations
Using the back of a small, rounded measuring spoon or a thin wooden handle, press gently into the center of each dough ball to create a deep well. Then, delicately pinch the dough above the well to form the recognizable V-notch of the heart shape. If the dough starts to stick or get too warm, chill the trays for 10 minutes before baking.
-
Step 4: Initial Bake and Filling
Bake the cookies for 8 minutes. The edges should be set but the centers still pale. Remove the trays from the oven and carefully spoon a small amount of your fruit preserves into each heart indentation, filling it almost to the brim. Return the cookies to the oven for an additional 4 to 6 minutes, or until the edges are light golden brown.
-
Step 5: Cooling and Finishing Touches
Remove the cookies from the oven and let them cool on the baking sheet for 5 minutes to set completely before carefully transferring them to a wire rack to finish cooling. Once the cookies are completely cool, lightly dust the entire batch with confectioners’ sugar using a fine-mesh sieve.
Transfer to a beautiful platter and serve immediately alongside hot coffee or cocoa for the perfect heartwarming winter treat.
The Accidental Discovery of Sunshine on a Plate

I was having one of those miserably gray Tuesdays when I needed comfort food fast, but only had heart-shaped sprinkles leftover from Valentine’s Day. Lacking sprinkles, I shaped the dough into hearts and filled them with bright jam instead. The result was this incredibly cheerful cookie that genuinely felt like sunshine.
Chasing Away the Mid-Winter Doldrums
January hits differently, doesn’t it? The magic of the holidays has vanished, leaving behind only icy windows and a relentless gray sky. I found myself staring glumly into the pantry, convinced that the only cure for seasonal melancholy involved large amounts of butter and something aggressively cheerful. Forget complicated layer cakes; this moment demanded simplicity and a burst of vibrant color. I needed a classic cookie that could deliver maximum nostalgia with minimal fuss.
That’s when I remembered those buttery, jam-filled delights my grandmother used to make. They were always round, but since my mood required a dose of pure, unadulterated sweetness, I decided to upgrade the traditional shape. Why make circles when you can make tiny, edible declarations of love? This is how theThumbprint Heart Cookies Recipe – Winter Cookiesiteration was born—a little beacon of warmth and sweetness designed specifically to fight back against the gloom.
The Anatomy of a Perfect Winter Cookie
These aren’t just any sugar cookies; they are shortbread’s sophisticated, jam-loving cousin. The dough relies on high-quality unsalted butter, vanilla powder that smells like a dream, and just enough flour to hold its shape without becoming tough. The magic really happens with the filling. While tradition often calls for raspberry, I’ve found that a mix of strawberry and a touch of tart apricot preserve gives the most dazzling, ruby-red heart effect. Ensure your preserves are thick; runny jam is the enemy of a beautifully defined thumbprint. The texture of the dough, combined with the sweet tartness of the filling, creates a harmony that defines the perfect winter comfort bake.
Why These Heart Thumbprints Are More Than Just a Cookie
In a world saturated with complex baking projects, sometimes the simple, reliable recipes are the most grounding. These festive winter cookies offer that nostalgic satisfaction. They are the perfect accompaniment to a steaming mug of tea or a roaring fireplace. The act of pressing that small heart indentation and filling it with jewel-toned jam is almost meditative. It forces you to slow down, if only for an hour, and focus on creating something truly beautiful and delicious. Plus, when you present a plate of heart thumbprints, you’re subtly telling everyone, “I baked this with love,” which always tastes better.
When measuring your ingredients, precision is key for a shortbread-style base. Make sure your butter is truly at room temperature—it should yield easily when pressed, but not look oily. If you try to cream cold butter, you end up with gritty sugar and a dense cookie. If you accidentally use overly soft, melted butter, the dough will be greasy and hard to handle, requiring excessive amounts of flour that dry out the final product. We want soft, tender deliciousness, not dry hockey pucks.
Ingredients List
- 1 cup (2 sticks) unsalted butter, softened
- 1/2 cup granulated sugar
- 2 large egg yolks
- 1 teaspoon pure vanilla powder
- 2 cups all-purpose flour
- 1/4 teaspoon salt
- 1/2 cup finely ground almonds or pecans (optional, for texture)
- 1/2 cup thick fruit preserves (raspberry, strawberry, or apricot recommended)
- 1/4 cup powdered sugar, for dusting
Crafting the Perfect Thumbprint Heart Cookies Recipe – Winter Cookies
The method is forgiving, thankfully, which is precisely what you need when the winter wind is rattling the windows. Creaming the butter and sugar thoroughly is paramount; it incorporates the air that gives these cookies their delicate crumb structure. Don’t rush this stage. Once you’ve added the yolks and vanilla, scrape down the bowl and incorporate the dry ingredients gradually. If using the ground nuts, add them with the flour. The final dough should be pliable, but not sticky.
The dough needs a quick chill. Wrap the dough in plastic wrap and place it in the refrigerator for 30 minutes. This prevents the cookies from spreading too much in the oven and helps them retain that lovely heart shape.
Preheat your oven to 350°F (175°C). Line two baking sheets with parchment paper. Now for the fun part: shaping the hearts. Roll the dough into balls, about one inch in diameter. Instead of using your thumb, use the blunt end of a wooden spoon or a small, rounded measuring spoon to create a deeper indentation. Then, gently pinch the top edges of the indent with your fingers to form the characteristic heart shape. This extra step is definitely worth the effort when you pull the finished, gorgeous cookies from the oven.
Fill the hearts before baking. A small dollop (about 1/2 teaspoon) of the chosen preserve sits perfectly in the indentation. Be careful not to let the jam overflow, as this will burn on the edges and ruin the presentation. Bake for 12 to 15 minutes, or until the edges are just barely golden—we are looking for tender, pale cookies, not deeply browned discs. Let them cool completely on the baking sheets for five minutes before transferring them to a wire rack. Once fully cooled, finish with a light, dusting of powdered sugar that mimics a fresh snowfall.
Perfecting the Cooking Process
The secret to speed and success is chilling the dough for just 30 minutes, not hours. While the dough chills, preheat your oven and measure the preserves. Form and fill all the cookies quickly on parchment-lined sheets. Bake one tray at a time for even heat distribution and tender perfection.
Add Your Touch
Feel free to swap the almond flour for finely ground toasted coconut for a tropical twist, or add a pinch of ground cardamom to the dough for warmth. If you want a more complex filling, mix a drop of vanilla powder into the preserves before spooning them into the hearts. Don’t be afraid to experiment!
Chef’s Quick Tips for Flawless Thumbprints
-
Do not overmix the dough once the flour is added; this activates the gluten too much, resulting in tough cookies instead of melt-in-your-mouth tenderness.
-
If your butter is still cold, cut it into small pieces and microwave it for 10 seconds only. This helps it soften evenly without actually melting it.
-
Use the back of a small, oiled teaspoon to gently scoop the jam into the heart indentations, ensuring you don’t overfill the cookie before baking.
My neighbor tasted these one snowy afternoon and instantly declared them “Winter Solstice Jewels,” demanding the recipe immediately. That nickname stuck, and now they are mandatory every January.
Storing & Reheating
Store cooled cookies in an airtight container at room temperature for up to five days. If stacking them, place a sheet of parchment between layers to protect the delicate jam filling and the powdered sugar dusting. These cookies freeze exceptionally well before baking, too.
Conclusion for Thumbprint Heart Cookies Recipe – Winter Cookies
Creating the perfectThumbprint Heart Cookies Recipe – Winter Cookiesis truly about celebrating the small moments of joy during the colder months. We covered the importance of quality ingredients, the simple trick to forming those adorable heart shapes, and how to use thick preserves for that perfect, ruby-red center. These classic cookies, elevated with a heartwarming design, are essential for chasing away the winter gloom.
They are quick enough to whip up on a slow Sunday and charming enough to give as a heartfelt gift. Remember that slight chill time is your friend, and don’t be shy about that finishing dusting of powdered sugar. Whether you share them with loved ones or keep the batch all to yourself—no judgment here—these buttery, jam-filled delights promise a little burst of sunshine in every bite. Go ahead, fill your kitchen with the scent of vanilla and happiness.
Print
Thumbprint Heart Cookies Recipe – Winter Cookies
- Total Time: 35 minutes
- Yield: 4 servings 1x
Description
Creamy butter meets pure vanilla powder for the ultimate melt-in-your-mouth shortbread hearts. A perfect winter treat! Full mixing instructions and nutrition breakdown inside.
Ingredients
- 1 cup (2 sticks) unsalted butter, softened
- 1/2 cup granulated sugar
- 2 cups all-purpose flour
- 1 teaspoon pure vanilla powder
- 1 large egg yolk
- 1/4 teaspoon salt
- 1/2 cup raspberry or strawberry jam (seedless recommended)
- Powdered sugar, for dusting
Instructions
- Step 1: Preheat the oven to 350°F (175°C). Line two baking sheets with parchment paper. In a large bowl or stand mixer, cream together the softened butter and granulated sugar until light and fluffy. Beat in the egg yolk and alcohol-free vanilla extract until well combined.
- Step 2: In a separate bowl, whisk together the flour and salt. Gradually add the dry ingredients to the wet ingredients, mixing on low speed until the dough just comes together. Do not overmix.
- Step 3: Roll the dough into 1-inch balls and place them 2 inches apart on the prepared baking sheets. To create the heart indentation, use the rounded end of a 1/2 teaspoon measuring spoon to press down firmly in the center of each ball, slightly angling the spoon to create a gentle V-shape at the top of the indentation to mimic the curve of a heart.
- Step 4: Bake the cookies for 8 minutes. Remove the sheets from the oven and carefully fill each heart indentation with about 1/2 teaspoon of jam. Return the cookies to the oven and bake for an additional 4 to 6 minutes, or until the edges are lightly golden brown and the jam is bubbling slightly.
- Step 5: Let the cookies cool completely on the baking sheet for 5 minutes before transferring them to a wire rack to finish cooling. Once completely cooled, dust generously with powdered sugar for a winter effect before serving.
Notes
- To prevent the cookies from spreading and losing their heart shape, chill the rolled dough balls for 15 minutes before the initial bake.
- Store baked cookies in an airtight container at room temperature for up to five days, using parchment between layers if you’ve applied the final powdered sugar dusting.
- Serve immediately after the powdered sugar dusting alongside a warm mug of spiced tea or rich hot chocolate to complete the cozy winter theme.
- If the cookies seem a bit stale, warm them for 3-5 minutes in a 250°F (120°C) oven to refresh the buttery base, taking care not to let the jam scorch.
- Prep Time: 15 minutes
- Cook Time: 20 minutes
- Method: Stovetop
- Cuisine: American
Nutrition
- Serving Size: 1 cookie (approx. 25g)
- Calories: 135
- Sodium: 55mg
- Fat: 10g
- Saturated Fat: 6.5g
- Trans Fat: 0.1g
- Protein: 12g