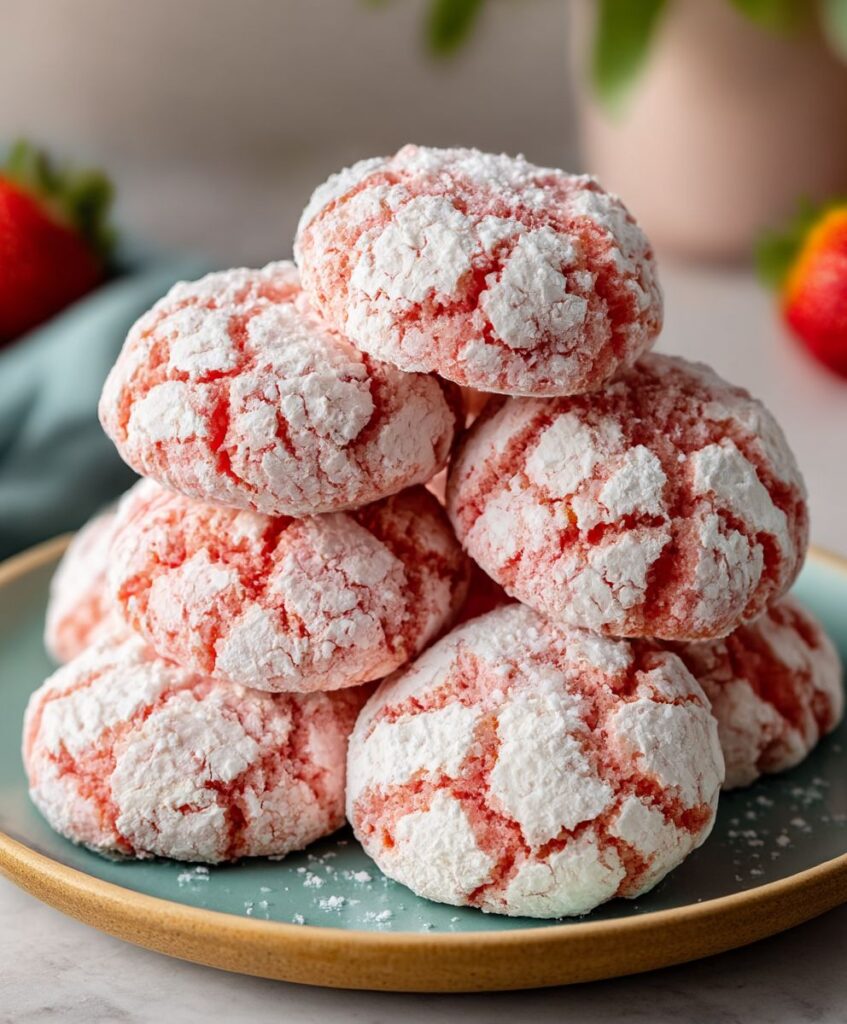
Remember those times you thought baking was just too complicated, requiring arcane knowledge and perhaps a silent pact with a pastry deity? Forget all that. These beautiful, powdered-sugar-dustedStrawberry Crinkle Cookiesdemand to be seen and devoured immediately.
With their vibrant pink interior and perfectly cracked exterior, they taste exactly like sunshine mixed with a sweet, nostalgic hug. Prepare to surrender to the crinkle.
- Prep is shockingly simple; requiring minimal chill time, you can have these chewy delights ready in under an hour.
- Intense, natural berry flavor combined with a soft, lemon zest undertone creates a perfectly balanced sweet and tangy profile.
- The signature sugary cracked appearance makes these cookies stunningly festive for any spring gathering or celebratory occasion.
- These bright cookies transition effortlessly from a light dessert treat to a perfect addition to any brunch platter.
Ingredients for Strawberry Crinkle Cookies
Here’s what you’ll need to make this delicious dish:
- Freeze-Dried StrawberriesThese are essential for achieving that intense, natural strawberry flavor and a deep pink color without introducing excess moisture.
- All-Purpose FlourThe structural backbone of the cookie; ensure it is properly leveled when measuring to prevent dense cookies.
- Baking PowderThis leavening agent helps the cookies achieve the perfect puff and contributes to the signature crinkle effect.
- Unsalted ButterUse softened butter, not melted, to properly cream with the sugar and create the necessary air pockets in the dough.
- Granulated SugarProvides sweetness and helps create a fine crumb structure when creamed with the butter.
- EggsAct as a binder, adding richness and moisture to the dough; make sure they are at room temperature.
- Alcohol-Free Vanilla ExtractEnhances the overall flavor profile, adding depth and complementing the fruit notes beautifully.
- Lemon ZestA tiny amount brightens the strawberry flavor, cutting through the sweetness for a more balanced treat.
- Powdered SugarRequired specifically for rolling the dough balls, as it is the key ingredient responsible for the beautiful, cracked appearance.
The full ingredients list, including measurements, is provided in the recipe card directly below.
How to Make Strawberry Crinkle Cookies
Follow these simple steps to prepare this delicious dish:
-
Prep the Strawberry Powder and Dry Ingredients
Preheat your oven to 350°F (175°C). Line two large baking sheets with parchment paper or silicone mats. Next, grind the freeze-dried strawberries into a fine powder using a food processor or blender. In a medium bowl, whisk together the strawberry powder, flour, and baking powder, setting the dry mixture aside for later use.
-
Cream the Fats and Sugar
In the bowl of a stand mixer fitted with the paddle attachment, or using a large bowl and a hand mixer, cream the softened butter and granulated sugar together until the mixture is light, fluffy, and noticeably paler, about three to five minutes. Scrape down the sides of the bowl frequently to ensure even mixing.
-
Form the Dough
Beat in the room-temperature eggs one at a time, followed by the alcohol-free vanilla extract and lemon zest. Slowly add the prepared dry ingredient mixture to the wet ingredients, mixing only until just combined. The dough will be soft and slightly sticky, resembling a thick cake batter; avoid overmixing at this stage to keep the cookies tender.
-
Chill and Roll the Crinkles
Transfer the dough to an airtight container and chill in the refrigerator for at least 30 minutes. This mandatory step prevents spreading. Once chilled, scoop the dough using a tablespoon or small cookie scoop. First, roll each ball quickly in granulated sugar, then roll generously in the powdered sugar until completely coated. The heavier the powdered sugar layer, the better the crinkle will be.
-
Bake and Cool
Place the heavily coated dough balls two inches apart on the prepared baking sheets. Bake for 10 to 12 minutes. The cookies are done when the centers are still slightly soft and puffy, and the edges are set. Do not overbake them, or they will lose their signature chewy texture. Let them cool on the baking sheet for five minutes before transferring them to a wire rack to finish cooling completely.
Transfer to plates and enjoy the sight of these stunning pink jewels before taking the first perfect bite.
The Secret Science Behind the Perfect Crinkle
Achieving that iconic, mesmerizing crackle onStrawberry Crinkle Cookiesisn’t just luck; it’s a delightful bit of kitchen chemistry. The secret lies entirely in the contrast between the moist dough and the heavy outer layer of powdered sugar. When you place the chilled, thick dough balls into the heat of the oven, they begin to spread outward almost immediately. However, the outer layer of powdered sugar and the small amount of granulated sugar creates a dense, resistant barrier that sets up quickly. As the dough inside continues to expand, the hardened sugar shell simply can’t stretch, causing it to fracture, resulting in the beautiful spiderweb cracks we crave. If your cookies aren’t crinkling properly, the likely culprit is insufficient powdered sugar coating or dough that wasn’t chilled enough.
Why Chilling Your Strawberry Cookie Dough is Non-Negotiable
I know, I know. Waiting is the hardest part of baking. But skipping the chilling time for these bright pink cookies is a one-way ticket to flat, sad discs. When you chill the dough, two crucial things happen: first, the flour hydrates fully, improving the cookie’s texture. More importantly, the butter solidifies. Cold, firm butter melts slowly in the oven, allowing the cookie structure to set before the fat causes them to spread too thin. If you skip this step, your beautiful dough balls will instantly flatten, making it impossible for the sugar coating to crack properly because there is no dome structure to expand against. Aim for at least 30 minutes, or even an hour if you have the time; your patience will be rewarded with thick, luscious, chewy berry cookies.
Flavor Foundations: Choosing the Best Ingredients
When developing a fruit-flavored cookie, especially one relying on visual appeal like these strawberry crinkle cookies, ingredient selection is paramount. Using fresh fruit is tempting, but fresh strawberries contain too much water, which would turn the dough into soup and necessitate adding excessive flour, leading to a tough, dry cookie. We want intense flavor and color without compromising texture, which brings us to our not-so-secret weapon: the humble, shelf-stable, freeze-dried strawberry.
The Magic of Freeze-Dried Strawberries
Freeze-drying removes virtually all the moisture from the fruit while concentrating the natural flavor and retaining the vibrant color. By grinding these dehydrated berries into a fine powder and incorporating them directly into the dry ingredients, we achieve a powerful burst of authentic berry taste and a gorgeous, natural pink hue throughout the cookie, all without disrupting the delicate balance of the dough’s structure. This technique ensures every single bite is packed with that summer-fresh flavor we are aiming for in these delicious cookies. Make sure the powder is fine; any large chunks of dried fruit may burn during baking.
The Essential Double Roll Technique
To achieve that spectacular contrasting effect—a deep pink interior beneath a blanket of pure white crackles—we employ a double-roll technique that serious bakers swear by. First, rolling the chilled dough balls in granulated sugar provides a grainy layer that helps absorb slight surface moisture from the dough, ensuring the final coating sticks better. Crucially, the granulated sugar also offers a slight grit and resistance, which aids in the initial structural development of the cookie in the oven. The second, much heavier roll in powdered sugar is what creates the visual “crinkle.” Because powdered sugar is essentially pulverized sugar mixed with a bit of cornstarch, it forms a thick, opaque coating that holds its shape. As the cookie expands beneath it, this fragile outer layer breaks perfectly, creating the coveted cracked appearance. Do not skimp on the powdered sugar—the more you use, the more defined your crinkles will be!
Troubleshooting and Perfecting Your Crinkled Treats
Even the most straightforward recipes can encounter a hiccup or two. If your first batch of strawberry crinkle cookies didn’t look like they belonged on a magazine cover, don’t despair; the fix is usually simple. The most common issues relate to dough consistency and sugar coating application. If the cookies spread too thin and didn’t crack, your oven might be running cool, or you likely skipped or reduced the chilling time. Ensure your butter is softened, not melted, when you begin the process, and measure your flour meticulously. Too little flour equals sticky, spreadable dough; too much equals dense, non-spreading dough.
Dealing with Dough That Won’t Crinkle
The number one reason for a lack of crinkle is not enough powdered sugar. You should be using so much powdered sugar that the dough ball resembles a miniature snowball. If you try to bake them immediately after rolling, the sugar will absorb too much moisture from the dough surface and melt away. If you live in a particularly humid environment, try rolling the dough balls in the granulated sugar, placing them back in the freezer for ten minutes, and then completing the heavy roll in powdered sugar right before they go into the hot oven. This brief freeze firms up the dough and prevents the powdered sugar from dissolving prematurely, guaranteeing beautiful, pronounced cracks on every single batch of these amazing berry cookies.
Flavor Variations for Your Pink Jewels
While the classic strawberry crinkle cookies are perfect as is, they offer a fantastic canvas for minor flavor modifications. If you prefer a more intense citrus note, consider adding orange zest instead of lemon zest, which offers a slightly sweeter, brighter contrast to the berries. For those who enjoy a richer base, a small amount of finely chopped white chocolate folded into the dough before chilling can introduce a creamy, decadent element that pairs beautifully with the tangy strawberry. Always remember to maintain the dry-to-wet ratio; if you add solid ingredients, chill the dough longer to ensure optimal structural integrity before rolling and baking.
There are kitchen mistakes, and then there are magnificent, pink-dusted, life-altering kitchen mistakes. Before I stumbled upon the holy grail of pink cookies, my baking repertoire consisted mainly of aggressively chewy chocolate chip discs and various forms of burnt sugar. I believed strawberry flavor required actual, wet strawberries—a rookie mistake that always resulted in soggy centers and flattened, depressed-looking biscuits.
The turning point arrived during a severe case of mid-January gloom. I needed color, and I needed it fast. Armed with a bag of freeze-dried strawberries and a basic snickerdoodle recipe, I inadvertently created the perfect storm: intense, concentrated berry flavor combined with that mesmerizing, snowy, cracked surface. TheseStrawberry Crinkle Cookiesare now my definitive answer to all things dull and grey, a genuine burst of summer that fits perfectly in the palm of your hand.
The Accidental Discovery of Sunshine on a Plate

I stumbled upon the idea forStrawberry Crinkle Cookieswhile accidentally pulverizing too many freeze-dried strawberries, turning my kitchen counter into a pink dust cloud. The resulting burst of concentrated flavor and that signature snowy, cracked look was pure, unadulterated summer joy, instantly curing my winter blues.
The Essential Role of Freeze-Dried Fruit
Forget fresh or frozen strawberries; they are delicious, but they bring water, and water is the enemy of a sturdy, intensely flavored cookie. The secret weapon in this recipe is the freeze-dried variety, which offers all the vibrant flavor and color without the extra moisture. When you grind these berries into a fine powder, you are essentially creating natural, potent strawberry sugar. This powder mixes seamlessly into the dough, ensuring every bite tastes profoundly of summer fields, rather than just vaguely fruity.
Using freeze-dried ingredients also guarantees that incredible, vivid pink color. Unlike artificial food coloring, which can sometimes mute during baking, the natural pigments in the ground strawberries hold up beautifully, resulting in cookies that look as sensational as they taste. I recommend using a high-powered blender or food processor to turn those crunchy little berries into the finest dust possible—any large chunks will absorb moisture unevenly and spoil the texture. Sifting the resulting pink powder with your flour is the final step toward achieving dough perfection.
Mastering the Crinkle Effect
The characteristic “crinkle” is achieved through a specific technique that relies on temperature contrast and sugar coating. If you simply bake a drop cookie, it will spread uniformly. To get those beautiful fissures, you must coat the chilled dough balls twice: once in granulated sugar (which helps prevent the second coating from melting too quickly) and then liberally in powdered sugar.
As the cookies bake in the hot oven, the dough expands rapidly. However, the outer shell of dense powdered sugar resists this expansion, forcing the dough to break through the surface, creating those stunning cracks. If your dough isn’t thoroughly chilled, the entire cookie will flatten before the crinkle can set, leaving you with pale, flat pink wafers. Patience in the chilling stage truly is a virtue here, guaranteeing a structurally sound and aesthetically pleasing dessert.
Crafting the Perfect Dough
Creating the perfect dough for these delightful pink treats involves careful timing and ingredient measurement. Start by ensuring your butter is softened, but not melted. Creaming softened butter with sugar incorporates air, which helps the cookies rise and remain light. Once your butter and sugar mixture is light and fluffy, you introduce the egg and alcohol-free vanilla extract, mixing until just combined. Overmixing at this stage can result in tough cookies, and nobody appreciates a tough cookie.
The dry ingredients—flour, baking powder, a touch of salt, and crucially, the strawberry powder—should be whisked together thoroughly before being added to the wet mixture. Incorporate the dry ingredients gradually, mixing only until no streaks of flour remain. The resulting dough should be vibrant pink and firm enough to handle easily. If your dough feels too sticky, add another tablespoon of flour, but remember that the chilling process will stiffen it significantly. After mixing, wrap the dough tightly and place it in the refrigerator. This two-hour nap is mandatory for ensuring manageable, firm balls that hold their shape and develop that spectacular crinkle.
Perfecting the Cooking Process
First, cream your butter and sugar, then whip in the eggs and vanilla before adding the dry mixture, ensuring a stiff, vibrant dough. Chill the dough thoroughly for at least two hours; this is non-negotiable for achieving that famous crinkle effect before rolling and baking.
The Two-Step Sugar Coating
Once your dough has completed its lengthy hibernation, preheat your oven to 350°F (175°C). Use a small scoop to portion the dough into even balls, about 1.5 tablespoons each. Now comes the important double-dip process. First, roll each ball in granulated sugar. This step seals the dough and creates a base layer.
Immediately after the granulated sugar dip, roll the balls generously in powdered sugar. Do not be shy with the powdered sugar; the thicker the coating, the more dramatic the crinkle will be. Place the fully coated dough balls on a baking sheet lined with parchment paper, leaving adequate space between them. Bake the cookies for 10 to 12 minutes. They should look slightly puffy and set around the edges, but the center should still appear soft. The edges of the powdered sugar will have cracked beautifully, revealing the pink interior.
If you prefer a chewier cookie, pull them out closer to the 10-minute mark. For a firmer cookie, go the full 12 minutes. Allow the cookies to cool completely on the baking sheet for about five minutes before transferring them to a wire rack to finish cooling. This helps them set up without collapsing.
Add Your Touch
Feel free to swap the strawberry powder with other freeze-dried fruit, like raspberries or blueberries, for varied flavor profiles. A dash of lemon zest brightens the strawberry flavor beautifully, or you can fold in white chocolate chips before the final chilling stage.
Storing & Reheating
Store these delightfulStrawberry Crinkle Cookiesin an airtight container at room temperature for up to five days. If you freeze the baked cookies, thaw them completely at room temperature; they maintain their chewy texture surprisingly well, ready for immediate enjoyment.
-
Ensure your freeze-dried strawberries are truly pulverized into a fine dust; chunky pieces lead to inconsistent dough hydration and a less vibrant final color.
-
Do not skip the chilling time—it is mandatory. Cold dough resists spreading too quickly, preserving the cookie’s thickness and maximizing the crinkle.
-
Roll the dough balls vigorously and thickly in powdered sugar just before baking; a thin coating melts and disappears too quickly, ruining the effect.
My nephew once declared theseStrawberry Crinkle Cookiestasted like eating a cartoon cloud, which I consider the highest possible compliment for any intensely pink dessert.
Conclusion for Strawberry Crinkle Cookies
These magnificentStrawberry Crinkle Cookiesoffer a perfect blend of intense, natural fruit flavor and captivating visual appeal. By relying on the magic of freeze-dried strawberries, we achieve a concentration of taste and color that fresh fruit simply cannot deliver in a baked good. Remember that patience during the essential chilling period and a generous double-coating of sugar are the keys to unlocking those stunning snowy fissures. Whether you are baking for a special event or simply curing a case of the mundane, these cheerful, chewy treats are guaranteed to bring a dose of bright, summery happiness to your table.
Print
Strawberry Crinkle Cookies
- Total Time: 35 minutes
- Yield: 4 servings 1x
Description
Achieve bakery-level perfection! These vibrant, easy Strawberry Crinkle Cookies require a critical 30-minute chill for that perfect cracked texture and chewy center.
Ingredients
- 1 box (15.25 oz) Strawberry Cake Mix
- 1/3 cup vegetable oil
- 2 large eggs
- 1 teaspoon pure vanilla powder
- 1 tablespoon all-purpose flour
- 1 cup confectioners' sugar (for rolling)
Instructions
- Step 1: Preheat the oven to 350°F (175°C) and line two baking sheets with parchment paper. In a large bowl, combine the strawberry cake mix, vegetable oil, eggs, vanilla powder, and all-purpose flour until a thick, uniform dough forms.
- Step 2: Cover the dough and refrigerate for at least 30 minutes. This chilling process is essential for stabilizing the dough and achieving the proper "crinkle" texture during baking.
- Step 3: Place the confectioners' sugar in a shallow bowl. Scoop the chilled dough using a small cookie scoop or tablespoon, rolling it into uniform 1-inch balls.
- Step 4: Roll each dough ball thoroughly in the confectioners' sugar, ensuring a very heavy and thick coating. Place the coated balls 2 inches apart on the prepared baking sheets.
- Step 5: Bake for 9 to 11 minutes. The cookies are done when the edges are just set and the tops have fully cracked and crinkled, but the centers still look slightly soft. Do not overbake.
- Step 6: Allow the cookies to cool on the baking sheet for 5 minutes before transferring them to a wire rack to cool completely.
Notes
- Store completely cooled cookies in an airtight container at room temperature for up to five days to maintain their soft, chewy texture.
- If the cookies lose their initial softness after a day, warm them briefly (5-10 seconds) in the microwave to restore that wonderfully chewy center.
- For a delightful dessert, serve these warm cookies alongside a scoop of high-quality vanilla bean ice cream or a drizzle of white chocolate ganache.
- To guarantee the signature "crinkle," ensure your dough balls are fully encased in a truly heavy, visible layer of confectioners' sugar just before they hit the oven.
- Prep Time: 15 minutes
- Cook Time: 20 minutes
- Method: Stovetop
- Cuisine: American
Nutrition
- Serving Size: 1 cookie (approx. 34g)
- Calories: 134
- Sodium: 52mg
- Fat: 4.3g
- Saturated Fat: 2.6g
- Unsaturated Fat: *Note: The Daily Value (%DV) is not established for Unsaturated Fat and Trans Fat.
- Trans Fat: 0.1g
- Protein: 12.6g