It was a Tuesday evening, a truly unremarkable Tuesday, when my culinary world was rocked by a viral sensation: the Dubai Chocolate Bar. Scrolling through endless feeds, I stumbled upon a video of someone cracking open a seemingly simple chocolate bar, only to reveal a riot of crunchy, creamy, and utterly decadent fillings. My jaw practically unhinged, and I knew right then and there: I needed to learn how to make the Decadent Dubai Chocolate Bar at Home. This wasn’t just a craving; it was a quest. Forget fleeting trends; this chocolate bar is an experience, a symphony of textures and flavors that will transport your taste buds straight to a luxurious bazaar. That night, I dove headfirst into deciphering its magic, determined to recreate that glorious crunch and silky melt without booking a flight. After some playful kitchen mishaps and a few delightful successes, I’ve cracked the code, and I’m here to share the secrets so you can effortlessly embark on your own chocolate adventure.
- This recipe simplifies a gourmet experience, allowing you to craft a stunning chocolate bar with readily available ingredients and straightforward techniques.
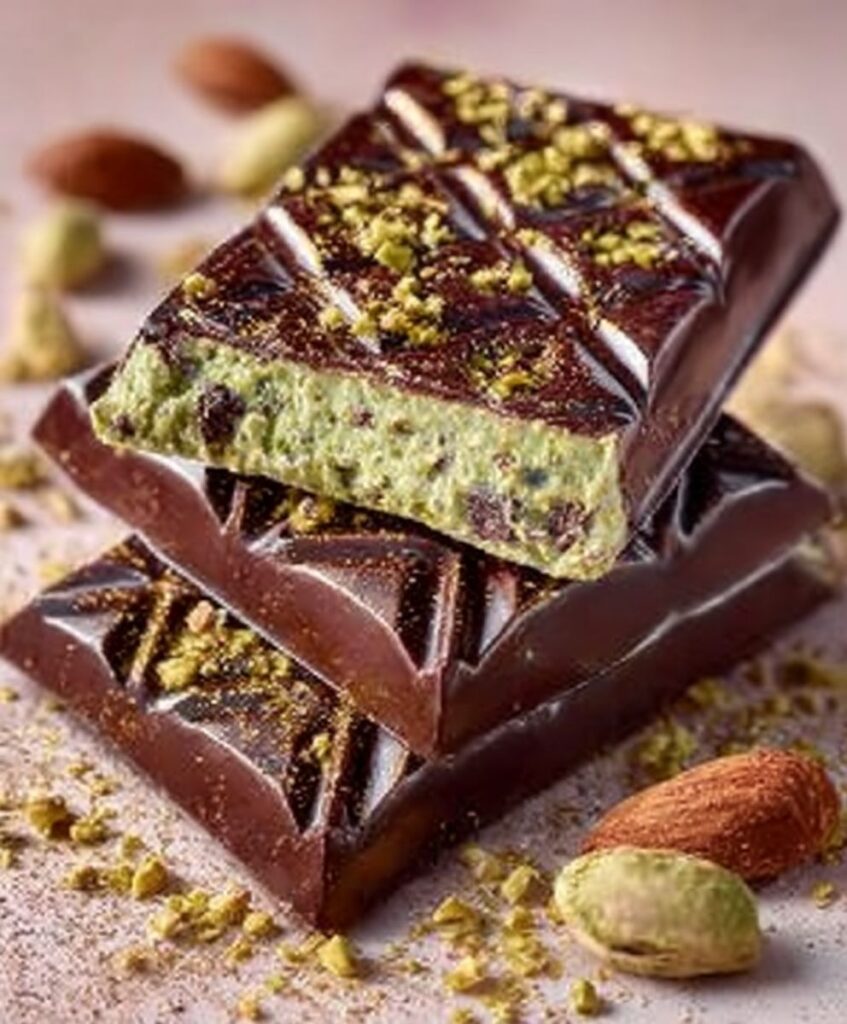
- Indulge in a perfect harmony of deep chocolate, crunchy pistachios, and a uniquely creamy, crisp texture that truly sets this bar apart.
- The finished bars boast an elegant, professional look, making them ideal for impressive gifts or a show-stopping dessert centerpiece.
- Beyond its stunning appearance, this chocolate bar offers delightful versatility for customizing fillings to suit any flavor preference or occasion.
Ingredients for How to Make the Decadent Dubai Chocolate Bar at Home
Here’s what you’ll need to make this delicious dish:
- High-Quality Dark Chocolate (70-80% cocoa)Opt for a good quality baking chocolate or couverture chocolate, as it melts smoothly and provides the foundational rich flavor for your bar.
- High-Quality Milk Chocolate (optional, for a sweeter finish)If you prefer a slightly less intense chocolate flavor, a blend of dark and milk chocolate creates a beautifully balanced bar.
- Roasted Unsalted PistachiosThese provide a vibrant green color and a delightful, nutty crunch that is essential to the Dubai chocolate experience.
- Fine Shredded Phyllo Dough (Kataifi Pastry)This delicate, hair-like pastry bakes up incredibly crispy and adds an irresistible textural element to the filling.
- Unsalted Butter or Coconut OilUsed to crisp up the phyllo dough and enhance the overall richness of the filling.
- White ChocolateA crucial component for the creamy, luxurious layer inside the bar; choose a high-quality white chocolate for best results.
- Powdered SugarThis fine sugar dissolves easily into the white chocolate mixture, ensuring a silky-smooth and sweet filling.
- Heavy Cream or Coconut CreamAdds richness and helps create the perfect ganache-like consistency for the creamy layer.
- Vanilla Bean PasteA touch of vanilla complements the chocolate and pistachio flavors, adding warmth and depth.
- A pinch of SaltEven in sweet recipes, a small amount of salt enhances all the other flavors and balances the sweetness.
The full ingredients list, including measurements, is provided in the recipe card directly below.
The Allure of the Dubai Chocolate Bar: More Than Just a Treat
Before we dive into the delicious details, let’s talk about what makes this particular chocolate bar so utterly captivating. It’s not just a candy bar; it’s an edible work of art, a multi-sensory experience that starts with the satisfying snap of the chocolate shell, followed by the revelation of its intricate interior. Imagine the sound of delicate, crispy phyllo mingling with the creamy embrace of white chocolate, punctuated by the vibrant crunch of pistachios. It’s a texture party, and everyone’s invited. My first attempt at recreating it involved a frantic search for the right mold and a good deal of melted chocolate on my counter. It looked more like a lumpy, abstract art piece than a sophisticated treat, but the taste? Oh, the taste was enough to keep me going. This isn’t your average supermarket chocolate bar; this is a handcrafted indulgence designed to impress. It’s the kind of dessert that makes people stop, stare, and then immediately ask for the recipe. And the best part? It’s entirely achievable in your home kitchen. We’re going to tackle tempering chocolate without fear, toast phyllo to golden perfection, and create a filling that dreams are made of. Prepare to elevate your dessert game from “I made brownies” to “I crafted a Dubai Chocolate Bar.” Trust me, the applause is worth every step.
Why Go Homemade? The Magic of Crafting Your Own Delights
You might be thinking, “Why bother making something so elaborate at home when I can just buy a fancy chocolate bar?” And to that, I say: the joy of creation, my friend! There’s an unparalleled satisfaction that comes from transforming simple ingredients into something truly extraordinary with your own hands. Plus, making it yourself means you control the quality of every single component. You choose the finest dark chocolate, the freshest pistachios, and ensure every element is exactly to your liking. No questionable additives, no preservatives, just pure, unadulterated deliciousness. Beyond the ingredients, there’s the sheer fun of the process. Picture yourself carefully painting chocolate into molds, layering the crispy phyllo, and patiently waiting for that moment of truth when you unmold your perfect bar. It’s a little bit like being a chocolatier, a little bit like being a mad scientist, and a whole lot of delicious. This recipe might seem intimidating at first glance, but I promise, with a little patience and a dash of playful spirit, you’ll be churning out bars that rival any gourmet shop. And the bragging rights? Absolutely priceless.
How to Make How to Make the Decadent Dubai Chocolate Bar at Home
Follow these simple steps to prepare this delicious dish:
Step 1: Prepare the Crispy Phyllo Filling
Preheat your oven to 325°F (160°C). Carefully unravel the shredded phyllo dough, separating any clumps. Place it on a baking sheet. Melt 2 tablespoons of unsalted butter or coconut oil and drizzle it evenly over the phyllo. Gently toss with your hands to coat all the strands. Bake for 10-15 minutes, stirring halfway, until the phyllo is golden brown and crispy. Let it cool completely. Once cool, lightly crush the crispy phyllo into smaller, irregular pieces. In a medium bowl, combine the crushed phyllo with the roasted unsalted pistachios and a pinch of salt. Set this aside.
Step 2: Temper the Dark Chocolate
This step ensures a shiny finish and a satisfying snap. Finely chop 1.5 cups of dark chocolate. Place two-thirds of the chopped chocolate in a heatproof bowl set over a saucepan of barely simmering water (a double boiler). Ensure the bowl does not touch the water. Stir gently until the chocolate is melted and smooth, reaching a temperature of 115-120°F (46-49°C). Remove the bowl from the heat and add the remaining one-third of chopped chocolate. Stir continuously until all the chocolate is melted and the temperature drops to 88-91°F (31-33°C). This process is known as seeding and helps achieve perfect temper.
Step 3: Mold the Chocolate Shell
Using a clean, dry chocolate bar mold (silicone or polycarbonate works best), carefully spoon or brush a thin, even layer of the tempered dark chocolate into each cavity. Ensure the chocolate covers the bottom and extends up the sides to form a sturdy shell. Gently tap the mold on your countertop a few times to release any air bubbles. Place the mold in the refrigerator for 5-10 minutes, just until the chocolate is set and firm to the touch.
Step 4: Create the Creamy White Chocolate Filling
While the dark chocolate shell is chilling, prepare the creamy filling. Finely chop 1 cup of white chocolate and place it in a heatproof bowl. In a small saucepan, heat 1/4 cup heavy cream or coconut cream with 2 tablespoons of powdered sugar and 1/2 teaspoon vanilla bean paste over medium-low heat until it just begins to simmer around the edges. Pour the hot cream mixture over the chopped white chocolate. Let it sit for 2-3 minutes to allow the chocolate to melt, then whisk gently until smooth and glossy. If the mixture is too thick, add a tiny bit more warm cream until it reaches a spreadable, ganache-like consistency.
Step 5: Assemble the Dubai Chocolate Bars
Remove the chilled dark chocolate mold from the refrigerator. Spoon a small amount of the creamy white chocolate filling onto the bottom of each dark chocolate shell, spreading it evenly. Next, generously sprinkle the crispy phyllo and pistachio mixture over the white chocolate layer. Gently press the filling down to ensure it’s compact. Finally, spoon the remaining tempered dark chocolate over the filling, spreading it to seal the bar completely. Tap the mold again to remove air bubbles and ensure a smooth top.
Step 6: Chill and Unmold
Place the filled chocolate mold back into the refrigerator for at least 30-45 minutes, or until the chocolate bars are completely firm and easily release from the mold. Once thoroughly chilled, gently flex the mold to unmold the decadent Dubai chocolate bars. If using a rigid polycarbonate mold, a firm tap on the counter usually does the trick. Transfer to plates and admire your handiwork before taking that satisfying, glorious first bite!
The Accidental Discovery of Sunshine on a Plate

One dreary afternoon, a package arrived from a friend’s trip, inside which lay a mysterious, shimmering chocolate bar. One bite, and suddenly, the skies cleared, birds sang, and I swore I could feel the Dubai sun warming my soul. It was an unexpected moment of pure, unadulterated joy that immediately inspired me to learn How to Make the Decadent Dubai Chocolate Bar at Home.
That first bite of the magnificent Dubai chocolate bar wasn’t just a taste; it was an experience. The way the smooth, rich chocolate gave way to an explosion of crunch and a whisper of something creamy and nutty left me utterly captivated. It wasn’t just a snack; it was a journey, a culinary passport to a land of luxurious flavors and textures. My mission, should I choose to accept it, became clear: I had to recreate that magic in my own kitchen. The challenge seemed daunting at first, almost like trying to bottle a desert sunset, but the allure of that extraordinary flavor was too strong to resist.
I dove headfirst into a rabbit hole of research, poring over countless recipes, watching obscure videos, and even consulting with a friend who once lived in the Emirates. My kitchen transformed into a confectionery laboratory, sometimes resembling a chocolate-splattered crime scene, other times smelling like a dream. There were moments of utter frustration, like the time my “perfectly tempered” chocolate decided to bloom into a ghostly white mess, or when my supposedly crispy filling absorbed moisture faster than a sponge in a swimming pool. Oh, the humanity! But with every mishap, I learned something new, inching closer to that elusive taste of opulence.
Gathering Your Golden Treasures: The Ingredients
To embark on this grand adventure of How to Make the Decadent Dubai Chocolate Bar at Home, you need a collection of truly special ingredients. Think of them as the jewels in your culinary crown. You’ll want about 500 grams of high-quality milk or dark chocolate, depending on your preference for sweetness or intensity. Remember, the better the chocolate, the more divine your final bar will taste. For the irresistible crunchy core, you’ll need 100 grams of fine vermicelli (or a similar very thin pasta, sometimes called “angel hair”), which we’ll toast to a golden crispness. A generous 50 grams of roasted, unsalted pistachios, roughly chopped, will add that authentic Middle Eastern touch and a delightful bite. And for the luscious creamy layer that ties it all together, gather 150 grams of a smooth, thick date caramel or a rich white chocolate ganache (made with white chocolate and heavy cream). A pinch of cardamom powder for an aromatic whisper, if you’re feeling adventurous, will elevate the flavors wonderfully.
Your Essential Chocolate Crafting Tools
No master chef goes to battle without their trusty tools, and your chocolate journey is no different. You’ll need a sturdy double boiler or a heatproof bowl set over a saucepan of simmering water for melting chocolate gently. Silicone chocolate bar molds are an absolute must to achieve that professional, polished look; aim for molds that yield bars roughly 100-150 grams each. A good quality silicone spatula will become your best friend for scraping down bowls and folding ingredients. Parchment paper or wax paper will prevent sticky situations, and a small offset spatula or butter knife will be indispensable for spreading layers evenly. Finally, a kitchen scale is crucial for precise measurements, because in chocolate making, precision is power!
Perfecting the Cooking Process
Achieving the perfect Dubai chocolate bar involves a symphony of steps. Start by gently melting your chocolate, then toast the vermicelli until golden. Next, prepare your creamy filling while the chocolate slightly cools. Finally, layer these delightful components into your molds, ensuring each element shines.
The true magic of mastering How to Make the Decadent Dubai Chocolate Bar at Home lies in understanding the sequence and patience. After melting your chocolate over a double boiler until smooth and glossy, set it aside to cool slightly while you prepare the other components. Overheated chocolate is a sad, streaky mess, and nobody wants that. While the chocolate contemplates its existence, gently toast your vermicelli in a dry pan over medium-low heat. Stir it constantly; it goes from perfectly golden to tragically burnt faster than a cat can knock a glass off the counter. Once it’s golden and fragrant, remove it from the heat and let it cool completely. Then, fold it with your chopped pistachios and a tiny drizzle of melted chocolate, just enough to bind the crunchy bits together, creating your glorious crispy core.
Prepping for Perfection: Getting Started
Before you even think about laying chocolate into molds, make sure all your components are ready and waiting. Your melted chocolate should be tempered if you’re feeling ambitious and want a super shiny, snap-able bar that resists melting at room temperature. Tempering involves heating and cooling chocolate to specific temperatures, encouraging stable crystal formation. If you’re new to this, don’t fret too much; simply melting it gently will still yield a delicious result, even if it lacks the professional snap. Ensure your date caramel or white chocolate ganache is at a spreadable consistency – not too warm and runny, nor too cold and stiff. Your crunchy vermicelli-pistachio mixture should be completely cool.
Crafting the Crispy Core
The crispy core is the heart of your Dubai chocolate bar, providing that signature textural contrast. As mentioned, toast the vermicelli until beautifully golden. Once cooled, combine it with the chopped, roasted pistachios. The key here is the binding agent. Melt a small amount of your chocolate – maybe 2-3 tablespoons – and mix it into the vermicelli and pistachio mixture. This acts as a delicious glue, holding the crunchy elements together so they don’t scatter when you bite into the bar. Spread this mixture thinly on a sheet of parchment paper and allow it to set slightly in the refrigerator for about 10-15 minutes. This makes it much easier to handle and layer.
The Creamy Dream Filling
Whether you opt for date caramel or white chocolate ganache, this layer is responsible for the luxurious, smooth counterpoint to the crunch. If using date caramel, ensure it’s thick and rich; you can buy it pre-made or easily whip up your own with pitted dates, a touch of water, and a pinch of salt, blended until smooth. For a white chocolate ganache, simply heat heavy cream until simmering, then pour it over finely chopped white chocolate, letting it sit for a few minutes before stirring until smooth. Allow the ganache to cool to room temperature, where it will thicken to a perfect spreadable consistency. If it’s too runny, it will mix with your other layers; if too stiff, it’ll be hard to spread. Consistency is everything!
Assembling Your Decadent Dubai Chocolate Bar
Now, for the grand performance! Begin by pouring a thin layer of your melted chocolate into the bottom of each silicone mold. Tap the molds gently on your counter to release any air bubbles – this ensures a smooth underside. Pop them into the refrigerator for 5-7 minutes, just until that base layer is set firm. Next, carefully spoon a layer of your creamy date caramel or white chocolate ganache over the set chocolate. You don’t want this layer to be too thick, or it will overwhelm the other textures. Return to the fridge for another 5-10 minutes. Once firm, take your pre-set crispy vermicelli-pistachio mixture (you can break it into pieces that fit the mold) and place a layer over the creamy filling. Gently press it down so it adheres. Finally, pour the remaining melted chocolate over the crispy layer, ensuring it completely covers and seals everything in. Use a small offset spatula to smooth the top. This final layer encapsulates all the delightful surprises within.
The Chilling Grand Finale
The journey to creating your masterpiece concludes with a period of blissful refrigeration. Place your filled molds into the refrigerator for at least 30-60 minutes, or until the chocolate is completely firm and easily releases from the molds. Patience is a virtue here; attempting to demold too early will result in heartbreak and fractured chocolate bars. Once fully set, gently flex the silicone molds to pop out your magnificent Dubai chocolate bars. Admire your handiwork, perhaps even take a triumphant photo, before indulging in the reward of your efforts. Each bar is a testament to your newfound chocolate-making prowess, a little piece of edible luxury you crafted with your own hands.
Add Your Touch
Feel free to personalize your Dubai chocolate bar! Swap pistachios for candied pecans, infuse the creamy layer with orange blossom water, or even swirl in a touch of dark chocolate for a marbled effect. Your kitchen, your rules!
Storing & Reheating
Store your exquisite Dubai chocolate bars in an airtight container at room temperature, away from direct sunlight, for up to two weeks. For longer freshness, refrigerate them, allowing them to come to room temperature for optimal enjoyment before serving.
-
Master the Temper:For that perfect glossy finish and satisfying snap, take the time to temper your chocolate correctly. It makes a huge difference in texture and melt resistance.
-
Cool Layers Completely:Ensure each layer is thoroughly chilled and firm before adding the next; this prevents layers from mixing and maintains distinct textures.
-
Embrace Quality Ingredients:Using premium chocolate, fresh pistachios, and quality dates will elevate your homemade bar from good to absolutely unforgettable.
My younger niece, after trying a bite, declared it “better than candy store chocolate,” which, for a five-year-old, is the highest praise imaginable. Her wide-eyed astonishment made every messy kitchen moment worth it.
Conclusion for How to Make the Decadent Dubai Chocolate Bar at Home
Learning How to Make the Decadent Dubai Chocolate Bar at Home is a truly rewarding culinary adventure. From the initial accidental discovery to the satisfying snap of a perfectly crafted bar, this recipe promises an unforgettable journey of flavors and textures. By following these steps—meticulously preparing each layer, from the crisp vermicelli to the creamy filling, and ensuring proper chilling—you unlock the secret to this luxurious treat. Don’t be afraid to experiment and add your unique touch, transforming these guidelines into your own signature masterpiece. So, gather your ingredients, unleash your inner chocolatier, and prepare to impress everyone with these divine, homemade Dubai chocolate bars!
Print
How to Make the Decadent Dubai Chocolate Bar at Home
- Total Time: 35 minutes
- Yield: 4 servings 1x
Description
Indulge in the Decadent Dubai Chocolate Bar! Craft this luxurious treat at home: crisp, buttery phyllo meets rich dark & milk chocolate, aromatic cardamom, and crunchy pistachios.
Ingredients
- 300g high-quality dark chocolate (60-70% cacao), chopped
- 100g high-quality milk chocolate, chopped
- 100g shredded phyllo pastry (or kataifi), torn into small pieces
- 50g unsalted butter or ghee, melted
- 50g shelled pistachios, roughly chopped
- 3 tablespoons sweetened condensed milk
- 1/4 teaspoon ground cardamom
- Pinch of sea salt
Instructions
- Step 1: Prepare the Crunchy Filling. Preheat your oven to 160°C (325°F). In a bowl, toss the torn phyllo pastry with the melted butter or ghee until evenly coated. Spread the buttered phyllo on a baking sheet and bake for 8-12 minutes, stirring halfway, until golden brown and crispy. Let cool slightly. In another bowl, combine the toasted phyllo, chopped pistachios, sweetened condensed milk, ground cardamom, and sea salt. Mix well until everything is evenly coated and slightly clumpy.
- Step 2: Melt the Chocolate. Set up a double boiler by placing a heatproof bowl over a saucepan with simmering water (ensure the bowl doesn't touch the water). Add the chopped dark and milk chocolates to the bowl. Gently melt the chocolate, stirring occasionally, until smooth and glossy. Alternatively, melt in a microwave in 30-second intervals, stirring after each, until smooth.
- Step 3: Create the Base Layer. Prepare your mold (a 9×5 inch loaf pan lined with parchment paper, or a silicone chocolate bar mold). Pour approximately one-third of the melted chocolate into the bottom of the prepared mold, spreading it evenly to form a thin base layer. Tap the mold gently on the counter to release any air bubbles. Place the mold in the refrigerator for 5-10 minutes, or until the chocolate is just set.
- Step 4: Add the Filling and Top Layer. Remove the mold from the refrigerator. Evenly spread the prepared crunchy pistachio-phyllo filling over the set chocolate base, gently pressing it down to create a compact layer. Pour the remaining melted chocolate over the filling, ensuring it completely covers the filling and extends to all edges of the mold. Gently tap the mold again to level the chocolate and release any trapped air.
- Step 5: Chill and Finish. Place the assembled chocolate bar in the refrigerator for at least 2-3 hours, or until it is completely firm. Once firm, carefully remove the bar from the mold. If using a loaf pan, use the parchment paper to lift it out. Cut the large bar into individual chocolate bars using a sharp, warm knife. Store in an airtight container at room temperature or in the refrigerator.
Notes
- To preserve the exquisite snap of the chocolate and the delicate crunch of the phyllo, store your bars in an airtight container; while they’ll last longer in the refrigerator, allow them to come to room temperature for about 10-15 minutes before serving for the most luxurious texture and flavor release.
- This chocolate bar isn't designed for traditional reheating; if you've stored it in the fridge, simply let it sit at room temperature for about 10-15 minutes before enjoying to allow the chocolate to mellow and the filling's flavors to fully blossom.
- Elevate the experience by pairing a slice of this rich bar with a strong cup of cardamom-spiced Arabic coffee or a scoop of creamy pistachio ice cream, letting its unique textures and flavors truly shine.
- Achieve perfectly clean slices by warming your sharp knife under hot water and drying it completely before each cut; this trick prevents the chocolate from cracking and gives your decadent bars a professional finish.
- Prep Time: 15 minutes
- Cook Time: 20 minutes
- Method: Stovetop
- Cuisine: American
Nutrition
- Serving Size: 1 piece (approx. 50g)
- Calories: 295
- Sodium: 20mg
- Fat: 20g
- Saturated Fat: 11g
- Trans Fat: 0.1g
- Protein: 10g