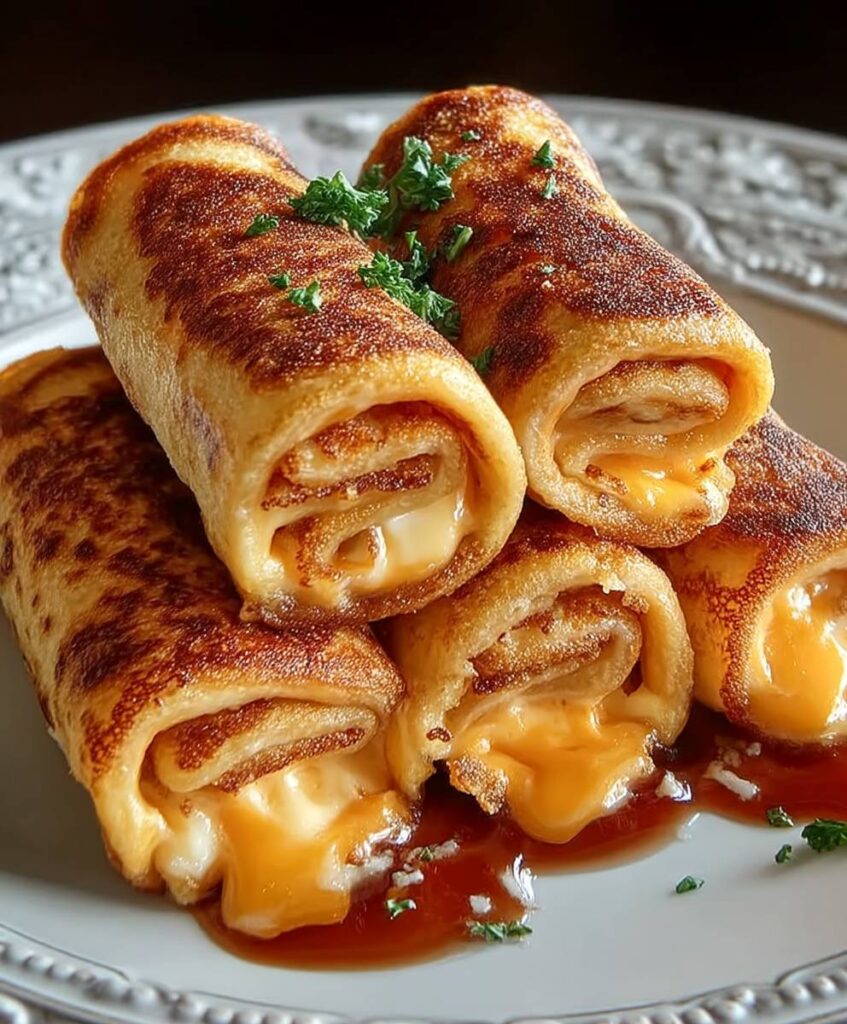
There’s something universally comforting about melted cheese nestled in crispy bread, a true culinary hug. Our Easy Grilled Cheese Roll Ups Recipe takes this classic and transforms it into a fun, dippable, and utterly irresistible snack that truly elevates comfort food. Forget the flat, predictable sandwich! Imagine golden-brown spirals of pure cheesy bliss, perfect for dunking. This brilliant twist is so straightforward, you’ll wonder why you ever made grilled cheese any other way.
- These delightful Easy Grilled Cheese Roll Ups are incredibly simple to prepare, making them a perfect quick meal or snack for busy days.
- Experience the classic comforting flavor of gooey, melted cheese perfectly encased in golden, crispy bread, a true nostalgic treat.
- Their unique spiral shape and golden hue make them visually appealing, transforming a simple grilled cheese into an exciting dish.
- Enjoy these versatile rolls as a stand-alone snack or pair them with your favorite dipping sauces for an extra burst of flavor.
The Unexpected Origin of a Classic Twist
Every culinary innovation, no matter how humble, has a story. My journey to creating the perfect Easy Grilled Cheese Roll Ups Recipe began not in a gourmet kitchen, but during a particularly chaotic Tuesday evening. The kids were ravenous, demanding “something cheesy, NOW!” My usual grilled cheese routine felt, well, routine. I needed a hero, a culinary superhero to swoop in and save dinner from the clutches of boredom. That’s when my gaze fell upon a forgotten rolling pin, sitting innocently on the counter. A lightbulb, powered by cheese-induced desperation, flickered on. Why flatten, when you can roll? The idea was simple: instead of stacking and pressing, I could spread, roll, and then grill. The vision was clear: golden-brown spirals, each a miniature explosion of cheesy delight. The first attempt was, shall we say, rustic. The cheese oozed out with the enthusiasm of a geyser, and the bread was less “roll-up” and more “crumpled mess.” But the potential was undeniable. A few tweaks, a little patience (mostly mine, definitely not the kids’), and voilà! The grilled cheese roll-up was born, forever changing our snack game and my reputation as a domestic wizard. This recipe isn’t just about food; it’s about making mealtime an adventure, a little victory in the everyday.
Why These Rolled-Up Wonders Will Win Your Heart (and Stomach)
There’s something inherently delightful about turning the familiar into the fantastic. These easy cheese rolls aren’t just a snack; they’re an experience. They address all the classic grilled cheese dilemmas. Ever had that moment when you bite into a regular grilled cheese, and all the glorious melted cheese decides to stage a daring escape from the sides? With these ingenious roll ups, the cheese is practically incarcerated within its crispy bread prison, ensuring every bite is perfectly cheesy. No more sad, half-empty bites here! Moreover, their size makes them incredibly kid-friendly and party-perfect. They are grab-and-go masterpieces, ideal for tiny hands or for adults who prefer to graze. Imagine serving these at a get-together: watch as guests marvel at their cuteness and then swiftly devour them with gusto. They’re a conversation starter and a crowd-pleaser, proving that sometimes, the simplest changes lead to the most satisfying results. Embrace the spiral revolution; your taste buds will thank you.
Ingredients for Easy Grilled Cheese Roll Ups Recipe
Here’s what you’ll need to make this delicious dish:
- Soft Sliced BreadChoose a good quality, soft white or whole wheat bread. Its pliability is key for rolling without tearing.
- Slices of CheeseOpt for a good melting cheese like cheddar, mozzarella, Colby Jack, or a blend. Pre-sliced cheese works best for convenience.
- Unsalted ButterEssential for achieving that golden-brown, crispy exterior and adding rich flavor. Make sure it is softened for easy spreading.
- Garlic Powder (optional)A pinch of garlic powder mixed with the butter adds an aromatic depth that elevates the savory profile.
- Dried Parsley (optional)A sprinkle of dried parsley can add a touch of color and a subtle herbaceous note to your finished roll ups.
The full ingredients list, including measurements, is provided in the recipe card directly below.
Choosing Your Cheese: A Melty Dilemma Solved
The success of any good grilled cheese, be it flat or rolled, hinges on the cheese. While American cheese offers undeniable meltability and a nostalgic flavor, don’t shy away from experimenting. A sharp cheddar brings a delightful tang, while mozzarella delivers an epic cheese pull. For a milder, creamier experience, Colby Jack is a fantastic choice. The key is to select a cheese that melts beautifully, creating that irresistible gooey center that makes your heart sing. Avoid hard, crumbly cheeses, as they won’t hold up to the rolling and grilling process. Consider combining different types of cheese for a more complex flavor profile. A mix of cheddar and mozzarella, for example, gives you the best of both worlds: robust flavor and incredible stretch. You can also venture into pepper jack for a slight kick, or even provolone for a sharper, more sophisticated note. Remember, the cheese is the star of this show, so pick one (or two!) that you truly love. A good cheese choice transforms a simple snack into a truly memorable treat.
How to Make Easy Grilled Cheese Roll Ups Recipe
Follow these simple steps to prepare this delicious dish:
Step 1: Flatten Your Bread Dreams
First, lay out your slices of bread on a clean surface. Using a rolling pin, carefully flatten each slice until it is thin and pliable, almost like a tortilla. This step is crucial for achieving tight, even rolls later on. Be gentle but firm to avoid tearing the bread.
Step 2: Get Cheesy and Seasoned
Next, place one slice of your chosen cheese onto each flattened bread slice. Make sure the cheese doesn’t extend all the way to the edges; leave a small border for sealing. In a small bowl, melt the butter, then stir in the garlic powder and dried parsley, if using. Brush a thin layer of this seasoned butter mixture over one side of the bread, which will become the exterior.
Step 3: Roll It Up Tight
Carefully roll each bread slice, starting from one short end, over the cheese. Roll it as tightly as you can without squishing the cheese out. The tighter the roll, the better it will hold its shape while grilling. Seal the seam gently by pressing down.
Step 4: Grill to Golden Perfection
Heat a non-stick pan or griddle over medium heat. Brush the outside of each roll up with any remaining seasoned butter. Place the rolled-up grilled cheese seam-side down in the hot pan. Cook for about 2-3 minutes per side, rotating frequently, until all sides are golden brown and crispy, and the cheese is beautifully melted and gooey.
Step 5: Slice and Serve
Once golden and crispy, remove the Easy Grilled Cheese Roll Ups from the pan. For easier dipping and presentation, you can slice each roll up into halves or thirds. Transfer to plates and serve immediately while hot, ensuring the cheese is perfectly molten.
Perfect Pairings and Dipping Delights
These simple cheese rolls are fantastic on their own, but they truly shine when paired with the right accompaniment. For a classic experience, a warm bowl of creamy tomato soup is the ultimate partner. The tang of the soup perfectly complements the richness of the melted cheese, creating a symphony of comfort. My family loves a good dunk-and-slurp situation, often turning our kitchen into a playful competition of who can achieve the cleanest dip. Beyond soup, consider other delightful dipping options. A robust marinara sauce, warmed slightly, offers a zesty contrast. For the adventurous palate, a spicy sriracha mayo or even a sweet and savory honey mustard can add an exciting twist. Ketchup, of course, remains a timeless and beloved choice, especially for the younger crowd. These easy grilled cheese spirals are versatile, ready to embrace whatever dip you fancy, making every bite an exciting new journey. So, grab your favorite sauce and get ready to dunk with gusto!
FAQ: Can I prepare Easy Grilled Cheese Roll Ups in advance?
Yes, you can assemble the rolls a few hours ahead of time. After rolling, cover them loosely with plastic wrap and refrigerate. When ready to cook, proceed with the grilling steps, adding a minute or two to the cooking time as they will be starting from a chilled state.
FAQ: What if my bread tears during rolling?
If your bread tears, it’s usually because it’s either too dry or not flattened enough. Try using a fresher loaf of bread next time, and ensure you’re flattening it thoroughly but gently. You can also try very lightly dampening the edges of the bread with water before rolling to make it more pliable.
FAQ: Can I use different cheeses for these cheese rolls?
Absolutely! The beauty of this Easy Grilled Cheese Roll Ups Recipe lies in its adaptability. Experiment with your favorite melting cheeses like pepper jack for a kick, or even smoked gouda for a richer flavor. Just ensure the cheese melts well to achieve that gooey center.
FAQ: What’s the best way to get a perfectly crispy exterior?
Achieving a golden, crispy exterior for your easy grilled cheese spirals involves proper heat control and sufficient butter. Cook them over medium heat to allow the bread to toast slowly without burning. Don’t skimp on the butter on the outside of the rolls; it helps develop that desirable crunch and rich flavor.
The Quest for the Ultimate Snack: Unrolling the Magic of Easy Grilled Cheese Roll Ups
Remember those days when a simple grilled cheese sandwich felt like the height of culinary achievement? Golden brown bread, gooey, melty cheese—pure bliss. But let’s be honest, sometimes even perfection needs a little pizzazz. Life gets busy, kids get picky, and suddenly, you need a snack that’s not just delicious but also a tiny bit exciting. That’s where the magic of the easy grilled cheese roll ups recipe swoops in, cape flowing dramatically, ready to save your snack time from utter boredom. Imagine your favorite comfort food, but spun into a delightful, handheld whirl of cheesy goodness. It’s less of a sandwich, more of an adventure!
My journey into the world of cheese roll ups started on a particularly chaotic Tuesday. The fridge was looking sparse, dinner plans were nonexistent, and a tiny human was performing an interpretive dance of hunger. I needed something fast, something fun, and something that wouldn’t require a culinary degree or a trip to a specialty store. Staring at a loaf of bread and a block of cheddar, inspiration struck like a rogue cooking show spotlight. “What if,” I mused to my silent kitchen, “we didn’t just grill it, but rolled it?” The idea was so brilliantly simple, so utterly approachable, it felt almost revolutionary. And thus, the quest for the perfect, simple grilled cheese roll ups began.
Why These Rolled Cheese Delights Will Become Your New Obsession
Beyond the sheer genius of their shape, these savory bread rolls offer a multitude of advantages. First, they are incredibly versatile. Think of them as a blank canvas for your cheesy dreams. Want to add a sprinkle of dried herbs? Go for it! Craving a tiny bit of spice? A dash of paprika works wonders. Second, they are undeniably fun to eat. There’s something inherently joyful about picking up a golden-brown spiral of toasted bread and warm, stretchy cheese. No crusts to contend with, no messy fillings escaping the sides—just pure, unadulterated snack happiness. They are perfect for little hands and big appetites alike, making them an ideal lunchbox hero, an after-school pick-me-up, or even a surprisingly chic appetizer for a casual get-together.
I’ve witnessed firsthand the transformative power of these rolled-up wonders. From turning frowns upside down on a rainy afternoon to being the undisputed star of a potluck, they rarely disappoint. Friends have asked for the “secret” to my success, and I always respond with a wink and a shrug, “It’s all in the roll, my friend.” The best part? This easy grilled cheese roll ups recipe is incredibly forgiving. Even if your rolling technique isn’t quite professional chef-level, the end result will still be utterly delightful. It’s comfort food reinvented, simplified, and made a hundred times more charming.
Gather Your Arsenal: Ingredients for Your Cheesy Expedition
Before we embark on this culinary adventure, let’s ensure our pantry is stocked. The beauty of this easy grilled cheese roll ups recipe lies in its minimal ingredient list, making it accessible for even the most spontaneous craving. You likely have most of these items on hand already, which means cheesy gratification is only minutes away.
-
Sliced Sandwich Bread:The softer, the better! Think white or whole wheat bread, perfect for flattening without tearing. You’ll want about 8-10 slices, crusts removed.
-
Cheese Slices:The heart of our operation! Cheddar, Monterey Jack, provolone, or a mozzarella blend work wonderfully. Aim for 8-10 slices, one for each roll up, or grated cheese for an even melt.
-
Unsalted Butter or Plant-Based Spread:For that irresistible golden crisp. About 2-3 tablespoons, melted.
-
Optional Extras:A sprinkle of garlic powder, onion powder, or dried Italian herbs for an extra flavor kick.
That’s it! No fancy, hard-to-find components. Just straightforward deliciousness waiting to be transformed. This simplicity is truly what makes these such an easy grilled cheese roll ups recipe. It’s a testament to the fact that sometimes, the best things in life (and in the kitchen) are the least complicated.
Rolling into Action: A Step-by-Step Guide to Perfection
Now, for the main event! Follow these steps, and you’ll be on your way to a plate of golden, cheesy spirals that will make you wonder why you ever bothered with a flat sandwich. Remember, a little patience and a lot of enthusiasm are your best tools here.
-
Prepare Your Bread:Lay a slice of bread on a clean surface. Using a rolling pin, flatten the bread as thinly as possible. This is crucial for a tight, neat roll. Repeat for all slices, carefully removing the crusts beforehand.
-
Cheese Placement:Place a slice of cheese (or a small handful of grated cheese) on one end of the flattened bread. Leave a small border around the edges. If you’re adding any optional fillings like a pinch of cooked, shredded chicken or a few finely diced bell peppers, now’s the time to tuck them in with the cheese.
-
The Art of the Roll:Starting from the cheese-laden end, carefully but firmly roll the bread slice into a tight cylinder. Once rolled, give it a gentle squeeze to ensure it holds its shape. You might need a tiny dab of water on the seam to help it seal if it’s being stubborn.
-
Butter Up:Melt your butter or plant-based spread in a small bowl. Using a pastry brush, generously coat the outside of each roll up with the melted butter. This is what gives them their beautiful golden color and crispy exterior.
-
Grill to Perfection:Heat a non-stick skillet or griddle over medium heat. Place the buttered roll ups seam-side down first to seal them, then cook, turning occasionally, until all sides are golden brown and the cheese is delightfully melted and gooey. This usually takes about 2-3 minutes per side.
-
Serve Immediately:Transfer your golden, glorious easy grilled cheese roll ups to a plate. Let them cool for just a moment (that cheese can be surprisingly hot!), then serve. They’re fantastic on their own, or with a dip like a tangy tomato soup or a creamy ranch dressing.
There you have it! A simple transformation from humble bread and cheese into a snack time superstar. This easy grilled cheese roll ups recipe is proof that deliciousness doesn’t always require an elaborate performance in the kitchen.
Perfecting the Cooking Process

Achieving consistent perfection with these roll ups is simple. Begin by preheating your non-stick skillet to medium heat as you butter the rolled bread. This ensures an even cooking temperature. Place the roll ups seam-side down first, cooking until sealed, then rotate them gently for uniform golden-brown crispness and a perfectly gooey cheese melt.
Add Your Touch
Unleash your culinary creativity! Enhance this easy grilled cheese roll ups recipe with finely minced cooked turkey or chicken for extra protein. Explore different cheese varieties, or sprinkle in dried oregano, chives, or a dash of garlic powder before rolling. A touch of finely chopped sautéed mushrooms also makes a fantastic addition for savory depth.
Storing & Reheating
To keep your easy grilled cheese roll ups fresh, store any leftovers in an airtight container in the refrigerator for up to two days. For reheating, a toaster oven or air fryer is ideal, bringing them back to crispy perfection in minutes. Avoid the microwave, as it can make them soggy, losing that desired crunch.
Chef’s Insider Tips for Glorious Grilled Cheese Roll Ups
-
Always flatten your bread slices thinly and evenly with a rolling pin; this prevents tearing and ensures a snug, consistent roll for optimum melt.
-
Do not overcrowd the pan during cooking. Cook the roll ups in batches to maintain consistent heat, which guarantees a beautiful, even golden-brown crust.
-
For an extra crispy exterior, lightly brush the outside of each roll up with melted butter or a plant-based spread before placing them in the hot skillet.
I once made a giant batch of these for a family movie night, and my niece, who usually picks at everything, declared them “the best swirly sandwiches ever!” That little moment confirmed these easy grilled cheese roll ups are indeed something special.
Frequently Asked Questions About These Cheesy Wonders
Can I use gluten-free bread for this easy grilled cheese roll ups recipe?
Absolutely! Gluten-free sandwich bread works well, but be mindful that some varieties might be a bit more delicate when flattening. Roll it gently to prevent tearing.
What kind of cheese melts best in these roll ups?
Medium cheddar, Monterey Jack, provolone, and mozzarella are excellent choices. They offer a fantastic melt and delicious flavor. A blend often provides the best of both worlds.
Can I prepare the roll ups ahead of time?
You can assemble the roll ups a few hours in advance and keep them covered in the refrigerator. However, for the best crispiness, butter and cook them right before serving.
How do I prevent the cheese from oozing out during cooking?
Ensure you roll the bread tightly and place the roll up seam-side down first when it hits the hot skillet. This helps seal the seam, keeping that delicious cheese inside.
Are there any dipping sauce recommendations for these cheesy delights?
They are fantastic with classic tomato soup, a marinara dip, ranch dressing, or even a simple side of ketchup. Get creative with your favorite dipping companions!
The Final Roll: Why These Are a Must-Try
So, there you have it: the complete lowdown on the easy grilled cheese roll ups recipe. It’s more than just a snack; it’s a testament to how simple ingredients can be transformed into something truly delightful and memorable. These roll ups are a fantastic solution for busy weeknights, a fun addition to any gathering, and an instant crowd-pleaser that appeals to all ages. The next time you’re facing a snack dilemma or simply craving some comforting, cheesy goodness with a twist, remember the magic of the roll. Grab your bread, your cheese, and your rolling pin, and get ready to create a new favorite. Happy rolling!
Conclusion for Easy Grilled Cheese Roll Ups Recipe
And there you have it, folks – the incredible journey to creating the perfect Easy Grilled Cheese Roll Ups Recipe! We’ve laughed, we’ve learned, and most importantly, we’ve discovered a simple, fun, and utterly delicious way to elevate a classic comfort food. These delightful rolls are more than just a snack; they’re a testament to culinary ingenuity. They are perfect for a quick lunch, a crowd-pleasing appetizer, or simply when a craving for cheesy goodness strikes. Go forth, roll, grill, and conquer your hunger with this fantastic recipe. Your taste buds will thank you!
Print
Easy Grilled Cheese Roll Ups Recipe
- Total Time: 35 minutes
- Yield: 4 servings
Description
Elevate your snack game with these easy grilled cheese roll-ups! Flattened bread encases gooey cheese, ready for a buttery, garlic-pepper crisp. Full instructions & nutrition info included.
Ingredients
- White or whole wheat sandwich bread – 8 slices
- Sliced cheese (such as American, cheddar, or provolone) – 8 slices
- Unsalted butter, softened – 4 tablespoons
- Garlic powder – 1/4 teaspoon
- Black pepper – a pinch
- Marinara sauce or ketchup (for serving) – 1/2 cup
Instructions
- Step 1: First, lay the bread slices flat on a clean surface. Using a rolling pin, gently flatten each slice of bread until it is thin. You can optionally trim the crusts for a neater roll.
- Step 2: Place one slice of cheese onto each flattened bread slice. Tightly roll up the bread and cheese, starting from one end, ensuring the cheese is encased within the bread.
- Step 3: In a small bowl, combine the softened butter with garlic powder and a pinch of black pepper. Lightly brush the outside of each bread roll-up with this butter mixture.
- Step 4: Heat a non-stick skillet or griddle over medium heat. Place the buttered roll-ups seam-side down first, cooking for 2-3 minutes until golden brown and crispy.
- Step 5: Continue to cook, turning occasionally, until all sides are golden brown and the cheese inside is melted and gooey, about 6-8 minutes total.
- Step 6: Remove from the skillet, let cool slightly, then slice each roll-up in half diagonally if desired. Serve immediately with marinara sauce or ketchup for dipping.
Notes
- Once cooled, store any leftover roll-ups in an airtight container in the refrigerator for up to 2-3 days.
- For best crispiness, reheat cooled roll-ups in a toaster oven or air fryer at 350°F (175°C) for 5-7 minutes, or gently warm them in a skillet over medium-low heat until heated through.
- While marinara and ketchup are classic dips, try serving these warm roll-ups with a creamy tomato soup for a delightful dunking experience, or a sprinkle of fresh chives for a pop of color and flavor.
- Ensure you roll the bread and cheese as tightly as possible, and always start grilling seam-side down; this clever trick helps seal the roll-up, preventing it from unraveling and ensuring a perfectly gooey interior.
- Prep Time: 15 minutes
- Cook Time: 20 minutes
- Method: Stovetop
- Cuisine: American
Nutrition
- Serving Size: 2 roll-ups
- Calories: 375
- Sodium: 905mg
- Fat: 21g
- Saturated Fat: 13.5g
- Trans Fat: 0.1g
- Protein: 5.5g
FAQs
Can I prepare Easy Grilled Cheese Roll Ups Recipe ahead of time for a party?
Absolutely! If you’re planning to dazzle your guests with this Easy Grilled Cheese Roll Ups Recipe, some prep work can be done in advance. Assemble the roll-ups without grilling them. Then, arrange them on a baking sheet, cover loosely, and pop them in the refrigerator. They can stay chilled for up to 24 hours. This clever trick means less fuss when your guests arrive. You’ll have more time to enjoy the compliments on your culinary genius. Just remember, don’t let them sit too long at room temperature before chilling!
What kind of cheese melts best for these delightful roll-ups?
The secret to an epic grilled cheese roll-up lies in its melty, gooey heart! For the ultimate experience, we recommend a dynamic duo. Try a good sharp cheddar for flavor, paired with creamy mozzarella for that irresistible stretch. Provolone or Gruyere also make fantastic choices, offering distinct flavor profiles. Avoid cheeses that are too crumbly or have very low moisture. They simply won’t give you that luscious, flowing melt we’re aiming for. Experiment with your favorites, but ensure they’re good melters – that’s the golden rule!
How can I ensure my Easy Grilled Cheese Roll Ups Recipe gets perfectly golden and crispy?
Achieving that coveted golden-brown crisp on your Easy Grilled Cheese Roll Ups Recipe is simpler than you think! The key is to use medium heat and a little patience. Don’t rush it by cranking up the heat. That leads to burnt bread and cold cheese – a culinary tragedy! Butter the outside of each roll generously. You can also use a little olive oil if you prefer. Cook them for about 2-3 minutes per side. Rotate gently until all sides are evenly toasted. This gentle approach ensures the cheese inside melts into a decadent puddle while the outside becomes a crunchy, golden dream.
Can I add extra fillings to my grilled cheese roll ups, and what are some good ideas?
Oh, the possibilities are endless for spicing up your grilled cheese roll-ups! Think of them as tiny, edible canvases. For savory additions, consider finely diced cooked chicken, shredded roast beef, or even a sprinkle of sautéed mushrooms and onions. Just be sure not to overfill. Otherwise, your beautiful rolls might burst their cheesy seams! A thin layer of tomato paste or a smear of mustard can also add a fantastic flavor kick. Remember, less is more when it comes to fillings. This helps maintain that perfect roll-up shape and ensures even cooking.