Homemade Vanilla Custard Fruit Tart | Classic Fresh Fruit Dessert
Imagine a symphony of textures: a buttery, crumbly crust giving way to luscious, smooth vanilla custard, all crowned with a vibrant explosion of fresh, glistening fruit. This isn’t just a dessert; it’s a mood-lifter, a showstopper, and frankly, my personal nemesis on a diet. Creating a `Homemade Vanilla Custard Fruit Tart | Classic Fresh Fruit Dessert` brings an unparalleled joy, reminding me of grand gatherings where everyone tried to discreetly snag the biggest slice, only to fail spectacularly. It’s the kind of treat that looks intimidatingly complex, yet whispers sweet nothings of simplicity once you dive in. Get ready to impress your taste buds and any lucky recipients with a culinary masterpiece that tastes like pure sunshine and smells like pure happiness.
- Effortlessly elegant, this tart offers a surprisingly simple approach to creating a stunning dessert that will impress everyone.
- Experience a delightful harmony of flavors, blending sweet vanilla custard with the vibrant tang of seasonal fresh fruits.
- Visually captivating, its colorful fruit topping transforms any meal into a festive occasion, making it a true centerpiece.
- Incredibly versatile, easily adapt this recipe with your favorite fruits, ensuring a fresh and unique experience every time.
The Sweet Allure of a Classic Fresh Fruit Dessert
There’s a magical quality to certain desserts, isn’t there? For me, the fresh fruit tart holds a special, almost nostalgic place. It transports me back to my grandmother’s kitchen, where the air was thick with the scent of baking and gentle chatter. Her version of a `Homemade Vanilla Custard Fruit Tart` was legendary, a dessert so beautiful it almost felt wrong to cut into it – almost. I remember one summer afternoon, trying to “help” by arranging the strawberries. My artistic vision, at age six, involved piling them precariously high, resulting in a fruity avalanche when the tart was finally placed on the table. Much laughter ensued, and the tart, despite its chaotic presentation, disappeared in minutes.
This recipe aims to capture that same spirit of joy and deliciousness, but with slightly less precarious fruit arrangements! Forget the store-bought versions that often disappoint with their rubbery crusts and bland fillings. We are embarking on a journey to create a truly spectacular `classic fresh fruit dessert` from scratch, a dessert that sings of summer, celebration, and the simple pleasure of good food. It’s more than just a recipe; it’s an experience, a chance to infuse your kitchen with delightful aromas and your table with vibrant beauty. Plus, the bragging rights are pretty sweet too.
The Crust: Your Golden Ticket to Tart Perfection
Every great fruit tart starts with an even greater crust. Think of it as the sturdy, yet tender, foundation upon which all your creamy, fruity dreams will be built. For our `homemade fruit tart`, we’re opting for a rich, buttery shortcrust pastry – pâte sucrée, if you want to get fancy – that’s crisp and slightly sweet. The secret to its melt-in-your-mouth texture lies in keeping your butter very cold and handling the dough as little as possible. Overworking the dough is the arch-nemesis of flakiness; it develops the gluten, making your crust tough, a culinary tragedy we absolutely want to avoid.
Blind baking is another crucial step that can often feel like a mystical art. It prevents the crust from puffing up or shrinking during baking, ensuring a perfectly flat base for our luscious vanilla custard. Don’t skip the parchment paper and pie weights (dried beans or rice work wonders!). I once, in a moment of overconfidence, decided to forgo pie weights. The result? A crust that looked less like a tart shell and more like a craggy moonscape. Lesson learned: embrace the weights, embrace the perfection. A perfectly blind-baked crust is your canvas, ready for the masterpieces to come.
The Heart of the Matter: Silky Vanilla Custard
Now, let’s talk about the soul of this dessert: the `vanilla custard`. This isn’t just any custard; it’s a rich, velvety, intensely vanilla-flavored creation that will have you sneaking spoonfuls directly from the pot. Achieving that perfectly smooth, lump-free texture is simpler than you might think, but it does require a little patience and a gentle hand. The key is tempering your egg yolks, which means slowly incorporating hot milk into the yolks to gradually raise their temperature, preventing them from scrambling. It’s a delicate dance, like teaching a tiny kitten to waltz.
Once tempered, the mixture returns to the heat, where gentle, constant stirring is paramount. This prevents the custard from sticking to the bottom of the pan and forming unfortunate lumps. Adding a touch of cornstarch ensures a beautifully thick and stable custard that sets perfectly without any animal-derived pectin. And for the vanilla? Please, for the love of all things delicious, use good quality vanilla powder or, even better, a vanilla bean. The difference is night and day, transforming a good custard into an unforgettable experience that makes this `vanilla custard fruit tart` truly sing.
A Burst of Color: Choosing and Arranging Your Fresh Fruits
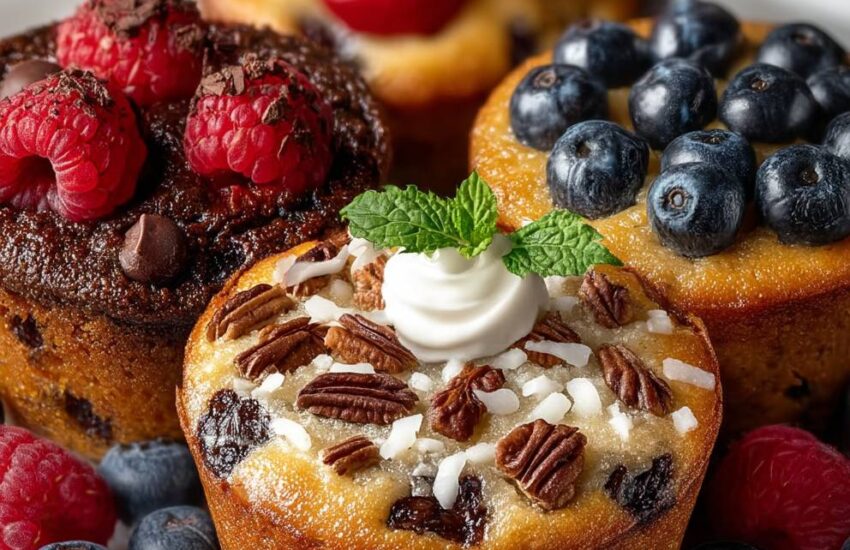
Here’s where you get to unleash your inner artist! The fruit topping is what truly makes this `fresh fruit tart` visually spectacular. The beauty lies in using seasonal fruits, ensuring peak flavor and vibrant colors. Think ruby-red strawberries, glistening blueberries, tangy kiwi slices, cheerful mandarin orange segments, and perhaps some perfectly rounded green grapes. The possibilities are endless, allowing you to customize your tart for any occasion or personal preference. Just make sure your fruit is fresh, ripe, and thoroughly dried after washing to prevent any excess moisture from seeping into your beautiful custard.
Arrangement is key. You can go for a structured, concentric pattern or a more free-form, organic design. Start with your larger fruits, then fill in gaps with smaller berries. Overlapping colors and textures creates a visually appealing mosaic that’s almost too pretty to eat. Almost. Remember, this is your masterpiece, so have fun with it! A little artistic flair here makes all the difference in presenting a truly impressive and inviting `homemade vanilla fruit tart`.
Finishing Touches: Glaze and Chill
The final flourishes truly elevate your `classic fruit dessert` from delicious to dazzling. A simple fruit glaze not only adds a beautiful sheen, making your fruits sparkle like jewels, but also helps to preserve their freshness and prevent them from drying out. A quick apricot glaze, made from warming apricot jam with a splash of water or fruit juice, brushed gently over the fruit, does the trick perfectly. It seals in the natural juices and provides a delicate sweetness that complements the tartness of the fruit.
Once assembled and glazed, the most challenging part (for me, anyway) is the waiting game. The tart needs adequate chilling time – at least 2-4 hours, or ideally, overnight – to allow the custard to fully set and the flavors to meld beautifully. This patience is rewarded with clean slices and a truly cohesive flavor profile. Serving a well-chilled tart ensures every bite is a refreshing burst of creamy, fruity perfection, making all your hard work worthwhile.
Frequently Asked Questions About Your Homemade Fruit Tart
What kind of crust is best for a fruit tart?
A classic sweet shortcrust pastry, also known as `pâte sucrée`, is ideal. Its buttery, crumbly texture provides a perfect contrast to the creamy filling and fresh fruit, making it a delicious `sweet tart recipe` foundation.
Can I make the custard ahead of time?
Absolutely! You can prepare the `vanilla custard` up to 2-3 days in advance. Store it in an airtight container in the refrigerator, with plastic wrap pressed directly onto the surface to prevent a skin from forming. Whisk it gently before assembling your `custard tart`.
How do I prevent my fruit tart from getting soggy?
Ensure your crust is thoroughly blind-baked and cooled before adding the custard. Also, make sure all your fresh fruit is completely dry before arranging it on the custard. Applying a fruit glaze also helps seal the fruit and protect the crust.
What are the best fruits for a fresh fruit tart?
Seasonal berries (strawberries, blueberries, raspberries), kiwi, mandarin oranges, grapes, and even thinly sliced peaches or nectarines work beautifully. Choose a variety that offers contrasting colors and textures for the most visually appealing and flavorful `creamy fruit tart`.
Ingredients for Homemade Vanilla Custard Fruit Tart | Classic Fresh Fruit Dessert
Here’s what you’ll need to make this delicious dish:
- All-purpose flourThe foundation of our flaky crust, providing structure and tender bite.
- Unsalted butterEssential for a rich, buttery flavor and tender texture in the pastry, ensure it’s very cold.
- Granulated sugarAdds sweetness to both the crust and the `vanilla custard`, balancing the tartness of the fruit.
- Large eggUsed in both the crust for binding and richness, and the custard for thickening and lusciousness.
- Cold waterHelps bring the pastry dough together without developing too much gluten.
- Whole milkThe base for our incredibly creamy and smooth vanilla custard.
- Egg yolksProvide richness, color, and act as a primary thickener for the custard.
- CornstarchA crucial thickening agent for the custard, ensuring it sets beautifully without using animal pectin.
- vanilla powderThe star flavor of our custard, use a high-quality extract for the best taste.
- Assorted fresh fruitsA colorful medley of seasonal berries, kiwi, mandarin oranges, and grapes for the vibrant topping.
- Apricot jam (optional, for glaze)Used to create a shiny, protective glaze over the fruit, enhancing visual appeal and freshness.
The full ingredients list, including measurements, is provided in the recipe card directly below.
How to Make Homemade Vanilla Custard Fruit Tart | Classic Fresh Fruit Dessert
Follow these simple steps to prepare this delicious dish:
Step 1:Prepare the Tart Dough
In a food processor, pulse flour, sugar, and a pinch of salt. Add cold, cubed unsalted butter and pulse until coarse crumbs form. Add the egg and cold water, pulsing just until the dough comes together. Form into a disc, wrap, and chill for at least 30 minutes. Preheat your oven to 375°F (190°C).
Step 2:Blind Bake the Crust
Roll out the chilled dough on a lightly floured surface to an 11-inch circle. Carefully transfer it to a 9-inch tart pan with a removable bottom, pressing it gently into the fluted edges. Trim excess dough. Prick the bottom with a fork, line with parchment paper, and fill with pie weights or dried beans. Bake for 15 minutes, then remove weights and parchment, and bake for another 10-15 minutes until lightly golden. Cool completely on a wire rack.
Step 3:Make the Vanilla Custard
Whisk egg yolks, granulated sugar, and cornstarch in a bowl until pale. Heat milk and vanilla powder in a saucepan until simmering. Slowly temper the hot milk into the egg mixture, then return the entire mixture to the saucepan. Cook over medium-low heat, stirring constantly, until the custard thickens significantly and coats the back of a spoon, about 5-7 minutes. Pour the custard into a clean bowl, cover with plastic wrap pressed directly onto the surface, and chill for at least 2 hours.
Step 4:Assemble the Tart
Once the crust is cool and the custard is chilled, pour and spread the vanilla custard evenly into the blind-baked tart shell. Arrange your washed and dried fresh fruits decoratively over the custard. You can create concentric circles or a beautiful mosaic pattern with your chosen fruits.
Step 5:Glaze and Chill
If using, gently heat apricot jam with a tablespoon of water or fruit juice in a small saucepan until melted and smooth. Strain if desired, then lightly brush the warm glaze over the arranged fruits for a beautiful shine. Refrigerate the `homemade vanilla custard fruit tart` for at least 2 hours, or ideally 4 hours, to allow the custard to fully set and the flavors to meld before serving.
Transfer to plates and drizzle with sauce for the perfect finishing touch.
Homemade Vanilla Custard Fruit Tart: A Classic Fresh Fruit Dessert That’s Anything But Boring
Have you ever looked at a bakery window, spotted a gleaming fruit tart, and thought, “I could never make something that beautiful?” Well, dear reader, prepare to have your apron strings untied and your culinary confidence boosted! We’re diving headfirst into the glorious world of the Homemade Vanilla Custard Fruit Tart, a classic fresh fruit dessert that looks utterly sophisticated but secretly begs for a bit of playful chaos in your kitchen. Forget stuffy recipes; we’re about to embark on a delicious adventure filled with sweet vanilla cream, vibrant berries, and a crust so buttery, it might just make you weep tears of joy. This isn’t just baking; it’s an edible art project with a spectacularly tasty payoff.
I remember my first attempt at a fruit tart. It involved a crust that crumbled like ancient ruins, a custard that resembled lumpy oatmeal, and fruit that decided to stage a dramatic escape. But through trial, error, and a few frantic calls to my grandma, I learned the secrets to a truly show-stopping dessert. And now, I’m sharing them with you! Get ready to impress yourself, your family, and anyone lucky enough to snag a slice of this magnificent Homemade Vanilla Custard Fruit Tart. It’s the kind of dessert that makes people ask, “You *made* this?” with a mixture of awe and disbelief.
Why This Classic Fresh Fruit Dessert Will Be Your New Obsession
Let’s be honest, some desserts are all flash and no substance. Not our homemade vanilla custard fruit tart! This beauty delivers on every front. The buttery, crisp shortbread crust provides the perfect foundation, a sturdy yet delicate canvas for the creamy magic that’s to come. Then there’s the vanilla custard – oh, the vanilla custard! It’s smooth, rich, infused with real vanilla bean goodness, and perfectly balanced in sweetness. It’s like a cloud of pure culinary joy. And finally, the pièce de résistance: a colorful array of fresh, seasonal fruits, glistening like edible jewels. Each bite offers a symphony of textures and flavors – the crunch of the crust, the silkiness of the custard, and the juicy burst of fresh fruit.
Beyond its incredible taste, this classic fresh fruit dessert offers unparalleled versatility. You can customize it to suit any season, any occasion, or simply whatever looks best at your local market. It’s perfect for a elegant dinner party, a casual backyard barbecue, or even just a Tuesday night when you need a little extra sparkle in your life. Plus, there’s an immense satisfaction in knowing you created such a masterpiece from scratch. Your kitchen will smell divine, your artistic side will flourish, and your taste buds will thank you profusely. Get ready to bake something truly special!
Gather Your Edible Treasures: Ingredients for Your Homemade Vanilla Custard Fruit Tart
Before we dive into the delightful chaos of baking, let’s gather our edible treasures. Think of yourself as a culinary adventurer, sourcing the finest ingredients for your epic quest to create the ultimate homemade vanilla custard fruit tart. Quality truly makes a difference here, especially with the vanilla and the freshest possible fruit. Don’t skimp on these; they’re the stars of our show! Here’s what you’ll need to bring this classic fresh fruit dessert to life.
For the Buttery Shortbread Crust:
- 1 ½ cups (180g) all-purpose flour, plus extra for dusting
- ½ cup (113g) unsalted butter, very cold and cubed
- ¼ cup (50g) granulated sugar
- ¼ teaspoon salt
- 1 large egg yolk
- 2-3 tablespoons ice water
For the Silky Vanilla Custard:
- 2 cups (480ml) whole milk
- ½ vanilla bean, split lengthwise and scraped, or 1 ½ teaspoons pure vanilla powder
- 4 large egg yolks
- ½ cup (100g) granulated sugar
- ¼ cup (30g) cornstarch
- 2 tablespoons unsalted butter, cut into small pieces
For the Dazzling Fresh Fruit Topping & Glaze:
- 2-3 cups assorted fresh fruit (strawberries, blueberries, raspberries, kiwi slices, mandarin orange segments, grapes)
- ½ cup apricot preserves or peach preserves (ensure no pectin)
- 1-2 tablespoons hot water or apple juice
Crafting Your Culinary Masterpiece: Step-by-Step Instructions
Now for the fun part! This section guides you through creating your spectacular homemade vanilla custard fruit tart. Don’t worry if you’re a beginner; we break down each step so clearly that even your pet goldfish could follow along. We’re going for delicious, not daunting!
Step 1: The Glorious Crust – Foundation of Flavor
First, tackle the crust. In a large bowl, whisk together the flour, sugar, and salt. Add the very cold, cubed butter. Using a pastry blender or your fingertips, cut the butter into the flour mixture until it resembles coarse crumbs with some pea-sized pieces remaining. This texture is crucial for flakiness! In a separate small bowl, whisk the egg yolk with 2 tablespoons of ice water. Add this mixture to the flour, mixing until just combined. If the dough is too dry, add the remaining tablespoon of ice water, a teaspoon at a time. Do not overmix; overworking leads to a tough crust. Form the dough into a disc, wrap it in plastic, and refrigerate for at least 30 minutes. This chill time prevents shrinking and makes rolling easier.
Step 2: Blind Baking Brilliance
Preheat your oven to 375°F (190°C). On a lightly floured surface, roll out the chilled dough into a 12-inch circle. Carefully transfer the dough to a 9-inch tart pan with a removable bottom. Press the dough gently into the bottom and up the sides. Trim any excess. Prick the bottom of the crust all over with a fork. Line the crust with parchment paper and fill with pie weights or dried beans. This “blind baking” prevents the crust from puffing up. Bake for 15 minutes, then carefully remove the parchment and weights. Continue baking for another 10-12 minutes, or until the crust is golden brown and cooked through. Let it cool completely on a wire rack. Patience, young padawan!
Perfecting the Cooking Process

For ultimate efficiency and flawless results when making your Homemade Vanilla Custard Fruit Tart, start with the crust. While it chills and then blind-bakes, you can prepare the vanilla custard. This allows the custard to cool perfectly, ready for spreading once the crust is baked and cooled. Timing is everything for a stress-free dessert.
Step 3: The Silky, Dreamy Vanilla Custard
While your crust is chilling or baking, let’s make the star of the show! In a medium saucepan, combine the whole milk and the scraped vanilla bean seeds and pod (if using a bean). Heat over medium heat until it just begins to simmer around the edges. Remove from heat and let it steep for 10 minutes, then remove the vanilla pod. If using vanilla powder, add it at the end. In a separate bowl, whisk the egg yolks and sugar until light and creamy. Gradually whisk in the cornstarch until smooth. Slowly pour about half of the warm milk into the egg yolk mixture, whisking constantly to temper the eggs and prevent scrambling. Pour this tempered egg mixture back into the saucepan with the remaining milk. Cook over medium-low heat, whisking constantly, until the custard thickens significantly and boils for 1 minute. It should coat the back of a spoon. Remove from heat and stir in the butter until melted and smooth. Transfer the custard to a clean bowl, press plastic wrap directly onto the surface to prevent a skin from forming, and refrigerate for at least 2 hours, or until completely chilled and set.
Step 4: The Dazzling Fruit Display & Glaze
Once your crust is cool and the custard is thoroughly chilled, it’s assembly time! Carefully spread the cold vanilla custard evenly into the baked tart shell. Now for the fun, artistic part: arranging your fresh fruit! Get creative. You can make concentric circles, geometric patterns, or just a beautiful, colorful pile. To make the glaze, gently warm the apricot preserves with 1-2 tablespoons of hot water or apple juice in a small saucepan over low heat until melted and smooth. Strain the glaze through a fine-mesh sieve for extra smoothness, if desired. Brush the warm glaze lightly over the arranged fruit. This adds a beautiful shine and helps preserve the fruit’s freshness. Refrigerate your Homemade Vanilla Custard Fruit Tart for at least 30 minutes before serving to let the glaze set and flavors meld.
Add Your Touch
Feel free to customize this classic fresh fruit dessert! Swap out fruits based on seasonality or preference; mangoes, peaches, or even roasted berries are delicious. Infuse the custard with a hint of almond paste or a pinch of cardamom for a different flavor profile. For an extra indulgent touch, a thin layer of melted dark chocolate brushed onto the cooled crust before adding the custard creates a delightful surprise.
Storing & Reheating
Store your Homemade Vanilla Custard Fruit Tart loosely covered in the refrigerator for up to 2-3 days. To maintain its quality, it’s best enjoyed fresh. This dessert is not suitable for reheating, as the custard will weep and the crust will lose its crispness. Serve it chilled for the best experience.
The first time I served this Homemade Vanilla Custard Fruit Tart at a family gathering, my notoriously picky uncle, who usually only eats plain toast, asked for a second slice! It instantly became a household legend, proving that sometimes, the simplest pleasures are truly the most memorable and universally loved.
Expert Tips for a Flawless Fruit Tart
- Keep ingredients cold:Ensure your butter and water for the crust are ice-cold. This prevents gluten development, leading to a tender, flaky crust, not a tough one.
- Temper your eggs slowly:When making the custard, gradually add hot milk to the egg mixture. Whisk constantly to prevent scrambling and ensure a silky-smooth cream.
- Chill everything thoroughly:A properly chilled crust is easier to work with and less likely to shrink. A well-chilled custard sets beautifully and tastes divine.
Frequently Asked Questions About Homemade Vanilla Custard Fruit Tart
Got questions? We’ve got answers! Making a homemade vanilla custard fruit tart can sometimes feel like a culinary puzzle, but these FAQs are here to demystify the process and help you achieve tart perfection. From troubleshooting to ingredient choices, we cover the common queries that pop up when crafting this classic fresh fruit dessert.
Can I make the crust or custard ahead of time?
Absolutely! You can prepare the tart dough up to 2 days in advance, keeping it wrapped tightly in the refrigerator. The vanilla custard can also be made a day ahead and stored in an airtight container with plastic wrap pressed directly on the surface to prevent a skin, chilled until ready to assemble. This makes assembly day a breeze!
What kind of fruit works best for a fruit tart?
The best fruits are fresh, colorful, and relatively firm. Berries (strawberries, blueberries, raspberries), kiwi, mandarin oranges, grapes, and peaches are excellent choices. Avoid fruits that release a lot of liquid, like overly ripe melons, as they can make the tart soggy. Choose what’s in season for the freshest flavor!
My crust shrunk in the oven! What did I do wrong?
Crust shrinkage is usually due to the dough not being sufficiently chilled before baking or being over-worked. Ensure your dough chills for at least 30 minutes (or longer) before rolling and again for 15-20 minutes in the pan before blind-baking. Handle the dough minimally to prevent gluten development.
How can I prevent the custard from becoming lumpy?
Lumpy custard often results from not whisking constantly during cooking or heating too quickly. Ensure you continuously whisk the custard over medium-low heat until it thickens. Tempering the egg yolks slowly with warm milk is also crucial to prevent them from scrambling. Using cornstarch helps keep it smooth.
Do I really need to glaze the fruit?
While not strictly necessary for taste, glazing the fruit does two wonderful things: it gives the tart a beautiful, professional-looking shine, making the fruit pop with vibrant color, and it helps to protect the fruit from drying out, keeping it fresh for longer. It’s a simple step that elevates the entire presentation of your classic fresh fruit dessert.
Final Thoughts on Your Homemade Vanilla Custard Fruit Tart Journey
And there you have it! Your very own Homemade Vanilla Custard Fruit Tart, a classic fresh fruit dessert that’s not only a feast for the eyes but a triumph for your taste buds. We’ve navigated the tricky terrain of crust making, mastered the velvety depths of vanilla custard, and artfully arranged a rainbow of fresh fruit. This journey, from simple ingredients to a show-stopping dessert, is a testament to the joy of home baking.
Remember, baking should be fun, a little messy, and always rewarding. Don’t stress over perfection; embrace the process and the delightful aromas filling your kitchen. Every homemade vanilla custard fruit tart tells a story – a story of effort, care, and the simple pleasure of creating something beautiful to share. So go forth, slice into your masterpiece, and bask in the compliments. You’ve earned every single one. Happy baking, and may your tarts always be tart-tastic!
Conclusion for Homemade Vanilla Custard Fruit Tart | Classic Fresh Fruit Dessert
This Homemade Vanilla Custard Fruit Tart truly stands out as an exquisite Classic Fresh Fruit Dessert, proving that culinary elegance is well within reach for any home baker. From its flaky, perfectly golden crust to the incredibly smooth, rich vanilla custard, and finally crowned with a vibrant, juicy array of fresh fruits, every single bite is a delightful celebration. We’ve explored the secrets to preparing components ahead of time, perfecting that silky custard, and selecting the brightest, most flavorful fruits. This tart isn’t just a dessert; it’s an edible masterpiece that promises to impress guests and delight every taste bud. So, roll up your sleeves, embrace the joy of baking, and create a dessert that tastes like sunshine and happiness on a plate.
Print
Homemade Vanilla Custard Fruit Tart | Classic Fresh Fruit Dessert
- Total Time: 35 minutes
- Yield: 4 servings
Description
Craft an exquisite Homemade Vanilla Custard Fruit Tart. Master the flaky, buttery crust and luscious vanilla custard for this elegant, fresh fruit dessert. Full instructions and nutrition included.
Ingredients
- All-purpose flourThe foundation of our flaky crust, providing structure and tender bite.
- Unsalted butterEssential for a rich, buttery flavor and tender texture in the pastry, ensure it's very cold.
- Granulated sugarAdds sweetness to both the crust and the `vanilla custard`, balancing the tartness of the fruit.
- Large eggUsed in both the crust for binding and richness, and the custard for thickening and lusciousness.
- Cold waterHelps bring the pastry dough together without developing too much gluten.
- Whole milkThe base for our incredibly creamy and smooth vanilla custard.
- Egg yolksProvide richness, color, and act as a primary thickener for the custard.
- CornstarchA crucial thickening agent for the custard, ensuring it sets beautifully without using animal pectin.
- vanilla powderThe star flavor of our custard, use a high-quality extract for the best taste.
- Assorted fresh fruitsA colorful medley of seasonal berries, kiwi, mandarin oranges, and grapes for the vibrant topping.
- Apricot jam (optional, for glaze)Used to create a shiny, protective glaze over the fruit, enhancing visual appeal and freshness.
Instructions
- Step 1:Prepare the Tart DoughIn a food processor, pulse flour, sugar, and a pinch of salt. Add cold, cubed unsalted butter and pulse until coarse crumbs form. Add the egg and cold water, pulsing just until the dough comes together. Form into a disc, wrap, and chill for at least 30 minutes. Preheat your oven to 375°F (190°C).
- Step 2:Blind Bake the CrustRoll out the chilled dough on a lightly floured surface to an 11-inch circle. Carefully transfer it to a 9-inch tart pan with a removable bottom, pressing it gently into the fluted edges. Trim excess dough. Prick the bottom with a fork, line with parchment paper, and fill with pie weights or dried beans. Bake for 15 minutes, then remove weights and parchment, and bake for another 10-15 minutes until lightly golden. Cool completely on a wire rack.
- Step 3:Make the Vanilla CustardWhisk egg yolks, granulated sugar, and cornstarch in a bowl until pale. Heat milk and vanilla powder in a saucepan until simmering. Slowly temper the hot milk into the egg mixture, then return the entire mixture to the saucepan. Cook over medium-low heat, stirring constantly, until the custard thickens significantly and coats the back of a spoon, about 5-7 minutes. Pour the custard into a clean bowl, cover with plastic wrap pressed directly onto the surface, and chill for at least 2 hours.
- Step 4:Assemble the TartOnce the crust is cool and the custard is chilled, pour and spread the vanilla custard evenly into the blind-baked tart shell. Arrange your washed and dried fresh fruits decoratively over the custard. You can create concentric circles or a beautiful mosaic pattern with your chosen fruits.
- Step 5:Glaze and ChillIf using, gently heat apricot jam with a tablespoon of water or fruit juice in a small saucepan until melted and smooth. Strain if desired, then lightly brush the warm glaze over the arranged fruits for a beautiful shine. Refrigerate the `homemade vanilla custard fruit tart` for at least 2 hours, or ideally 4 hours, to allow the custard to fully set and the flavors to meld before serving.
Notes
- Keep your beautiful fruit tart covered in the refrigerator for up to 2-3 days; while the fresh fruits are best enjoyed promptly, it will still be delicious.
- This delightful fruit tart is designed to be served chilled, so there's no need to reheat it; simply bring it out of the fridge 15-20 minutes before serving to let its flavors truly shine.
- Present individual slices as a vibrant standalone dessert, or elevate the experience with a light dusting of powdered sugar or a delicate dollop of unsweetened whipped cream on the side.
- To achieve that perfectly flaky and tender tart crust, remember to use very cold, cubed butter and pulse the dough just until it comes together, preventing overmixing which can make it tough.
- Prep Time: 15 minutes
- Cook Time: 20 minutes
- Method: Stovetop
- Cuisine: American
Nutrition
- Serving Size: 1 slice (1/8th of tart)
- Calories: 390
- Sodium: 85mg
- Fat: 23g
- Saturated Fat: 14g
- Trans Fat: 0g
- Protein: 47g
FAQs
Can I prepare this Homemade Vanilla Custard Fruit Tart ahead of time for a special occasion?
Yes, you absolutely can! The crust can be baked and cooled a day or two in advance, wrapped gently to maintain its crispness. The vanilla custard can also be made, cooled completely, and then refrigerated in an airtight container for up to three days. For the freshest look and best texture, assemble the tart with the vibrant fruit topping just a few hours before serving. This thoughtful timing prevents the crust from becoming soggy and keeps the fruit looking its absolute best. It’s a fantastic trick for stress-free entertaining, allowing you to enjoy your guests instead of being stuck in the kitchen at the last minute. Just imagine, a spectacular dessert ready to wow everyone without a scramble!
What are the best types of fresh fruit to use for a Classic Fresh Fruit Dessert?
The true beauty of a fruit tart lies in its stunning visual appeal and the delightful medley of flavors from fresh fruit! For a truly classic and vibrant look, opt for a colorful mix of berries like plump strawberries, juicy blueberries, tart raspberries, and sweet blackberries. Sliced kiwi, bright mandarin orange segments, and thinly sliced ripe peaches or nectarines also add wonderful splashes of color and complementary flavors. Aim for fruits that are ripe but firm, ensuring they hold their shape beautifully on top of the custard. Try to avoid fruits that release excessive water, such as very ripe melon, as they can sometimes lead to a soggy tart. A thoughtful assortment not only looks stunning but provides a delightful range of tastes and textures in every bite.
How do I ensure my vanilla custard is perfectly smooth and sets beautifully for this Homemade Vanilla Custard Fruit Tart?
The secret to achieving a velvety smooth vanilla custard, perfect for a Homemade Vanilla Custard Fruit Tart, lies in two key steps: gentle heat and constant attention. Cook the custard base over medium-low heat, stirring continuously with a whisk, making sure to scrape the bottom and corners of the pan to prevent scorching and the formation of lumps. Once it thickens to your desired consistency, a quick pass through a fine-mesh sieve will catch any tiny bits, guaranteeing that truly silky texture we all adore. To ensure it sets beautifully firm, give it ample time to chill undisturbed in the refrigerator, ideally for at least four hours, or even better, overnight. Patience truly is a virtue here, leading to a luscious, firm custard that stands up proudly beneath your vibrant fruit topping.
Are there any easy substitutions for the tart crust if I’m looking for a gluten-free option?
Absolutely! Crafting a delicious gluten-free tart crust for this classic dessert is surprisingly straightforward. You can easily use a high-quality store-bought gluten-free pie or tart crust mix, carefully following the package directions for preparation and baking. Alternatively, you can create your own using a blend of gluten-free flours, such as almond flour, oat flour, or a commercial gluten-free all-purpose blend. It’s often helpful to ensure your chosen flour blend includes a binder, like xanthan gum, or add a small amount if it doesn’t, to help with the dough’s structure and prevent crumbling. Bake it exactly as you would a regular crust until it achieves a lovely golden brown and crisp texture. This ensures that everyone can indulge in a slice of this delightful fruit tart!