Custard-Filled Sweet Bread: A Delicious Recipe for Your Next Baking Adventure
Picture this: a Saturday morning, the air thick with the promise of something sweet, a gentle hum from the kitchen promising pure delight. My grandma, a wizard with flour and a twinkle in her eye, always declared that life’s best moments were baked, not bought. And her masterpiece? A soft, pillowy treat, generously filled with creamy goodness. That memory, fragrant with vanilla and warm dough, is precisely what inspired me to master the art of making Custard-Filled Sweet Bread: A Delicious Recipe for Your Next Baking Adventure. It’s a journey from simple ingredients to an utterly irresistible creation, bringing a smile to everyone who takes a bite. Here’s why this recipe will become your new baking obsession: This delightful recipe offers straightforward steps, ensuring even novice bakers can achieve perfectly golden, tender sweet bread with a luscious filling. Experience a harmonious blend of delicate sweetness from the bread and the rich, velvety texture of the homemade vanilla custard, creating a truly decadent flavor profile. The golden-brown exterior and creamy interior make this bread visually stunning, perfect for impressing guests or simply brightening your breakfast table. Beyond a breakfast pastry, this sweet bread is wonderfully versatile, serving as an elegant dessert, a comforting afternoon snack, or a delightful addition to any brunch spread.
Ingredients for Custard-Filled Sweet Bread: A Delicious Recipe for Your Next Baking Adventure
Here’s what you’ll need to make this delicious dish:
- All-Purpose FlourThe foundation of our soft, tender bread. Ensure it’s fresh for the best texture and rise.
- Granulated SugarSweetens both the bread dough and the creamy custard, balancing the richness.
- Active Dry YeastThe magical ingredient that gives our bread its wonderful airy structure and soft crumb. Always check the expiration date.
- Warm MilkProvides the necessary liquid for the dough and helps activate the yeast. Aim for a temperature between 105-115°F (40-46°C).
- Unsalted ButterAdds richness and tenderness to the bread dough. Make sure it’s softened to room temperature for easier incorporation.
- Large EggsContribute to the dough’s structure, color, and richness, and are essential for a silky-smooth custard.
- SaltBalances the sweetness and enhances all the flavors in both the bread and the custard. Don’t skip this important ingredient.
- Vanilla PowderThe star flavor of our luscious custard, providing a comforting and aromatic essence. Use pure vanilla for the best results.
- CornstarchThickens the custard to a perfect, spoonable consistency without any unwanted lumps. It’s a great plant-based option.
The full ingredients list, including measurements, is provided in the recipe card directly below.
The Sweet Science of Dough: Crafting Your Base
Every great Custard-Filled Sweet Bread begins with a remarkable dough. This isn’t just any dough; it’s a living, breathing entity that, with a little care and attention, transforms into a cloud-like vessel for our creamy custard. The first time I attempted this, my kitchen looked like a flour bomb went off, and the dough resembled a stubborn, uncooperative blob. I learned quickly that patience and a gentle touch are key. Think of it less as a battle and more like a tender embrace, guiding the ingredients into harmony. The warmth of the milk, the fizz of the yeast, the soft embrace of butter – each plays a crucial role in creating the perfect foundation for your delicious sweet bread. Don’t be intimidated; if I can conquer the dough, so can you. The reward of a perfectly risen, golden-brown loaf is absolutely worth every truthahn-speck of flour.
Mastering the Creamy Custard: The Heart of the Sweet Bread
While the dough is off doing its rising magic, our attention turns to the luscious heart of this treat: the creamy custard. This isn’t just any filling; it’s a velvety dream, rich with vanilla and a delightful smoothness that melts in your mouth. Many years ago, my first attempt at custard resulted in something resembling scrambled eggs, leading to much laughter and a quick pivot to a jam-filled backup plan. The secret, I discovered, lies in constant stirring and precise temperature control. Whisking continuously ensures a lump-free texture, transforming simple ingredients like milk, sugar, eggs, and cornstarch into a silken delight. This custard is the delicious counterpoint to the tender bread, creating a symphony of textures and flavors that will make you wonder where this recipe has been all your life. Getting it just right is incredibly satisfying, like solving a delicious puzzle.
Assembling Your Masterpiece: Bringing It All Together
The moment the dough and custard are ready, the real fun begins. This is where your individual Custard-Filled Sweet Bread: A Delicious Recipe for Your Next Baking Adventure truly starts to take shape. I remember one particular baking session where I got a little too ambitious with the custard filling, resulting in a delicious but somewhat leaky situation during baking. Lesson learned: generosity is good, but restraint is divine when it comes to filling! Gently rolling out the dough and carefully spooning in the creamy custard before shaping is an art form that comes with practice. Each fold and pinch secures the precious filling, promising a delightful surprise with every slice. It’s a bit like wrapping a precious gift, knowing the joy it will bring when finally opened. The anticipation builds with every perfectly formed piece.
The Magic of Baking: Watching Your Creation Come to Life
The final act in our culinary play is the baking itself. Sliding the trays of beautifully shaped dough into the warm embrace of the oven is always a moment of quiet anticipation. The aroma that begins to waft through the house as the sweet bread bakes is simply intoxicating – a promise of the deliciousness to come. It’s during this time that the bread transforms, puffing up, turning golden brown, and developing that irresistible crust while the custard inside sets to a perfect creamy consistency. There’s a particular satisfaction in watching your efforts literally rise and glow. The gentle crackle of the crust as it cools, the irresistible fragrance, and the sheer visual appeal of the finished bread truly make the waiting worthwhile. This final stage confirms that every step, from activating the yeast to crafting the custard, was a worthwhile journey.
How to Make Custard-Filled Sweet Bread: A Delicious Recipe for Your Next Baking Adventure
Follow these simple steps to prepare this delicious dish:
Step 1: Prepare the Dough
In a large mixing bowl, combine the warm milk, a tablespoon of sugar, and active dry yeast. Let it sit for 5-10 minutes until foamy, indicating the yeast is active. Add the remaining sugar, softened unsalted butter, eggs, and salt, mixing until well combined. Gradually add the all-purpose flour, one cup at a time, until a soft, shaggy dough forms.
Step 2: Knead and First Rise
Turn the dough out onto a lightly floured surface and knead for 8-10 minutes until it becomes smooth and elastic. Place the dough in a lightly oiled bowl, turning once to coat. Cover the bowl with plastic wrap or a clean kitchen towel and let it rise in a warm place for 1-1.5 hours, or until doubled in size.
Step 3: Make the Vanilla Custard
While the dough rises, prepare the custard. In a medium saucepan, whisk together granulated sugar and cornstarch. Gradually whisk in the milk until smooth. Add one egg yolk. Cook over medium heat, stirring constantly, until the mixture thickens and comes to a gentle boil. Remove from heat, stir in the vanilla powder, and transfer to a bowl. Cover the surface with plastic wrap to prevent a skin from forming and let it cool completely in the refrigerator.
Step 4: Shape the Sweet Bread
Once the dough has doubled, gently punch it down and divide it into 12-16 equal pieces. Roll each piece into a small ball, then flatten it into a circle. Spoon about 1-2 tablespoons of the cooled vanilla custard into the center of each dough circle. Carefully gather the edges of the dough around the custard and pinch them together tightly to seal, forming a neat ball.
Step 5: Second Rise and Bake
Arrange the filled dough balls seam-side down on a baking sheet lined with parchment paper, leaving some space between them. Cover loosely with plastic wrap and let them rise again for another 30-45 minutes, or until visibly puffy. Preheat your oven to 375°F (190°C). Brush the tops of the risen sweet breads with an egg wash (one egg beaten with a tablespoon of water) for a golden finish. Bake for 18-22 minutes, or until golden brown and cooked through.
Step 6: Cool and Serve
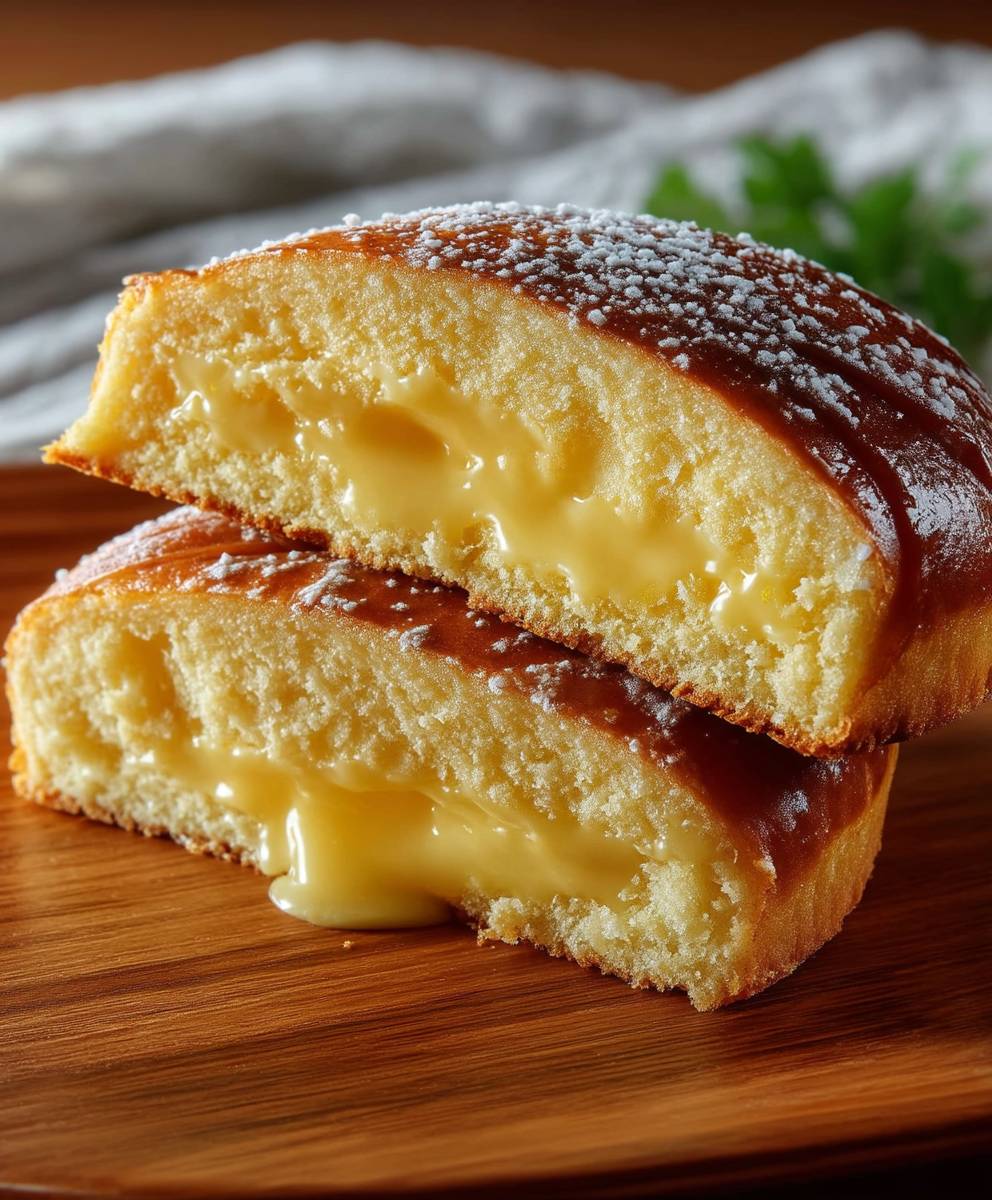
Once baked, remove the sweet bread from the oven and let it cool on a wire rack. They are best enjoyed warm, but also delightful at room temperature. Transfer to plates and drizzle with a light dusting of powdered sugar for the perfect finishing touch.
Tips for Your Best Custard-Filled Sweet Bread
Achieving bakery-worthy results with your Custard-Filled Sweet Bread: A Delicious Recipe for Your Next Baking Adventure is entirely within reach with a few helpful pointers. One of the most common pitfalls, which I’ve certainly stumbled into, is rushing the proofing process. Resist the urge! Dough needs its sweet time to rise properly. A warm, draft-free spot is ideal for both the first and second rises, allowing the yeast to work its magic and create that wonderfully airy texture. If your kitchen is cool, a slightly warmed oven (turned off!) can be a perfect proofing box. Another crucial tip involves your custard. Ensure it is completely chilled before you attempt to fill the dough. Warm custard will make the dough sticky and difficult to work with, leading to a rather messy assembly. Additionally, when sealing the dough around the custard, be firm but gentle. A good seal prevents the custard from leaking out during baking, keeping all that creamy goodness safely tucked inside.
Variations to Keep Things Exciting
While the classic vanilla Custard-Filled Sweet Bread is a triumph on its own, don’t hesitate to experiment with variations to suit your taste or the season. For a citrusy twist, you could infuse your custard with lemon or orange zest, adding a bright counterpoint to the sweetness. Simply add the zest during the custard-making process. If you’re a chocolate lover, a cocoa-infused custard or even tiny chocolate chips folded into the vanilla custard would be a delightful surprise. You could also experiment with fruit-flavored custards by adding pureed fruits like raspberries or mango, ensuring to adjust the sweetness and thickness as needed, perhaps with a touch more cornstarch. For an extra touch of decadence, consider sprinkling some chopped nuts, like almonds or pecans, on top of the sweet bread before baking, or adding a simple glaze made from powdered sugar and a splash of milk or fruit juice after they cool. These small tweaks can transform the bread into a whole new experience, proving its incredible versatility.
Storing Your Delicious Sweet Bread
Once you’ve baked your batch of Custard-Filled Sweet Bread, proper storage ensures they remain fresh and delicious for as long as possible. Although they are undeniably best enjoyed on the day they are made, these delightful treats can be stored for a few days. Allow the sweet bread to cool completely before storing. Once cooled, place them in an airtight container at room temperature for up to 2 days. If you need to extend their freshness, storing them in the refrigerator can keep them good for up to 3-4 days. However, be aware that refrigeration can sometimes alter the texture of the bread, making it a little firmer. For longer storage, this sweet bread freezes beautifully. Once completely cool, wrap individual pieces tightly in plastic wrap, then place them in a freezer-safe bag or container. They can be stored in the freezer for up to 2 months. To enjoy, simply thaw at room temperature or gently warm them in a microwave or oven for that freshly baked taste and texture.
The Accidental Discovery of Sunshine on a Plate

My kitchen often resembles a mad scientist’s pflanzliches lab, flour explosions and sugar avalanches being standard. One particularly chaotic Tuesday, attempting to recreate a half-remembered treat from a dream, I stumbled upon this divine custard-filled sweet bread. It was a glorious accident, a true culinary eureka moment that brought unexpected joy, turning a dreary afternoon into a delightful surprise.
Perfecting the Cooking Process
For optimal results, prepare your creamy custard first; it needs ample time to chill and firm up. While the custard cools, you can then focus entirely on creating the fluffy sweet bread dough. This sequence ensures both components are ready for assembly at the perfect moment, leading to an incredibly efficient and satisfying baking experience.
Add Your Touch
Feel free to customize this delightful sweet bread! Swap vanilla powder for almond or lemon zest in the custard for a different flavor profile. You might also fold a handful of dried cranberries or chocolate chips into the dough before the final rise. A sprinkle of coarse sugar on top before baking adds a lovely crunch.
Storing & Reheating
Store leftover custard-filled sweet bread in an airtight container at room temperature for up to two days, or refrigerated for up to four. For reheating, a quick 10-15 seconds in the microwave brings back its soft texture. Alternatively, a brief warm-up in a toaster oven can revive its crisp exterior beautifully.
Ah, the first time I served this sweet bread to my notoriously picky family, my sister-in-law, a self-proclaimed dessert critic, declared it “pure edible magic.” Her praise made all the flour dust and sticky counters worth it, cementing this recipe as a permanent family favorite.
Baking, much like life, is an adventure filled with sweet triumphs and occasional, shall we say, “learning experiences.” But sometimes, amidst the flour dust and the sticky countertops, you stumble upon something truly spectacular. Something that makes the entire house smell like a dream, something that brings smiles faster than a squirrel finding a dropped nut. Today, my friends, we embark on such a journey, creating the most incredibly fluffy, rich, and utterly irresistible Custard-Filled Sweet Bread: A Delicious Recipe for Your Next Baking Adventure. Forget your worries, tie on that apron, and prepare for a symphony of flavors that will dance on your taste buds.
This isn’t just any sweet bread; it’s a hug in carb form, a golden embrace filled with a luscious, creamy custard. Each bite is a testament to the magic that happens when simple ingredients are treated with a little love and a lot of laughter. Imagine tearing into a warm, soft bun, the delicate crust giving way to an airy crumb, only to discover a hidden treasure of velvety custard. It’s the kind of treat that makes you close your eyes and sigh contentedly, forgetting all about that email you didn’t want to send.
Gathering Your Culinary Crew: Ingredients
Before we don our imaginary chef hats, let’s ensure our pantry is stocked. Precision is key, but don’t fret; even if your measuring cups stage a small rebellion, we’ll still end up with something delicious. This recipe for a delightful sweet bread with a creamy filling requires fresh ingredients for the best flavor and texture.
For the Sweet Bread Dough:
- 1 cup (240ml) warm milk (around 105-115°F or 40-46°C)
- 1/2 cup (100g) granulated sugar, plus 1 tablespoon
- 2 1/4 teaspoons (1 packet) active dry yeast
- 1/2 cup (113g) unsalted butter, melted and cooled
- 2 large eggs, at room temperature
- 1 teaspoon vanilla powder
- 1 teaspoon salt
- 4 1/2 to 5 cups (540-600g) all-purpose flour, divided, plus more for dusting
- 1 egg, beaten, for egg wash
For the Creamy Custard Filling:
- 2 cups (480ml) milk
- 1/2 cup (100g) granulated sugar
- 1/4 cup (30g) cornstarch
- 4 large egg yolks
- 2 tablespoons unsalted butter
- 1 teaspoon vanilla powder
The Dough: A Journey of Elasticity
This sweet bread adventure begins with activating the yeast, our tiny little architects of fluffiness. In a large bowl, combine the warm milk and 1 tablespoon of sugar. Sprinkle the active dry yeast over the top and let it sit for about 5-10 minutes, or until it becomes foamy. This indicates our yeast is alive and ready to party!
Once your yeast is bubbling, add the remaining 1/2 cup of sugar, melted butter, two large eggs, vanilla powder, and salt to the mixture. Whisk everything together until well combined. Gradually add 4 cups of the all-purpose flour, mixing with a wooden spoon until a shaggy dough forms. Turn the dough out onto a lightly floured surface and knead for 8-10 minutes, incorporating additional flour as needed, up to 1/2 cup, until the dough is smooth, elastic, and no longer sticky. It should spring back when gently poked. If you have a stand mixer, use the dough hook attachment for this step – it’s a real arm saver!
Lightly grease a large clean bowl with a little oil. Place the dough in the bowl, turning it once to coat. Cover the bowl with plastic wrap or a clean kitchen towel and let it rise in a warm place for 1 to 1 1/2 hours, or until doubled in size. This is where patience truly pays off. While our dough is puffing up like a proud marshmallow, let’s conquer the creamy heart of our sweet bread.
Crafting the Creamy Custard
Now for the star of the show, the luscious custard filling. In a medium saucepan, heat 1 1/2 cups of the milk over medium heat until it just begins to simmer around the edges. Meanwhile, in a separate bowl, whisk together the remaining 1/2 cup of milk, 1/2 cup granulated sugar, cornstarch, and egg yolks until smooth and no lumps remain. This mixture forms the base of our velvety custard.
Once the milk on the stove is simmering, slowly temper the egg yolk mixture by gradually whisking about half of the hot milk into the egg yolk mixture. This prevents the eggs from scrambling. Then, pour the warmed egg mixture back into the saucepan with the remaining hot milk, whisking continuously. Cook over medium-low heat, stirring constantly, until the custard thickens to a pudding-like consistency. This usually takes about 5-7 minutes. Once thickened, remove from heat and stir in the butter and vanilla powder until smooth.
Pour the hot custard into a clean bowl. To prevent a skin from forming, press a piece of plastic wrap directly onto the surface of the custard. Allow it to cool at room temperature for about 30 minutes, then refrigerate for at least 2 hours, or until completely chilled and firm. This firm custard is perfect for our sweet bread filling.
Assembly and Baking: The Grand Finale
Once your dough has doubled and your custard is chilling like a pro, it’s time to bring them together. Gently punch down the risen dough to release the air. Turn it out onto a lightly floured surface and divide it into 12 equal pieces. Shape each piece into a smooth ball. On a lightly floured surface, roll each dough ball into a circle about 4-5 inches in diameter.
Spoon about 1-2 tablespoons of the chilled custard into the center of each dough circle. Carefully gather the edges of the dough around the custard, pinching them firmly together to seal the filling completely inside. Ensure there are no gaps for the custard to escape during baking. Place the seam-side down on a baking sheet lined with parchment paper, leaving about 2 inches between each bun. Cover loosely with plastic wrap or a clean kitchen towel and let rise again in a warm place for another 30-45 minutes, or until noticeably puffy.
Preheat your oven to 375°F (190°C). Just before baking, brush the tops of the sweet bread buns with the beaten egg wash. This gives them that beautiful golden-brown sheen. Bake for 18-22 minutes, or until golden brown and cooked through. Remove from the oven and let cool slightly on a wire rack before serving. The aroma filling your kitchen will be pure bliss!
Expert Tips for Baking Bliss
- Don’t rush the proofing: Allow the dough to double in size for a truly light and airy texture. A warm, draft-free spot helps the yeast work its magic efficiently.
- Chill your custard thoroughly: A well-chilled custard filling is easier to handle and less likely to leak during the baking process, ensuring perfect pockets of creamy goodness.
- Seal those buns tightly: Pinch the dough edges securely around the custard to prevent any delicious filling from escaping. A tight seal is the secret to a perfectly filled sweet bread.
Conclusion for Custard-Filled Sweet Bread: A Delicious Recipe for Your Next Baking Adventure
This Custard-Filled Sweet Bread is more than just a recipe; it’s an invitation to create joy in your kitchen. From the delightful process of kneading the dough to the moment you bite into that warm, custard-filled treasure, every step is a reward. We’ve explored the journey from humble ingredients to an irresistible baked good, covered essential cooking tips, and offered creative ways to customize your masterpiece. We hope this delicious recipe for your next baking adventure inspires you to gather your loved ones and share in the simple pleasure of homemade goodness. Happy baking!
Print
Custard-Filled Sweet Bread: A Delicious Recipe for Your Next Baking Adventure
- Total Time: 35 minutes
- Yield: 4 servings
Description
Indulge in our Custard-Filled Sweet Bread: airy, buttery dough cradling a smooth, rich vanilla bean custard. This comforting treat promises a delightful baking experience.
Ingredients
- All-purpose flour: 3 cups
- Granulated sugar: 1/2 cup
- Active dry yeast: 2 1/4 teaspoons (one packet)
- Whole milk: 1 1/2 cups, divided
- Unsalted butter: 1/2 cup (1 stick), softened, plus 2 tablespoons
- Large eggs: 2 large, plus 2 large egg yolks
- Cornstarch: 3 tablespoons
- alcohol-free vanilla extract: 2 teaspoons
Instructions
- Step 1: **Prepare the Dough:** In a small bowl, combine 1/2 cup warm milk (105-115°F / 40-46°C), 1 tablespoon of the sugar, and the active dry yeast; let sit for 5-10 minutes until foamy. In a large bowl or stand mixer, combine the remaining 1 cup milk, 1/4 cup sugar, softened butter, 2 large eggs, and 1/2 teaspoon salt. Add the yeast mixture, then gradually add the flour, mixing until a shaggy dough forms. Knead on a lightly floured surface or with a dough hook for 8-10 minutes until smooth and elastic. Place the dough in a greased bowl, cover, and let rise in a warm place for 1 to 1.5 hours, or until doubled in size.
- Step 2: **Make the Custard Filling:** While the dough rises, prepare the custard. In a medium saucepan, whisk together the 2 large egg yolks, remaining 1/4 cup granulated sugar, and cornstarch until smooth. Gradually whisk in 1 cup of whole milk until well combined. Cook over medium heat, stirring constantly with a whisk, until the mixture thickens significantly, comes to a gentle boil, and coats the back of a spoon (about 5-7 minutes). Remove from heat, stir in the vanilla bean paste and 2 tablespoons of butter. Transfer the custard to a clean bowl, press plastic wrap directly onto the surface to prevent a skin from forming, and chill in the refrigerator until completely cold.
- Step 3: **Shape and Fill the Bread:** Gently punch down the risen dough and turn it out onto a lightly floured surface. Roll the dough into a large rectangle, approximately 18×12 inches. Evenly spread the chilled custard filling over the entire surface of the dough, leaving a small border (about 1/2 inch) along one of the longer edges. Tightly roll the dough from the opposite long edge towards the border, forming a log. Pinch the seam gently to seal. Using a sharp knife or dental floss, cut the log into 12-16 equal slices (about 1.5 inches thick).
- Step 4: **Second Rise:** Arrange the sliced rolls (cut-side up) in a greased 9×13 inch baking dish, leaving a little space between each roll. Alternatively, you can place them on a parchment-lined baking sheet. Cover loosely with plastic wrap or a clean kitchen towel and let them rise again in a warm place for 30-45 minutes, or until visibly puffy and almost touching. Preheat your oven to 375°F (190°C) during the last 15 minutes of the second rise.
- Step 5: **Bake and Cool:** Once risen, gently brush the tops of the rolls with an egg wash (one egg beaten with 1 tablespoon of water) for a golden finish. Bake for 25-30 minutes, or until the bread is deeply golden brown and the custard is set. If the tops begin to brown too quickly, you can loosely tent the dish with aluminum foil. Remove from the oven and let cool in the pan for 10-15 minutes before transferring to a wire rack to cool completely. Serve warm or at room temperature.
Notes
- For ultimate freshness, store any leftover Custard-Filled Sweet Bread covered in the refrigerator for up to 3-4 days to preserve the creamy filling.
- To enjoy your chilled bread, warm slices gently in the microwave for 15-30 seconds or reheat in a 300°F (150°C) oven for 5-10 minutes until soft and fragrant.
- These delightful rolls make a wonderful accompaniment to your morning coffee or tea, a charming addition to a brunch spread, or a simple, comforting dessert.
- When preparing the custard, be sure to whisk constantly over medium heat until it significantly thickens and coats the back of your spoon, as this ensures a silky-smooth, perfectly set filling.
- Prep Time: 15 minutes
- Cook Time: 20 minutes
- Method: Stovetop
- Cuisine: American
Nutrition
- Serving Size: 1 slice (approx. 85g)
- Calories: 310
- Sodium: 240mg
- Fat: 14g
- Saturated Fat: 7g
- Trans Fat: 0.1g
- Protein: 24g