
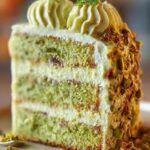
Remember the time you tried to make that fancy French dessert and it collapsed into a sad, sugary puddle? Forget that disaster. This recipe for theBest Creamy Pistachio Layer Cake | Perfect for Beginner Bakersis your glorious redemption. It’s the cake that tastes like a vacation to an Italian villa, combining moist, subtly sweet cake layers with a tangy, cloud-like cream cheese frosting, guaranteed to impress every single person at your table—including yourself.
- This simple layer cake requires basic kitchen skills and uses accessible ingredients, making complex results achievable for beginner bakers immediately.
- The flavor profile balances earthy, toasted pistachios with bright citrus notes and rich vanilla, avoiding artificial coloring or flavoring entirely.
- Its striking light green hue and impressive height make this cake a truly stunning centerpiece for any celebration or casual weekend gathering.
- Enjoy this versatile dessert chilled or at room temperature, paired beautifully with a strong cup of coffee or a delicate herbal tea throughout the year.
The Magic of Pistachios: Why This Cake is Your Next Obsession
There are layer cakes, and then there arelayer cakes—the kind that stop conversations and demand full attention. If you think pistachios are just an excellent addition to ice cream or a crunchy garnish, prepare to have your entire world view adjusted. We are not using that sickly sweet, fluorescent green pudding mix that dominated childhood birthday parties. This recipe uses actual, honest-to-goodness ground pistachios, which lends an incredible depth of flavor and a beautiful, natural pale green tint to the cake crumb.
When I first attempted this recipe, I was convinced it would involve complicated folding techniques or some sort of pastry wizardry, but I discovered the true genius of pistachio cake lies in its simplicity. It’s essentially a very elevated vanilla cake with crushed nuts stirred in. The key is to toast the pistachios lightly before grinding them. This step might seem fussy, but it wakes up the oils in the nuts, transforming them from mildly flavored crunchiness into fragrant, earthy treasure. If you skip the toasting, the cake will still be good, but you’ll be making a regular cake. If you toast them, you create magic. Trust me, the difference is astronomical.
This dessert is designed specifically so that you, the busy home baker, can achieve towering, bakery-quality results without spending a week weeping over failed ganaches. We skip the traditionally unstable whipped cream frosting in favor of a robust, slightly tangy cream cheese variation, which holds its shape perfectly and complements the nuttiness of the cake. This is truly theBest Creamy Pistachio Layer Cakebecause it manages to be luxurious without being intimidating.
The Simple Science Behind the Crumb: Getting the Layers Right
The foundation of any great layer cake is, obviously, the layers themselves. We aim for moist, tender, and perfectly level cakes. Many beginner bakers struggle with dry edges or domes that require excessive trimming. The secret to avoiding these pitfalls often lies in the fat you choose and how you measure your ingredients.
In this recipe, we utilize both softened butter and a neutral oil. Butter provides flavor and structure, contributing to that classic creamy richness. Oil, however, ensures moisture remains trapped in the crumb, keeping the cake tender and fresh for days—a necessity if you want to prep ahead of time. Cream the butter and sugar thoroughly until they are light and fluffy; this step incorporates necessary air, providing lift. Once you add the dry ingredients, mix only until just combined. Overmixing develops gluten unnecessarily, leading to a tough, rubbery cake texture that nobody enjoys.
To ensure all three layers bake evenly, use a kitchen scale to divide the batter equally among your prepared cake pans. Uneven layers lead to a perpetually lopsided cake, which is a structural nightmare when you try to stack it. By taking a quick minute to weigh the batter, you guarantee perfectly uniform layers that stack easily and look professional. Bake at a moderate temperature, 350°F (175°C), and rely on the toothpick test—it should come out with moist crumbs attached, not totally clean, which indicates overbaking.
Crafting the Cloud: Mastering the Cream Cheese Frosting
Cream cheese frosting is one of the most forgiving and delicious toppings in the baking world, provided you keep a few key tips in mind. The biggest challenge people face is ending up with a runny, soup-like mess that oozes off the sides of the cake. This usually happens for two reasons: temperature control and over-mixing.
Always ensure your butter and cream cheese are adequately softened but not melted. If they are too warm, the emulsion breaks when you add the powdered sugar, resulting in liquid frosting. Take them out about 30 minutes before mixing. Beat the butter and cream cheese together until completely smooth before adding any sugar. This initial creaming ensures a stable base.
When adding the powdered sugar, do so slowly, one cup at a time, allowing it to fully incorporate. If the frosting feels too soft, do not panic and start adding an entire bag of sugar, which will make it overly sweet. Instead, try chilling the finished frosting in the refrigerator for about 20 minutes. The cold temperature firms up the fats, giving you a much stiffer, more manageable consistency perfect for piping or spreading. A touch of lemon juice or alcohol-free vanilla extract cuts through the sweetness and adds complexity that truly elevates this frosting from standard to spectacular.
Pro Baker Secrets for Stunning Results
Toasting the Nuts: The Crucial Flavor Step
We already touched upon the importance of toasting, but let’s delve into the mechanics. Buy shelled, unsalted pistachios. Spread them in a single layer on a baking sheet. Toast in a 350°F (175°C) oven for about 6 to 8 minutes, or until you smell their aroma fill the kitchen. This smells heavenly and is your cue they are done. Watch them carefully, as nuts go from perfect to burnt charcoal surprisingly quickly.
Once cool, grind the nuts in a food processor. The goal is a fine powder, but be extremely careful not to over-process them. If you run the processor for too long, the pistachios will release too much oil and turn into nut butter, which will dramatically change the cake’s texture, making it heavy and oily instead of light and airy. Pulse until the mixture resembles coarse cornmeal or fine sand, stopping frequently to scrape down the sides.
Prepping Your Pans and Achieving Even Layers
Layer cake construction begins before the mixing bowl even comes out. Proper pan preparation prevents sticking and helps guarantee those beautiful, flat layers that make stacking a joy. Start by greasing the bottom and sides of your 8-inch round cake pans with butter or baking spray. Then, cut circles of parchment paper to fit the bottom of each pan exactly. This parchment acts as a safety net, ensuring a clean release every time. You can lift the cakes right out of the pans once they are cool.
To prevent the layers from developing large domes in the center—the bane of many home bakers—try using insulated baking strips soaked in water and wrapped around the outside of your pans. These specialized strips, easily found online, slow down the baking process at the edges, allowing the center to rise at the same rate, resulting in flatter cakes requiring minimal leveling. If you do get a slight dome, wait until the cakes are completely cooled, and use a long serrated knife to gently saw off the top, creating a perfect canvas for your frosting.
Ingredients for Best Creamy Pistachio Layer Cake | Perfect for Beginner Bakers
Here’s what you’ll need to make this delicious dish:
- All-Purpose FlourUse a standard white flour, and measure it properly by spooning it into the measuring cup and leveling off to ensure a light crumb.
- Granulated SugarProvides sweetness and helps create a tender texture when creamed thoroughly with the butter.
- Unsalted ButterMust be softened to room temperature for the best creaming results, contributing richness to the cake layers.
- Neutral OilSuch as canola or vegetable oil, ensuring the cake remains moist for several days without drying out.
- EggsEnsure they are large and at room temperature for better emulsification with the fat and sugar mixtures.
- Plain Greek Yogurt or ButtermilkAdds tanginess and acidity, reacting with the leavening agents to produce a tender crumb.
- Ground PistachiosUse freshly toasted and finely ground nuts for the deepest, most natural pistachio flavor and color.
- Baking Powder and Baking SodaThe essential chemical leaveners that provide lift and make the cake light and airy.
- Salt and Alcohol-Free Vanilla ExtractFlavor enhancers that balance the sweetness and bring forward the nutty notes in the cake.
- Cream CheeseUse full-fat, brick-style cream cheese, softened to room temperature for a smooth, stable frosting.
- Powdered Sugar (Confectioners’ Sugar)Essential for the creamy frosting, sift it first to prevent lumps and ensure a velvety texture.
The full ingredients list, including measurements, is provided in the recipe card directly below.
How to Make Best Creamy Pistachio Layer Cake | Perfect for Beginner Bakers
Follow these simple steps to prepare this delicious dish:
Step 1: Prepare the Nuts and Pans
Preheat your oven to 350°F (175°C). Toast 1.5 cups of shelled pistachios on a baking sheet for 6-8 minutes, then allow them to cool completely. Grease three 8-inch round cake pans and line the bottoms with parchment paper circles. Grind 1 cup of the cooled pistachios into a fine meal, being careful not to turn it into butter. Reserve the remaining nuts for garnish.
Step 2: Mix the Dry and Wet Ingredients
In a medium bowl, whisk together the flour, baking powder, baking soda, and salt. In a separate large mixing bowl, beat the softened butter and sugar until the mixture is light and fluffy, about 3-4 minutes. Add the eggs one at a time, beating well after each addition. Incorporate the alcohol-free vanilla extract and oil, mixing thoroughly.
Step 3: Combine and Divide the Batter
Alternate adding the dry ingredients mixture and the yogurt (or buttermilk) to the wet ingredients, starting and ending with the dry ingredients. Mix only until just combined, avoiding over-mixing. Stir in the ground pistachio meal by hand. Weigh the batter and divide it equally among the three prepared cake pans.
Step 4: Bake the Cake Layers
Bake the layers for 25 to 30 minutes, or until a toothpick inserted into the center comes out with moist crumbs attached. Let the cakes cool in the pans on a wire rack for 10 minutes before inverting them onto the rack, removing the parchment paper, and allowing them to cool completely before frosting.
Step 5: Prepare the Cream Cheese Frosting
While the cakes cool, beat the softened cream cheese and butter together in a stand mixer until smooth and creamy, scraping down the bowl frequently. Gradually add the sifted powdered sugar and alcohol-free vanilla extract, mixing on low speed until combined, then increase the speed to medium and beat until the frosting is light and fluffy. If the frosting seems too soft, chill it briefly.
Step 6: Assemble and Garnish the Cake
Place the first cake layer on your serving plate or cake stand. Spread an even layer of frosting over the top. Repeat with the second layer and frosting, then top with the final cake layer. Frost the top and sides of the entire cake smoothly. Gently press the reserved chopped pistachios around the bottom edge or sprinkle them over the top for a professional finish.
Allow the finished cake to chill in the refrigerator for at least 30 minutes before slicing to allow the frosting to set, resulting in perfectly clean slices for the perfect finishing touch.
Let’s be honest, baking can feel like an intensely stressful job interview where the interviewer is a whisk and the stakes are your weekend sanity. You carefully measure, you gently fold, you pray to the kitchen gods, and sometimes, you still end up with a brick instead of a cake. That was my life until I met the pistachio layer cake.
This isn’t just any pistachio cake. This is the velvet-textured, slightly nutty, impossibly moist confection that makes people ask, “Wait, did you actually bake this yourself, or did you kidnap a pastry chef?” The secret? It relies on simple techniques and pantry staples, making it truly theBest Creamy Pistachio Layer Cake | Perfect for Beginner Bakerswho fear complicated pastry science. Forget everything you think you know about high-maintenance desserts; this recipe is essentially a delightful vacation for your mixing bowl.
We’re diving into a realm where the hardest part is waiting for the cake to cool down enough so you can smother it in that dreamy, tangy cream cheese frosting. The vibrant green color, derived naturally from finely ground nuts, screams spring, making this cake perfect for holidays, birthdays, or Tuesday afternoons when you simply deserve a masterpiece.
The Recipe for Utter Bliss: Ingredients
Cake Components
- 2 cups all-purpose flour
- 1 cup shelled, unsalted pistachios, very finely ground
- 1 1/2 teaspoons baking powder
- 1/2 teaspoon baking soda
- 1/2 teaspoon salt
- 1 cup unsalted butter, softened
- 1 1/2 cups granulated sugar
- 3 large eggs, at room temperature
- 1 cup buttermilk (or 1 cup milk mixed with 1 tablespoon white vinegar, left for 5 minutes)
- 1 teaspoon alcohol-free vanilla extract
Cream Cheese Frosting
- 8 ounces cream cheese, softened
- 1/2 cup (1 stick) unsalted butter, softened
- 4 cups powdered sugar, sifted
- 1 teaspoon alcohol-free vanilla extract
- 1-3 tablespoons milk or heavy cream, as needed for consistency
- Extra chopped pistachios for garnish
Baking Magic: Step-by-Step Instructions
Creating the Tender Cake Layers
The foundation of this cake is moisture, which we achieve through a combination of buttermilk and the creaming method. Preheat your oven to 350°F (175°C) and grease and flour two 8-inch round cake pans. Line the bottoms with parchment paper—a crucial step for ensuring easy release that prevents those heartbreaking stuck edges.
In a medium bowl, whisk together the dry ingredients: flour, finely ground pistachios, baking powder, baking soda, and salt. Make sure those pistachios are practically powder; nobody wants gritty cake. Set this mixture aside. In a separate large bowl, use an electric mixer to cream the softened butter and granulated sugar until the mixture is light and fluffy. This step incorporates air, which is vital for a tender crumb. Don’t rush it; aim for at least three minutes of whipping.
Beat in the eggs one at a time, making sure each egg is fully incorporated before adding the next. Then, alternately add the dry ingredient mixture and the buttermilk, starting and ending with the dry ingredients (Dry, Wet, Dry, Wet, Dry). Mix only until just combined. Overmixing the batter is the number one cause of tough cake, so stop the mixer the moment you see no streaks of flour remaining. Divide the batter evenly between the prepared pans and bake for 28 to 32 minutes, or until a toothpick inserted into the center comes out clean. Let the cakes cool in the pans for 10 minutes before turning them out onto a wire rack to cool completely. Patience is a virtue, especially when dealing with hot cake.
Whipping Up the Dreamy Cream Cheese Frosting
The frosting is where the “creamy” title really shines. In a large mixing bowl, beat the softened cream cheese and butter together until completely smooth and there are absolutely no lumps. If you skip softening these ingredients, you will battle lumps for eternity, or at least until you give up and order takeout.
Gradually add the sifted powdered sugar, one cup at a time, beating on low speed until combined, then increasing to medium speed. Stir in the alcohol-free vanilla extract. If the frosting seems too thick—which can happen if your kitchen is chilly—add milk or cream, one tablespoon at a time, until you reach that perfect spreadable consistency. It should be thick enough to hold its shape but soft enough to glide smoothly over the cake layers.
Assembly and Presentation Tips
Once the layers are entirely cool (seriously, fully cool, or your frosting will stage a rapid melting protest), place the first layer on your serving platter. Spread about one-third of the frosting evenly over the top. Place the second layer on top, pressing gently. Frost the entire outside of the cake. This is where you get to decide if you want a perfect, smooth coat or a trendy, rustic “naked” look.
For the final flourish, gently press reserved chopped pistachios around the base or sprinkle them over the top. The contrast of the creamy white frosting and the bright green nuts is simply gorgeous, turning this home-baked treat into a showstopper that rivals any professional bakery display. Serving this masterpiece chilled enhances its structural integrity and flavor profile.
Sometimes, the greatest cooking hacks aren’t complicated techniques but tiny adjustments that drastically reduce friction in the kitchen.
- Ensure your cream cheese and butter are thoroughly softened; this is the singular key to achieving that smooth, lump-free frosting texture essential for the ultimate cake finish.
- Do not overmix the cake batter after adding the dry ingredients; mix only until the flour disappears to guarantee a moist and incredibly tender, light crumb.
- Chill the frosted cake briefly before cutting it. This sets the frosting firmly, allowing for clean, beautiful slices that hold their elegant shape perfectly.
I once served this cake at a neighborhood potluck where a renowned home baker confessed, tearfully, that she thought she had wasted years perfecting her sourdough starter when she could have just been making this pistachio delight.
The Accidental Discovery of Sunshine on a Plate

I once spent seven hours wrestling a complicated meringue layer cake, only for it to collapse dramatically like a tired soufflé. Defeated, I stumbled upon a simple recipe that birthed theBest Creamy Pistachio Layer Cake | Perfect for Beginner Bakers, proving that joy in the kitchen doesn’t require advanced engineering skills.
Perfecting the Cooking Process
For maximum baking efficiency, prepare the cake batter first, ensuring the dry ingredients are fully sifted before combining them with the wet mixture. While the layers cool completely, begin whipping the rich cream cheese frosting, thus ensuring your assembly phase goes smoothly and prevents any accidental melting catastrophes.
Add Your Touch
If you prefer a brighter citrus note, swap half the alcohol-free vanilla extract for fresh lemon zest—it provides an unexpected zing that complements the earthy pistachios beautifully. For texture enthusiasts, consider folding toasted, chopped pecans into the cake batter just before dividing it between the pans, adding delightful crunch.
Storing & Reheating
Store leftover pistachio cake tightly covered in an airtight container in the refrigerator for up to four days. Allow slices to sit at room temperature for about twenty minutes before serving to ensure the frosting returns to its optimal creamy texture, tasting fresh and decadent every time.
Conclusion for Best Creamy Pistachio Layer Cake | Perfect for Beginner Bakers
Embracing this simple approach to dessert truly delivers magnificent results. This recipe proves that you don’t need a complicated pastry degree to create something stunning and delicious. We’ve conquered the art of moist cake layers and smooth, tangy cream cheese frosting, securing your place as a kitchen champion. Whether you are baking for a special event or simply celebrating a successful Monday, thisBest Creamy Pistachio Layer Cake | Perfect for Beginner Bakersis your foolproof ticket to green, creamy perfection. Go forth and amaze your friends and family with this wonderfully nutty, show-stopping dessert that tastes even better than it looks.
Best Creamy Pistachio Layer Cake | Perfect for Beginner Bakers
- Total Time: 35 minutes
- Yield: 4 servings
Description
Master the ultimate Pistachio Layer Cake! Buttermilk ensures a velvety, moist crumb every time. Perfect for novices, this recipe uses simple creaming techniques for lush results.
Ingredients
- All-purpose flour: 2 cups
- Granulated sugar: 1 3/4 cups
- Unsalted butter (softened): 1 cup (divided)
- Large eggs: 4
- Buttermilk (room temperature): 1 cup
- Finely ground shelled pistachios: 1/2 cup (plus extra for garnish)
- Cream cheese (full-fat, softened): 8 ounces
- Powdered sugar (sifted): 3 cups
Instructions
- Step 1: Preheat the oven to 350°F (175°C). Grease and flour two 8-inch round cake pans. In a large bowl, whisk together the flour, sugar, baking powder, and a pinch of salt. Set aside.
- Step 2: Cream 1/2 cup of the softened butter in a separate bowl until light and fluffy. Beat in the eggs one at a time, ensuring each is fully incorporated. Slowly alternate adding the buttermilk and the dry ingredient mixture to the wet mixture, beginning and ending with the dry. Mix just until combined, then fold in the 1/2 cup of finely ground pistachios.
- Step 3: Divide the batter evenly between the prepared pans. Bake for 28 to 32 minutes, or until a toothpick inserted into the center comes out clean. Let the cakes cool in the pans for 10 minutes before turning them out onto a wire rack to cool completely.
- Step 4: While the cakes cool, prepare the cream cheese frosting: Beat the remaining 1/2 cup of softened butter with the 8 ounces of cream cheese until smooth and lump-free. Gradually add the 3 cups of sifted powdered sugar until the frosting is light and creamy. Add a splash of milk if necessary to reach a spreading consistency.
- Step 5: Once the cake layers are fully cooled, level the tops if desired. Place the first layer on a serving plate and spread a generous amount of frosting evenly over the top. Carefully place the second layer on top. Frost the entire cake, then immediately garnish the top and sides with extra chopped pistachios.
Notes
- Store leftovers covered in the refrigerator for up to 4 days, but remember to let the cake sit out on the counter for 30–45 minutes before serving for the optimal soft texture and flavor.
- For the best cake texture and smoothest frosting, ensure your buttermilk, butter, eggs, and cream cheese are all truly at room temperature before you begin mixing.
- Elevate the nutty profile by serving a slice alongside a strong espresso or a dusting of finely grated orange zest just before presentation.
- To achieve that professional look without crumb distractions, apply a very thin "crumb coat" of frosting, chill the cake for 15 minutes, and then apply the final thick layer.
- Prep Time: 15 minutes
- Cook Time: 20 minutes
- Method: Stovetop
- Cuisine: American
Nutrition
- Serving Size: 1 slice (1/14th of cake)
- Calories: 615
- Sodium: 330mg
- Fat: 47g
- Saturated Fat: 27g
- Trans Fat: 0.4g
- Protein: 52g

Leave a Comment