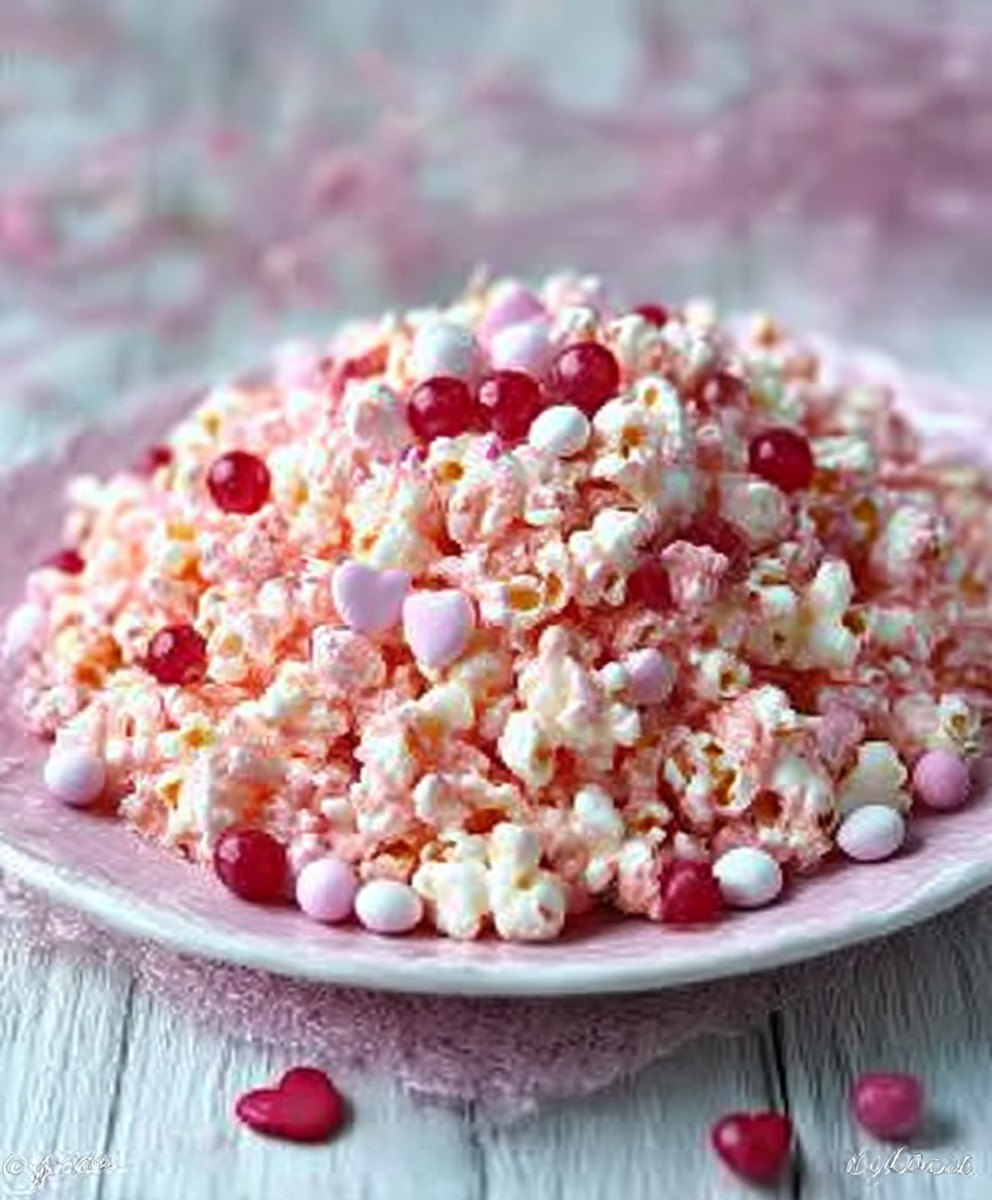
Easy Pink Popcorn Recipe for Valentine’s Day
Forget the tired box of chocolates; we are diving headfirst into a flurry of sweet, salty, and utterly vibrant crunch. I guarantee thisEasy Pink Popcorn Recipe for Valentine’s Dayis the simplest expression of love you can make—unless you count ordering takeout.
This recipe avoids all culinary complexity, delivering maximum visual impact and addictive flavor. It’s the perfect, whimsical snack for cozy couch dates or a celebratory Galentine’s movie marathon.
- Achieve maximum impact with minimal effort, transforming simple kernels into a stunning, photo-ready confection in under 15 minutes.
- The unique flavor profile balances delicate sweetness with a necessary hint of sea salt, creating a truly irresistible snacking experience.
- This vibrant pink hue makes the popcorn visually appealing and instantly sets the perfect romantic or celebratory mood for any gathering.
- The recipe is highly versatile, allowing easy customization with different flavors, sprinkles, or delightful edible glitter for extra sparkle.
Ingredients for Easy Pink Popcorn Recipe for Valentine’s Day
Here’s what you’ll need to make this delicious dish:
- Popcorn KernelsUse high-quality kernels designed for stovetop popping; they deliver the best fluffiness and volume compared to microwave bags.
- Coconut Oil or Canola OilA neutral, high-smoke point oil is essential for popping the kernels evenly without burning them before they reach their full potential.
- Unsalted Butter or Vegan Butter AlternativeThis provides the necessary richness and fat base for the caramel coating, ensuring the sugar adheres beautifully to every piece.
- Granulated SugarThe backbone of the sweet coating; it melts down into a clear syrup that holds the color and flavor across the popped corn.
- Water or Light Corn Syrup AlternativeA small amount helps dissolve the sugar quickly and efficiently, promoting a glassy, uniform coating texture when heated.
- Vanilla Bean PasteUse a pure extract to deepen the overall sweetness and add a sophisticated aroma that elevates the simple sugar syrup.
- Red or Pink Gel Food ColoringGel coloring provides highly concentrated pigment without adding excess liquid, crucial for achieving that bright, vibrant pink shade.
- Fine Sea SaltA pinch of salt cut through the intense sweetness, balancing the overall flavor and making the popcorn far more addictive.
The full ingredients list, including measurements, is provided in the recipe card directly below.
How to Make Easy Pink Popcorn Recipe for Valentine’s Day
Follow these simple steps to prepare this delicious dish:
-
Step 1: Prep and Pop the Kernels
In a large, heavy-bottomed pot, heat the oil over medium-high heat. Add 2–3 test kernels. Once they pop, add the remaining kernels and quickly cover the pot, shaking gently to ensure even heating. Remove the pot from the heat immediately when popping slows down to avoid burning, and transfer all the popped corn to a very large bowl or lined baking sheet.
-
Step 2: Create the Sugar Syrup Base
In a medium saucepan, melt the butter over medium heat. Stir in the granulated sugar and water (or light syrup alternative). Cook, stirring constantly, until the sugar is completely dissolved and the mixture begins to simmer gently. Reduce the heat slightly to maintain a rolling boil without scorching the sides.
-
Step 3: Introduce the Color and Flavor
Once the syrup is boiling steadily, cook for about 2–3 minutes until it thickens slightly (it doesn’t need to reach a specific temperature). Remove the pan from the heat and quickly stir in the vanilla bean paste, fine sea salt, and the pink gel food coloring until the color is deep and uniform. Work quickly, as the syrup will start to set almost immediately.
-
Step 4: Coat the Popcorn Evenly
Immediately pour the hot pink syrup over the prepared popcorn. Use a sturdy spatula or two large spoons to gently fold and toss the popcorn, ensuring every flake gets coated in the vibrant glaze. Continue tossing until all the pink syrup is distributed and begins to harden slightly, giving the popcorn a shiny, glossy appearance.
-
Step 5: Cool and Set
Spread the coated popcorn onto a piece of parchment paper or a non-stick silicone mat in a thin layer. Allow the popcorn to cool completely—about 10 to 15 minutes—before breaking up any large clumps. The coating will become hard and crunchy once fully cooled.
Transfer to decorative bowls or cellophane bags for gifting, offering a sweet, crunchy bite for the perfect finishing touch.
The Great Popcorn Disaster Avoidance Guide: Tips and Troubleshooting
Popcorn is deceptively simple. While this specific Easy Pink Popcorn Recipe for Valentine’s Day is beginner-friendly, there are a few common pitfalls that can turn your perfect pink snack into a sticky, burnt mess. Let’s make sure your romantic gesture doesn’t end in kitchen cleanup misery. We need crunchy, delightful sweetness, not cement coating.
Mastering the Perfect Pop: Stovetop Secrets
Achieving maximum crunch starts with the pop itself. Many people struggle with stovetop popping because they forget the two crucial phases. First, heating the oil and adding the initial three kernels establishes the optimal popping temperature—usually around 400°F (200°C). Once those test kernels pop, you know the oil is ready for the mass influx. Second, shaking is vital. Use a heavy pot with a tight-fitting lid, allowing steam to escape slightly or using a lid that is slightly ajar. Shake the pot constantly, lifting it slightly off the burner every few seconds, ensuring the kernels don’t rest on the hot bottom for too long. If you hear the popping slow down to two or three seconds between pops, remove it immediately. Even five extra seconds can be the difference between fluffy corn and tiny, burnt regrets sticking to your pot.
Another common mistake is overcrowding the pot. Never try to pop more than half a cup of kernels at once, especially in a standard four-quart pot. Overcrowding leads to uneven popping and often results in tough, chewy pieces known in the industry as “duds” or “old maids.” While tempting, patience ensures a superior texture for this glamorous snack.
Solving Sticky Situations: Coating Consistency
The pink sugar coating needs to transition from liquid gold to crunchy perfection quickly. If your popcorn ends up soft or sticky after cooling, the syrup likely didn’t cook long enough. You don’t need a candy thermometer here, but watch for visual cues. The syrup should look thicker than water, almost like thin honey, right before you add the coloring. If it is too thin, the moisture content will be too high, resulting in a chewier, rather than crispy, texture. The moment you pour the hot syrup over the popcorn, you must toss vigorously. The rapid change in temperature causes the sugar to harden instantly. If you wait too long to toss, the syrup will pool at the bottom of the bowl and form one giant pink candy clump.
If you find that the coating is too thick and hardens before you can coat everything, try warming the empty bowl you plan to use for mixing slightly. A warm bowl gives you an extra 30 seconds of working time before the syrup totally solidifies. Remember, speed and thoroughness are your allies when making this kind of glazed popcorn.
Beyond Pink: Flavor Twists and Customization
While the classic buttery vanilla flavor paired with vibrant pink is perfect for Valentine’s Day, this versatile base recipe is a blank canvas. Experimenting with different extracts and additions can transform this easy treat into a staple for any holiday or themed party. Why limit the fun to just one day?
Citrus Zest and Fruity Flair
If you prefer a brighter, tangier note to cut through the sweetness, consider adding fresh citrus zest. Just before removing the sugar syrup from the heat, stir in the finely grated zest of half an orange or a full lemon. The aroma is intoxicating and provides a welcome contrast. For a truly tropical twist, replace half of the vanilla bean paste with a high-quality coconut or pineapple extract. These additions give the Easy Pink Popcorn Recipe for Valentine’s Day an unexpected, sophisticated depth.
Alternatively, you could incorporate freeze-dried fruit powder. Once the popcorn is coated, lightly dust it with crushed strawberry or raspberry powder while the glaze is still tacky. This intensifies the pink color and adds a natural, slightly tart flavor layer, making the snack even more compelling and complex without adding significant moisture. Just ensure the fruit powder is finely ground to prevent chalkiness.
Adding Texture and Crunch
Popcorn is great, but textured additions are even better. To make this pink popcorn a truly gourmet experience, mix in crushed nuts like pistachios or almonds immediately after coating. The stickiness of the cooling syrup acts as a perfect adhesive. If you need a richer chocolate element, drizzle melted white chocolate (tinted slightly pink, perhaps?) over the finished, cooled popcorn. This creates a visually stunning marbling effect and adds a layer of creamy decadence that pairs wonderfully with the sweet crunch. Just make sure the base popcorn is completely cool before adding the chocolate drizzle, or you will end up with a messy, melted catastrophe.
Storage and Gifting Your Pink Masterpiece
One of the best features of this recipe is its stability. Unlike baked goods that stale quickly, this glazed popcorn stays fresh and crisp for quite some time, making it an excellent candidate for advance preparation or gifting. Learning proper storage techniques ensures that crunch lasts.
How Long Does Glazed Popcorn Last?
When stored correctly, pink glazed popcorn maintains its optimal crunch for about 5 to 7 days. The key to longevity is protection from moisture. Humidity is the enemy of crispy popcorn, causing the sugar coating to absorb water and become sticky and soft very quickly. Always store the popcorn in an airtight container at room temperature. Avoid refrigerating it, as the cold environment actually introduces more moisture, speeding up the staling process.
For maximum crispness, line your airtight container with a paper towel. The paper towel subtly absorbs any residual moisture trapped inside the container. If, by chance, your popcorn does lose some of its initial snap, you can briefly reheat it. Spread the popcorn on a baking sheet and bake at a very low temperature (around 250°F or 120°C) for 5 to 10 minutes. This process helps dry out the coating, restoring some of that glorious crunch without melting the candy layer completely.
Presentation Perfect for Gifting
ThisEasy Pink Popcorn Recipe for Valentine’s Daymakes a stunning, budget-friendly gift. Package the cooled popcorn in clear cellophane bags tied with a pretty ribbon—red, white, or perhaps a mix of pink and gold. For a more sophisticated look, use mason jars with personalized labels. Layering the pink popcorn with other contrasting snacks, like plain white chocolate pretzels or dark cocoa puffs, creates visual depth and makes the gift feel substantial. Remember, half the enjoyment of a homemade gift is the beautiful presentation; make it look like a labor of love, even if it only took 15 minutes to prepare.
Frequently Asked Questions About Pink Glazed Popcorn
What is the best way to get a truly bright pink color?
You must use gel food coloring instead of liquid drops. Liquid coloring dilutes the sugar syrup and makes the popcorn sticky. Gel coloring is highly concentrated, providing intense, bright hues with only a small amount, ensuring your final product is gorgeously vibrant.
Can I make this popcorn using an air popper?
Absolutely! Air-popped corn works wonderfully for this recipe because it is dry and light. However, air-popped corn tends to be very fragile, so ensure you handle it extremely gently when tossing it with the hot pink syrup to minimize breakage and crumbling.
How can I prevent the sugar syrup from burning?
The primary reason sugar burns is inconsistent heat or vigorous, high-temperature boiling. Ensure you use a heavy-bottomed saucepan to distribute the heat evenly. Once the sugar dissolves and the mixture starts to boil, reduce the heat slightly and avoid scraping the sides of the pan, as this can introduce crystallized sugar back into the mix and cause scorching.
Can I prepare this Easy Pink Popcorn Recipe for Valentine’s Day ahead of time?
Yes, you can easily prepare this popcorn up to a week in advance. Ensure it is fully cooled and stored immediately in a sealed, airtight container at room temperature, away from direct sunlight or moisture, to maintain maximum crispness and color vibrancy.
The Year I Almost Ruined Valentine’s Day with Toast
There I was, staring at the calendar, realizing I had exactly 48 hours until the most pressurized romantic holiday of the year. My plan? A sophisticated, three-course meal that required ingredients I couldn’t pronounce and tools I didn’t own. Two hours into the prep, I had successfully turned a perfectly good head of cauliflower into something resembling charcoal, and my kitchen smelled suspiciously like failure. That’s when I realized the secret to romantic success isn’t about complexity; it’s about charming simplicity and, frankly, sugar.
Forget the fancy reservations and the stress-inducing soufflés. This year, we are pivoting to fun, low-stress, and utterly adorable snacks. Nothing says “I love you” quite like a giant bowl of fluffy, crunchy, and dazzlingly pink goodness. This isn’t just any treat; it’s the ultimate, movie-night-approved, stress-free snack that requires zero advanced culinary degrees. We are making a ridiculously easy pink popcorn recipe for Valentine’s Day.
Why Simplicity Wins the Romance Game
Valentine’s Day should feel effortless, not like a timed cooking challenge on reality TV. When you’re trying to enjoy a cozy night in, the last thing you want is a mountain of dishes or a sauce that refuses to emulsify. This festive popcorn snack delivers massive visual impact and incredible flavor with minimal fuss. It’s light, crispy, and the vibrant hue is perfect for setting a romantic mood or just brightening up a dreary February evening. Plus, making it together? That’s prime quality time, unless, of course, you get territorial about who gets to pour the glaze.
The Quest for the Perfect Crunch: Ingredients You Need
The key to superior flavored popcorn lies in starting with a fluffy, perfectly popped base and then coating it evenly with a quick, simple candy coating. You don’t need special equipment, just a large bowl and a sturdy saucepan.
Ingredients for the Popcorn Base
- 1 cup popcorn kernels (high quality kernels yield fewer unpopped duds!)
- 3 tablespoons coconut oil or vegetable oil
- 1/2 teaspoon fine sea salt (optional, for pre-seasoning)
Ingredients for the Sweet Pink Glaze
This vibrant glaze is what transforms standard movie snack material into a celebratory treat. We are using standard kitchen staples and, crucially, a touch of coloring to achieve that perfect rosy shade.
- 1/2 cup granulated sugar
- 1/4 cup light corn syrup
- 1/4 cup unsalted butter (or dairy-free alternative)
- 1/2 teaspoon vanilla bean paste
- 1/4 teaspoon baking soda (this is the secret to airy glaze texture!)
- 2–4 drops concentrated pink or red food coloring gel (gel colors provide better intensity without adding too much liquid)
Popping Perfection: Step-by-Step Instructions
Timing is everything here. We need the popcorn ready just as the glaze hits that perfect, hot candy stage. Trust the process, and maybe put on some upbeat music.
Step 1: Prep the Popcorn
Grab your largest pot—a Dutch oven or a large saucepan with a lid works best. Pour the oil into the pot and place it over medium-high heat. Add three popcorn kernels and wait patiently. Once those three kernels pop, you know the oil is perfectly hot.
Remove the pot from the heat momentarily and add the rest of the kernels. Shake the pot to coat them in the hot oil. Cover the pot and return it to medium heat. Once the popping starts vigorously, shake the pot gently and continuously until the popping slows to several seconds between pops. Remove from heat immediately, transfer the popped corn to a very large bowl, and discard any unpopped kernels. Set aside.
Step 2: Creating the Festive Pink Glaze
In a small, heavy-bottomed saucepan, combine the sugar, corn syrup, and butter. Place this over medium heat. Stir constantly until the butter melts and the sugar dissolves. Once the mixture starts boiling, stop stirring. You must allow this mixture to boil undisturbed for exactly 4 minutes. If you have a candy thermometer, you are aiming for 250°F (the soft-ball stage), but 4 minutes is generally sufficient.
Remove the saucepan from the heat immediately. Swiftly stir in the vanilla bean paste, baking soda (it will bubble dramatically—that’s good!), and the pink food coloring gel. The baking soda is crucial because it makes the glaze aerated and less rock-hard, ensuring a crisp coating instead of a tooth-breaker. Be quick; this mixture sets fast.
Step 3: Coating and Cooling
Working rapidly, drizzle the hot pink glaze evenly over the bowl of prepared popcorn. Use a sturdy rubber spatula or wooden spoon to gently fold the popcorn, ensuring every fluffy piece gets coated with that gorgeous pink shine. If the glaze starts to harden too quickly, you can place the popcorn in a very low oven (around 200°F) for 5 minutes to soften the glaze slightly, making it easier to mix, but usually, rapid stirring works fine.
Spread the coated popcorn onto a baking sheet lined with parchment paper or a silicone mat. Allow it to cool completely—about 30 minutes—until the glaze is crisp and hardened. Once cool, break the popcorn clusters apart and serve this wonderful snack immediately. This easy pink popcorn recipe for Valentine’s Day is now ready to impress.
Perfecting the Cooking Process

For maximum efficiency, complete all your kernel popping first, ensuring the corn is fluffed and ready in the large mixing bowl. While the popcorn cools slightly, immediately start making the glaze. This sequence ensures the hot candy coating is poured over the popped kernels at the optimal temperature before it thickens, allowing for easier and more even distribution.
Add Your Touch
Elevate this romantic movie snack by swapping vanilla bean paste for alcohol-free almond extract for a marzipan twist, or add a pinch of chili powder to the glaze for a surprising sweet-and-spicy kick. You can also mix in white chocolate chips or festive sprinkles after the popcorn cools but before the glaze fully hardens for extra decoration.
Storing & Reheating
Store leftover sweet popcorn in an airtight container at room temperature for up to one week. Avoid refrigeration, as this introduces moisture and makes the popcorn soggy. If the popcorn loses its crunch, spread it on a baking sheet and bake at 250°F for 5-8 minutes to restore crispness before cooling again.
Three Tips from a Popcorn Perfectionist
I once made this pink caramel corn for a large family gathering, and I learned the hard way that doubling the glaze doesn’t work well unless you use two pots. Always mix the glaze into the popcorn in smaller, manageable batches for the best coverage.
- Ensure your mixing bowl is large enough to contain the popped corn with ample space left over; attempting to fold the sticky glaze in a small bowl results in an epic mess.
- Use gel food coloring only, as liquid food coloring can introduce excess water into the hot sugar mixture, risking crystallization and a grainy, rather than glossy, coating.
- Do not scrape the sides of the saucepan when boiling the glaze, as stray sugar crystals can fall into the hot liquid, causing the entire batch of candy coating to seize up immediately.
The Magic of This Easy Pink Popcorn Recipe
What makes this festive popcorn snack so perfect for celebrating? It’s the sheer joy of the color and the simplicity of execution. Life is often complicated enough; your snacks don’t need to be. Whether you are prepping for a quiet date night, hosting a friend group, or just need a stunning treat for a school function, this dazzling treat always steals the show. People are consistently amazed that something so bright and fun only took 15 minutes of active cooking time.
Choosing the Right Popcorn Kernels
Did you know there are different styles of popcorn? We generally use mushroom kernels for caramel corn because they pop into large, round balls that hold up better to heavy coatings, minimizing breakage. However, standard butterfly kernels work perfectly well for this lighter pink glaze and offer a delicate crunch. Just make sure the kernels are fresh; old kernels often result in a poor pop rate and a tough texture.
Frequently Asked Questions About Pink Popcorn
How do I make sure the popcorn stays crispy?
The secret is twofold: first, use the baking soda in the glaze to ensure the sugar coating remains airy and crisp, not hard and thick. Second, ensure you let the coated popcorn cool completely and air out on the parchment-lined sheet before storing it.
Can I substitute honey for corn syrup in the glaze?
While honey can be substituted for sweetness, it has a different molecular structure and caramelizes faster and darker than corn syrup. This means your boiling time will be much shorter, and the resulting pink color might be slightly muddied by the stronger honey flavor and deeper base color.
What if my glaze hardens before I can coat all the popcorn?
If the glaze thickens or hardens mid-coating, you have two options: quickly reheat the bowl of popcorn and sticky glaze in a very low oven (200°F) for 2 to 3 minutes to make the glaze pliable again, or add a teaspoon of hot water to the remaining glaze in the pot and gently warm it to loosen the consistency.
Is this popcorn recipe safe for people with nut allergies?
The base recipe is nut-free, provided you use vegetable oil for popping and ensure your flavorings (like vanilla bean paste) are alcohol-free and produced in a dedicated facility, if cross-contamination is a concern. Always double-check ingredient labels if you plan to introduce other toppings like sprinkles or candies.
Your Sweetest Valentine’s Day Yet
Ditch the kitchen panic and embrace the fun. This easy pink popcorn recipe for Valentine’s Day is the perfect, shimmering accent to any celebration. Whether you are curled up watching a movie or packing small bags for friends, this simple, sweet treat guarantees smiles. Go ahead, make a batch (or two), and enjoy the crunch!
Conclusion for Easy Pink Popcorn Recipe for Valentine’s Day
This festive treat offers maximum delight for minimal effort, proving that romance doesn’t need to be complicated or expensive. We explored how simple ingredients, combined with a touch of pink magic, transform everyday popcorn into a holiday centerpiece. Remember the key tips: use steady, low heat for the glaze, mix quickly, and let it cool completely on parchment paper for that satisfying crunch. Whether you’re snuggling up for a movie night or need a beautiful, quick snack, this truly is the perfect Easy Pink Popcorn Recipe for Valentine’s Day. Enjoy creating sweet, memorable moments with this simple, stunning snack that everyone will adore.
Print
Easy Pink Popcorn Recipe for Valentine’s Day
- Total Time: 35 minutes
- Yield: 4 servings 1x
Description
Achieve crunchy, candied perfection! This easy V-Day pink popcorn uses a rich butter-sugar-syrup glaze, boiled until dissolved, for maximum coating. Pop kernels, glaze quickly, and enjoy.
Ingredients
- 1/2 cup unpopped popcorn kernels
- 2 tablespoons coconut oil (or preferred popping oil)
- 1 cup granulated sugar
- 1/2 cup (1 stick) unsalted butter
- 1/4 cup light corn syrup
- 1 teaspoon vanilla powder
- 1/2 teaspoon kosher salt
- 8–10 drops pink or red gel food coloring
Instructions
- Step 1: Preheat the oven to 250°F (120°C). Pop the popcorn kernels using your preferred method (air popper or stovetop oil). Once popped, immediately place the popcorn in a very large bowl and discard any unpopped kernels. Set aside.
- Step 2: Prepare the glaze. In a medium saucepan, combine the butter, granulated sugar, light corn syrup, and salt. Bring the mixture to a boil over medium heat, stirring constantly until the sugar dissolves completely.
- Step 3: Stop stirring and allow the mixture to boil for approximately 4-5 minutes, until the temperature reaches 240°F (115°C) (soft-ball stage). Remove the saucepan from the heat immediately.
- Step 4: Quickly stir in the alcohol-free vanilla extract and the pink food coloring until the color is evenly distributed and vibrant. Pour the hot glaze evenly over the bowl of popcorn and toss quickly with a rubber spatula until the kernels are mostly coated.
- Step 5: Spread the coated popcorn evenly onto two large, parchment-lined baking sheets. Bake for 10-12 minutes, stirring once halfway through, to help set the coating and crisp the popcorn.
- Step 6: Remove the popcorn from the oven and allow it to cool completely on the baking sheets. Once cool, break the popcorn into serving-sized clusters. Store in an airtight container.
Notes
- Store cooled popcorn in a rigid airtight container at room temperature; avoid the refrigerator, as the humidity can soften the crisp candy coating.
- If your popcorn loses its crunch after a day or two, spread it on a baking sheet and bake at 250°F (120°C) for 5 minutes, then cool completely to restore crispness.
- For a charming Valentine's presentation, mix the cooled pink popcorn with white chocolate chips or sprinkle it with edible glitter before serving.
- Use a reliable candy thermometer when making the glaze, as hitting the 240°F soft-ball stage exactly ensures a perfectly crisp, non-sticky caramel coating.
- Prep Time: 15 minutes
- Cook Time: 20 minutes
- Method: Stovetop
- Cuisine: American
Nutrition
- Serving Size: 1.75 cups (45g)
- Calories: 251
- Sodium: 175mg
- Fat: 7.9g
- Saturated Fat: 5.0g
- Trans Fat: 0.1g
- Protein: 34.0g
FAQs
How long does this Easy Pink Popcorn Recipe for Valentine’s Day stay fresh, and how should I store it?
ThisEasy Pink Popcorn Recipe for Valentine’s Dayretains its optimal crispness for about three to five days if stored properly. The most important factor is keeping moisture away. After the popcorn has cooled completely and the glaze has hardened, transfer it into an airtight container. Keep the container stored at room temperature, away from direct sunlight or humidity. If you hear a satisfying crunch when you bite into it, you know you stored it correctly!
Can I substitute the food coloring for a natural alternative, such as beet powder?
Absolutely, you can achieve a beautiful, natural pink hue using alternatives like freeze-dried beet powder mixed with a tiny bit of water or vanilla bean paste. When using powders, mix them into the melted sugar mixture before adding the popcorn. Be mindful that natural coloring might slightly dull the final glaze sheen compared to gel colors, and you may need to add a bit more to achieve the vibrant pink shade. Test a small amount first to ensure the flavor is not affected, although beet powder usually remains neutral.
What is the secret to achieving a light, crispy coating without burning the sugar mixture?
The key to a light and crispy coating lies in monitoring the temperature and working quickly. Use medium-low heat when melting your sugar and flavoring ingredients; this prevents crystallization and scorching. Once the mixture reaches a smooth, syrupy consistency, remove it immediately from the heat before stirring in the coloring. Pour the glaze over the popcorn and stir aggressively but gently, ensuring every kernel gets coated before the syrup begins to harden. Speed is your friend here!
I need to make a huge batch—Can I double or triple this Easy Pink Popcorn Recipe for Valentine’s Day?
Scaling thisEasy Pink Popcorn Recipe for Valentine’s Dayis certainly possible, but you must make sure to do it in batches for the best results. Attempting to coat too much popcorn in one bowl often results in uneven glazing, leaving some kernels sticky and others bare. If you are doubling the entire recipe, prepare the glaze ingredients in one large pot, but divide the cooked popcorn into two separate, very large mixing bowls. Pour half the glaze over each bowl and stir individually to ensure every piece gets that vibrant, crunchy coating.